Jul 22, 2013
mustardwithmutton

no comments

Bruce Bogtrotter’s Chocolate Cake – A Cake Worth Stealing

Bruce Bogtrotters Chocolate Cake - The Ultimate Chocolate Cake If you’ve ever read Roald Dahl’s book Matilda, or seen the movie, you’ll know that Bruce Bogtrotter is the little boy that dared to steal a sliver of chocolate cake from his evil headmistress’s tea tray. As punishment he was forced to eat the entire enormous cake in front of the whole school assembly. I’m not sure if it was punishment or pleasure for Bruce as he seemed to do a fine job of it and much to the annoyance of the villainous headmistress, Ms Trunchball, scoffed the whole cake down while his school friends cheered him on. I’m not surprised really as the cake looked amazing. Ms Trunchball probably said it best when she declared “That was not boy’s cake! You don’t think for one minute I’m going to eat the filth I give to you? That cake was made from real butter and real cream!”.

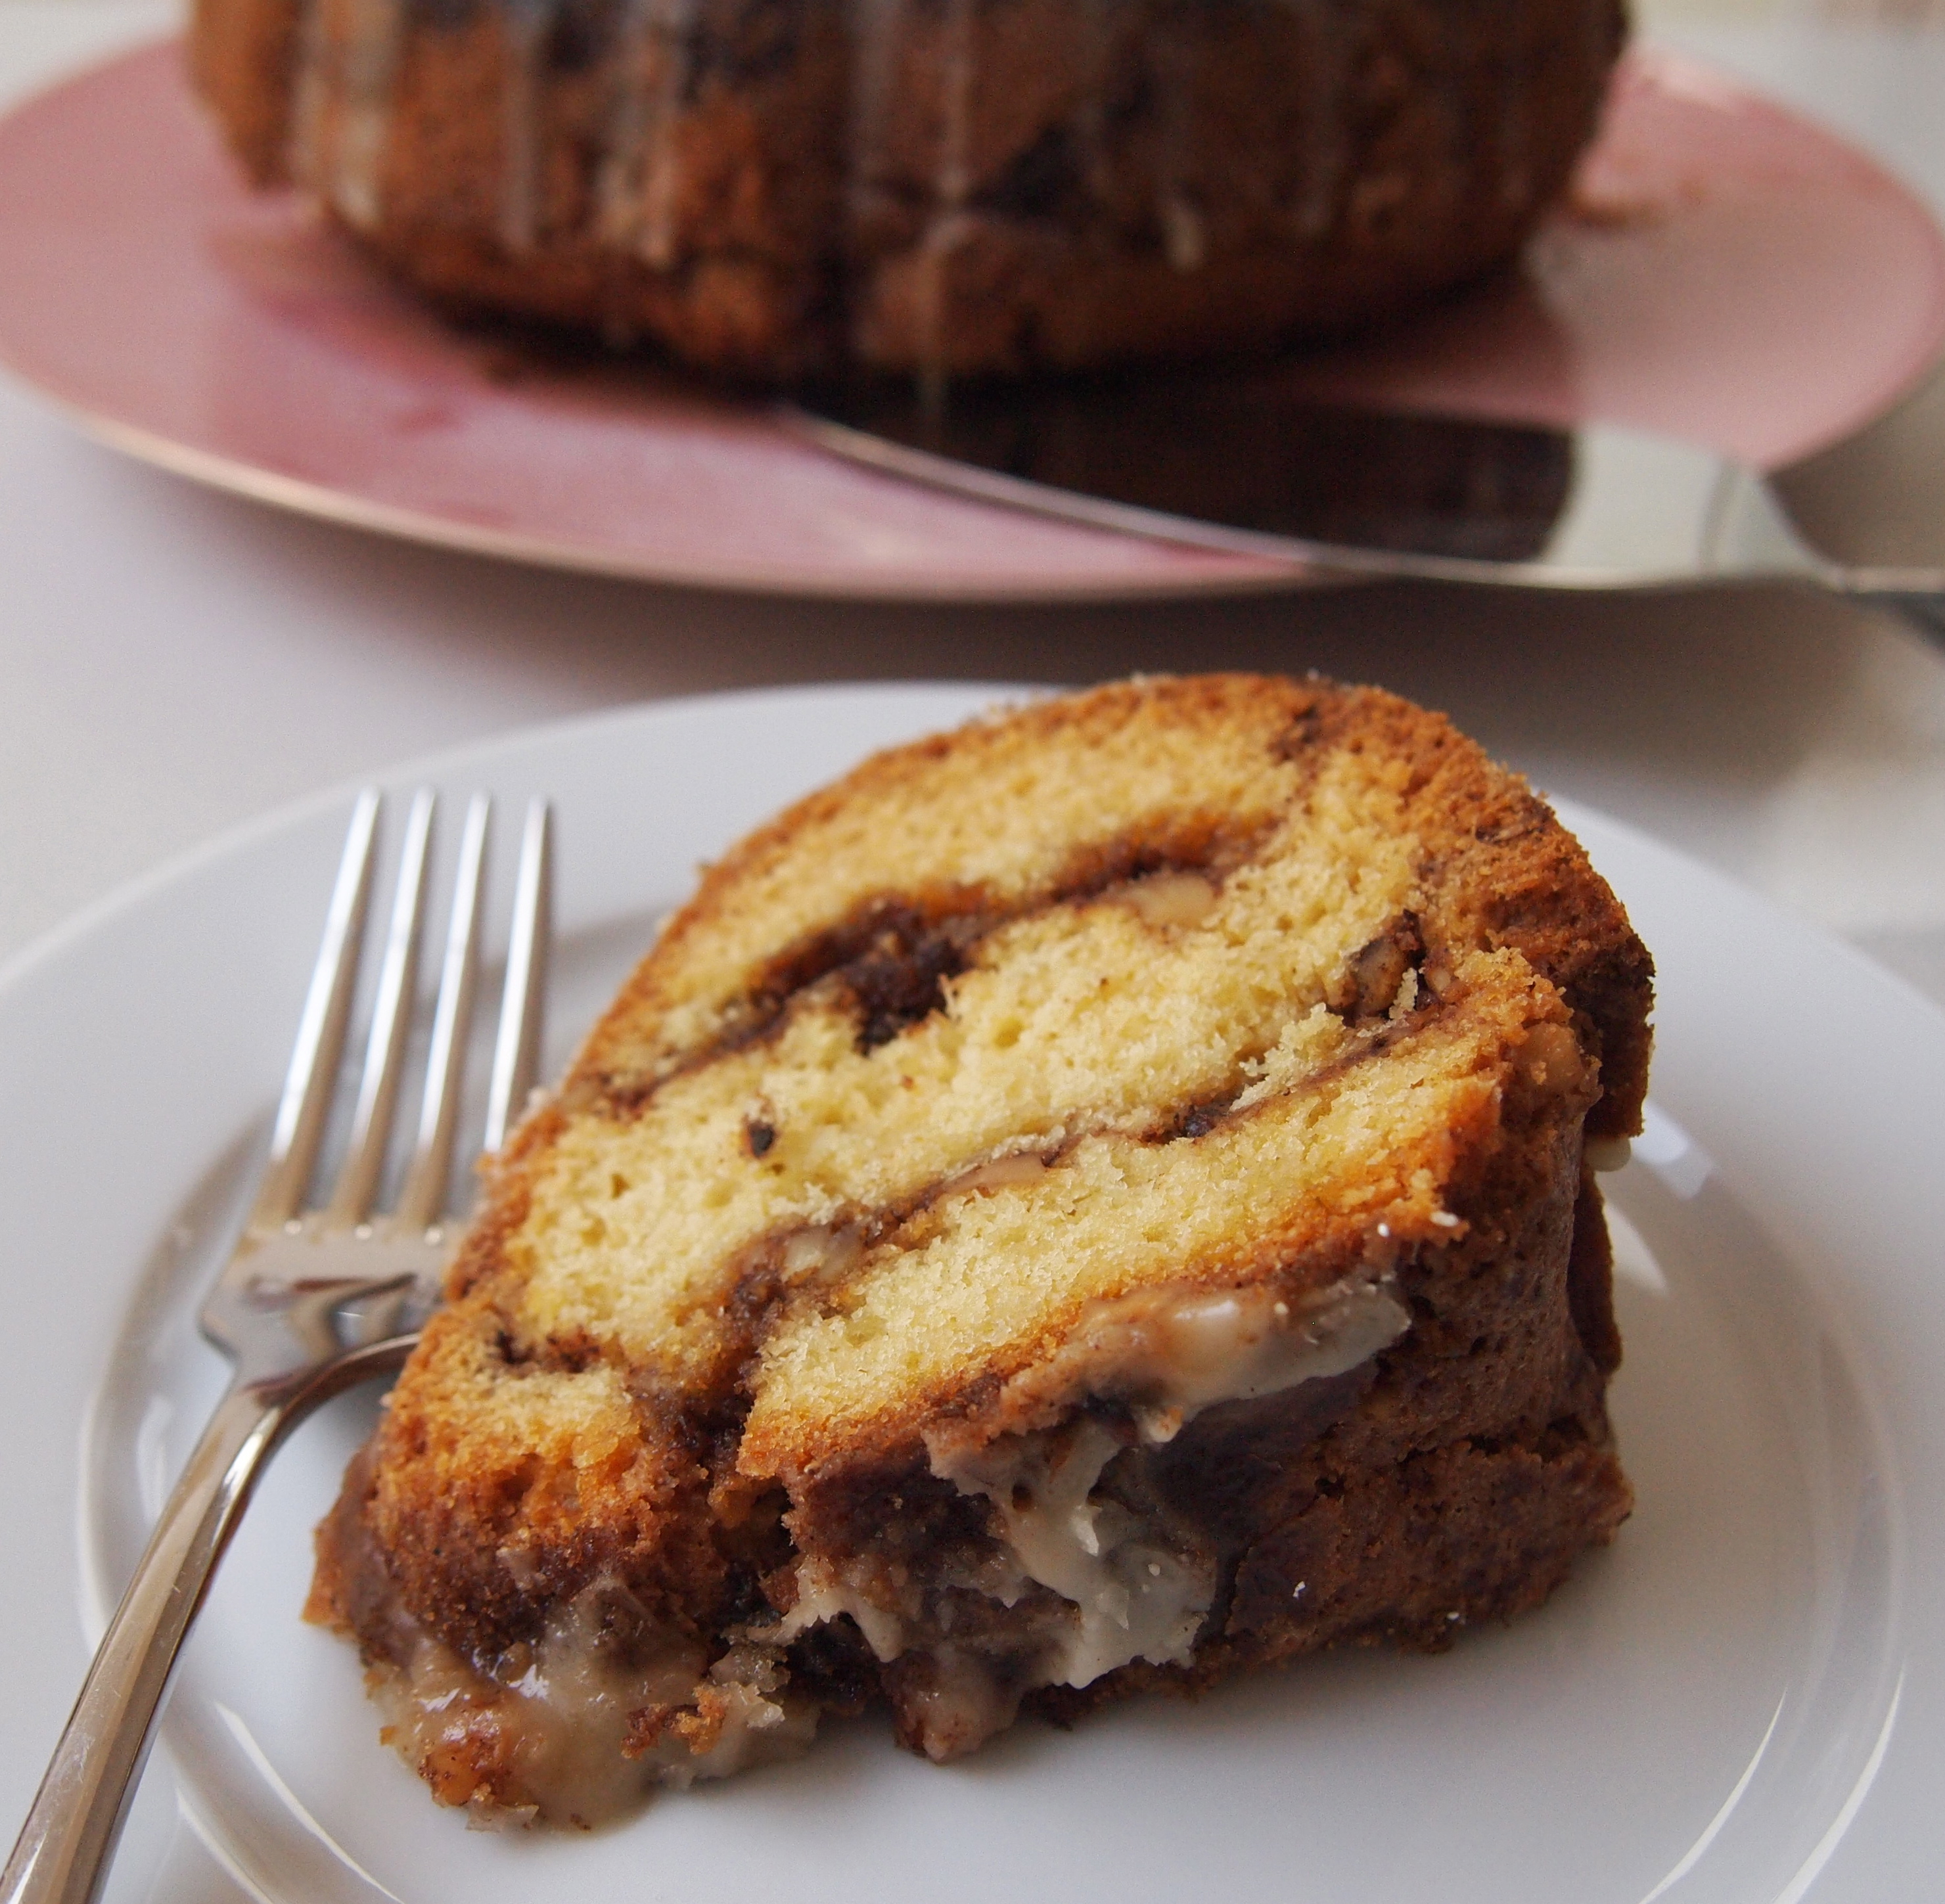
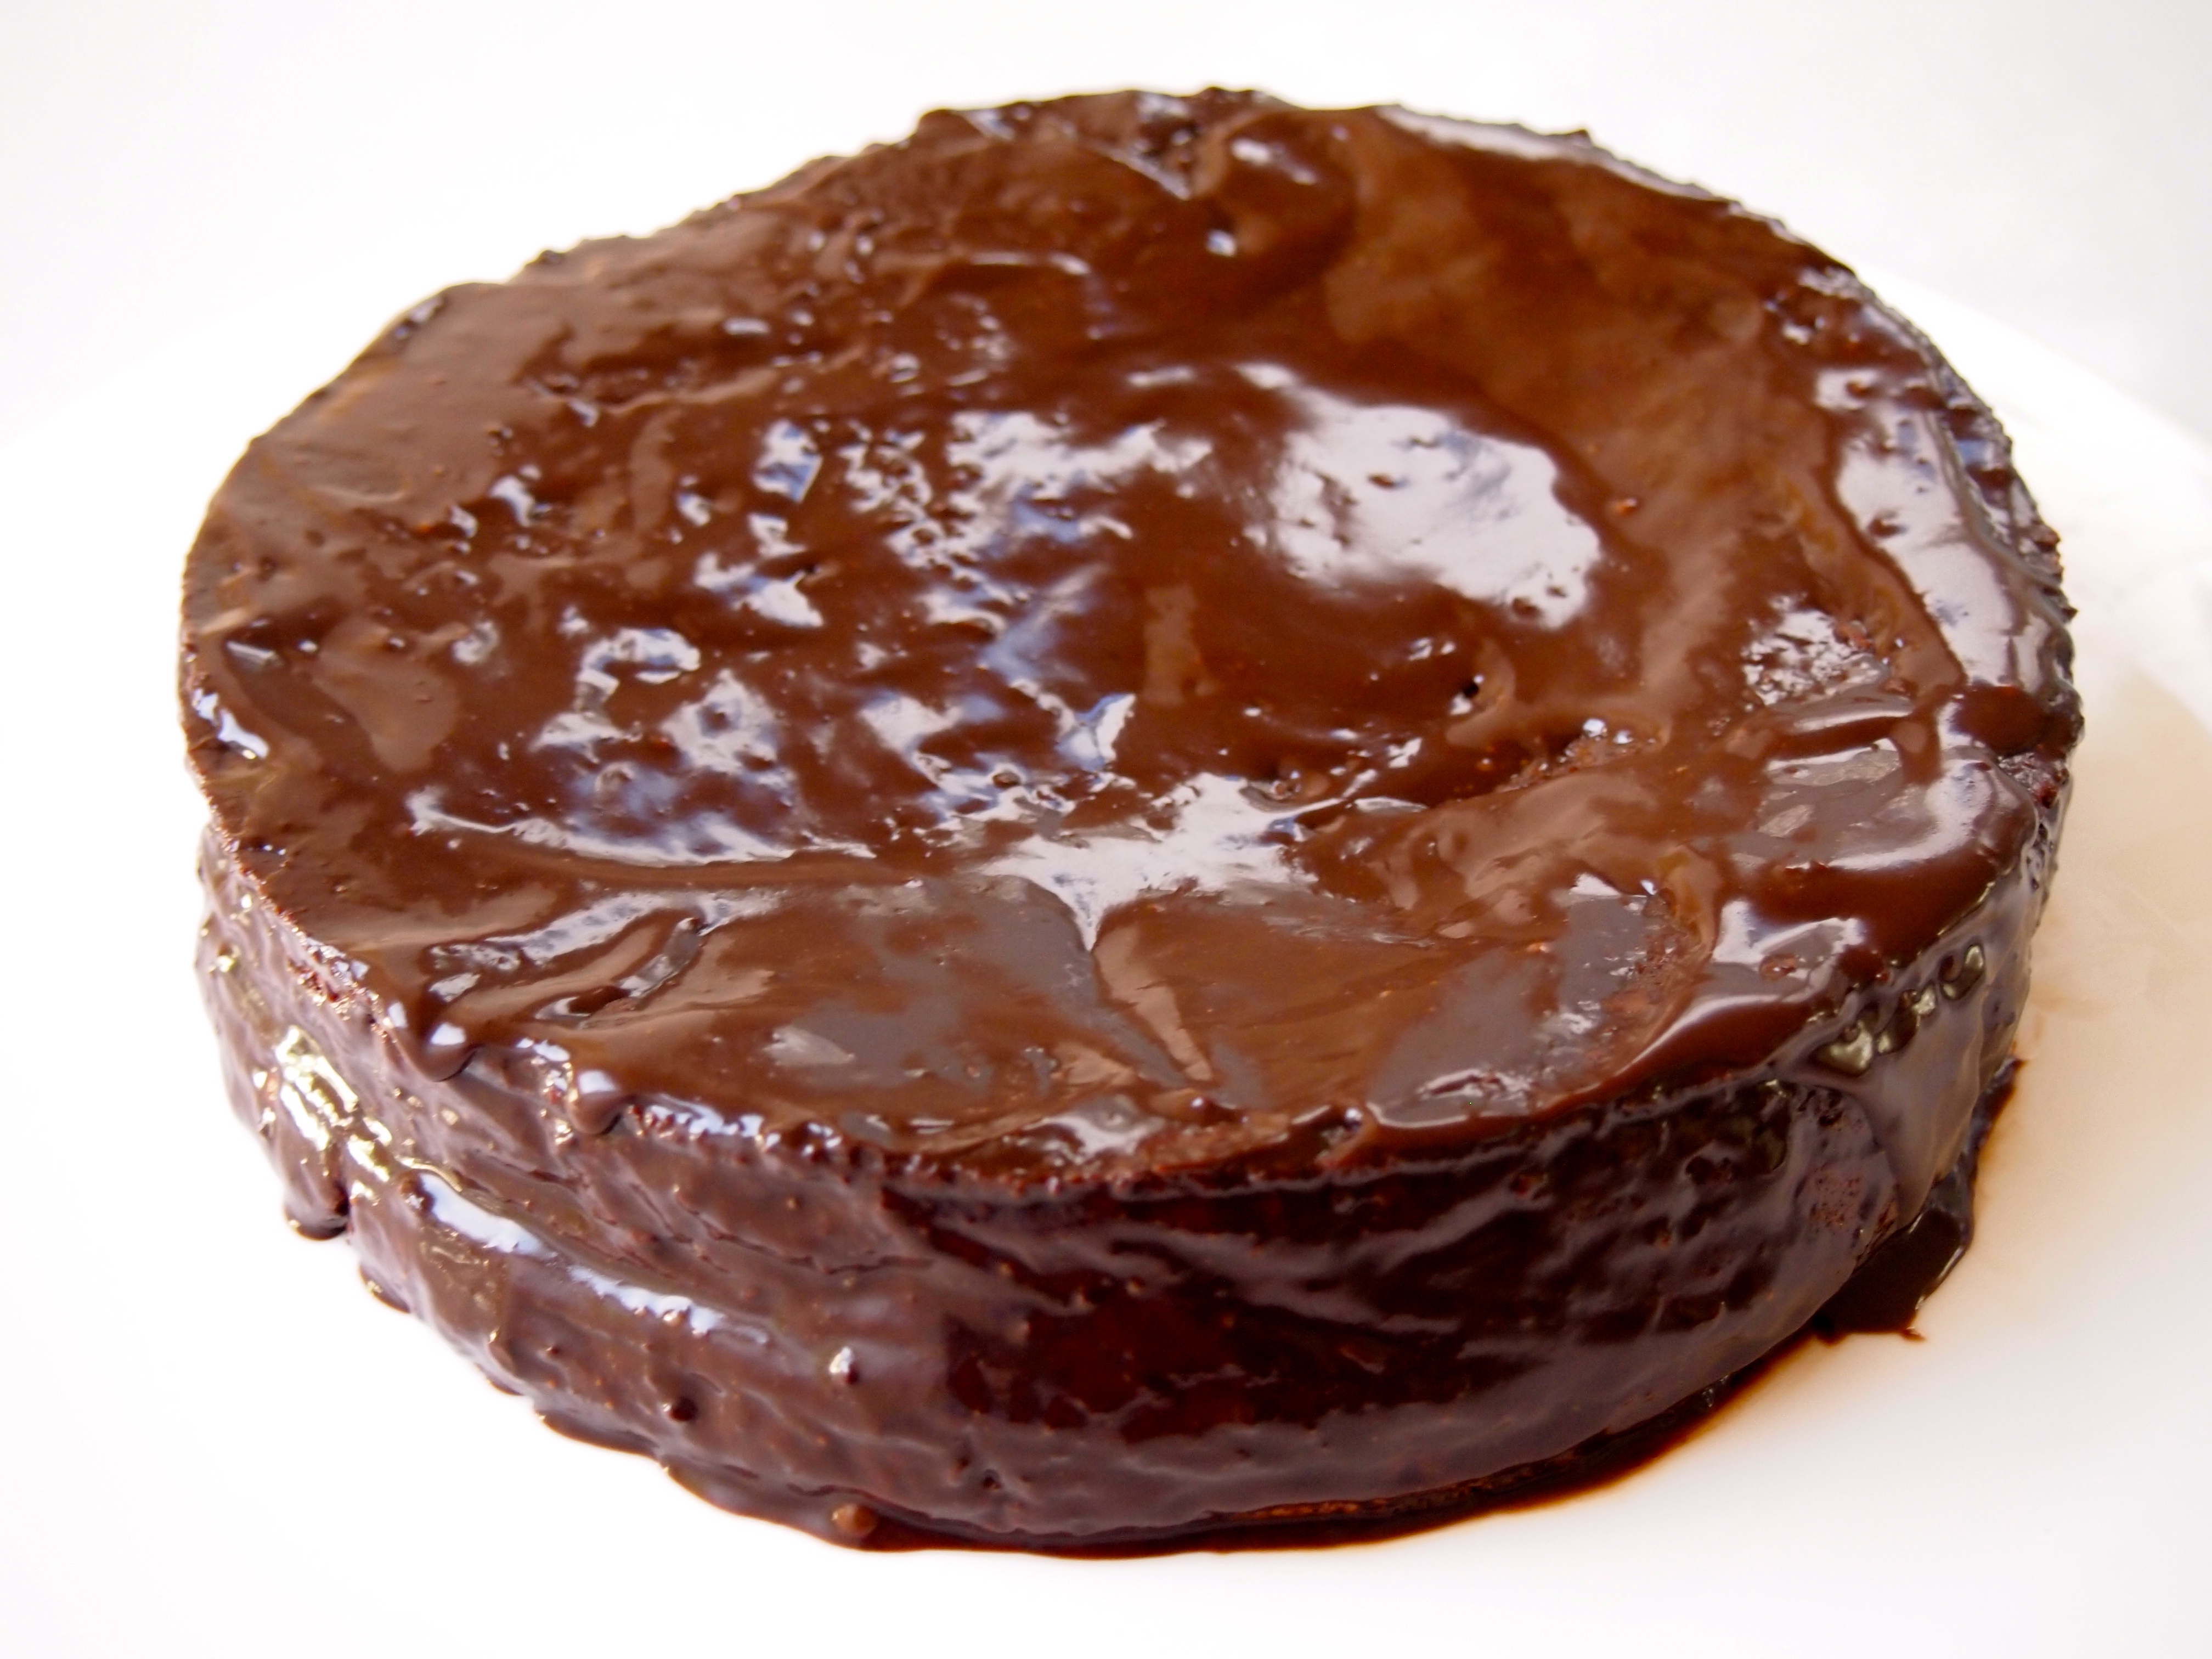
A little while ago I came across a book called Roald Dahl’s Revolting Recipes, which is a collection of recipes inspired from all his children’s books, and I was delighted to find it contained the recipe for the cake that poor Bruce Bogtrotter had to consume. I knew I had to make it and I’m so glad I did. My niece declared it one of the best chocolate cakes she’s ever had and whilst it wasn’t quite as big as Ms Trunchball’s cake I somehow knew that if I was told to consume it one sitting I might not find it such an onerous task. That being said, it’s very rich, fudgey and utterly delicious and far too good to use as punishment!

Ingredients – Serves 8 or 1 greedy school child   Adapted from Roald Dahl’s Revolting Recipes

225g dark chocolate
175g butter, softened
225g caster sugar
¼ cup plain flour
6 large eggs (separated)

Ganache
120g dark chocolate
120ml cream

Method

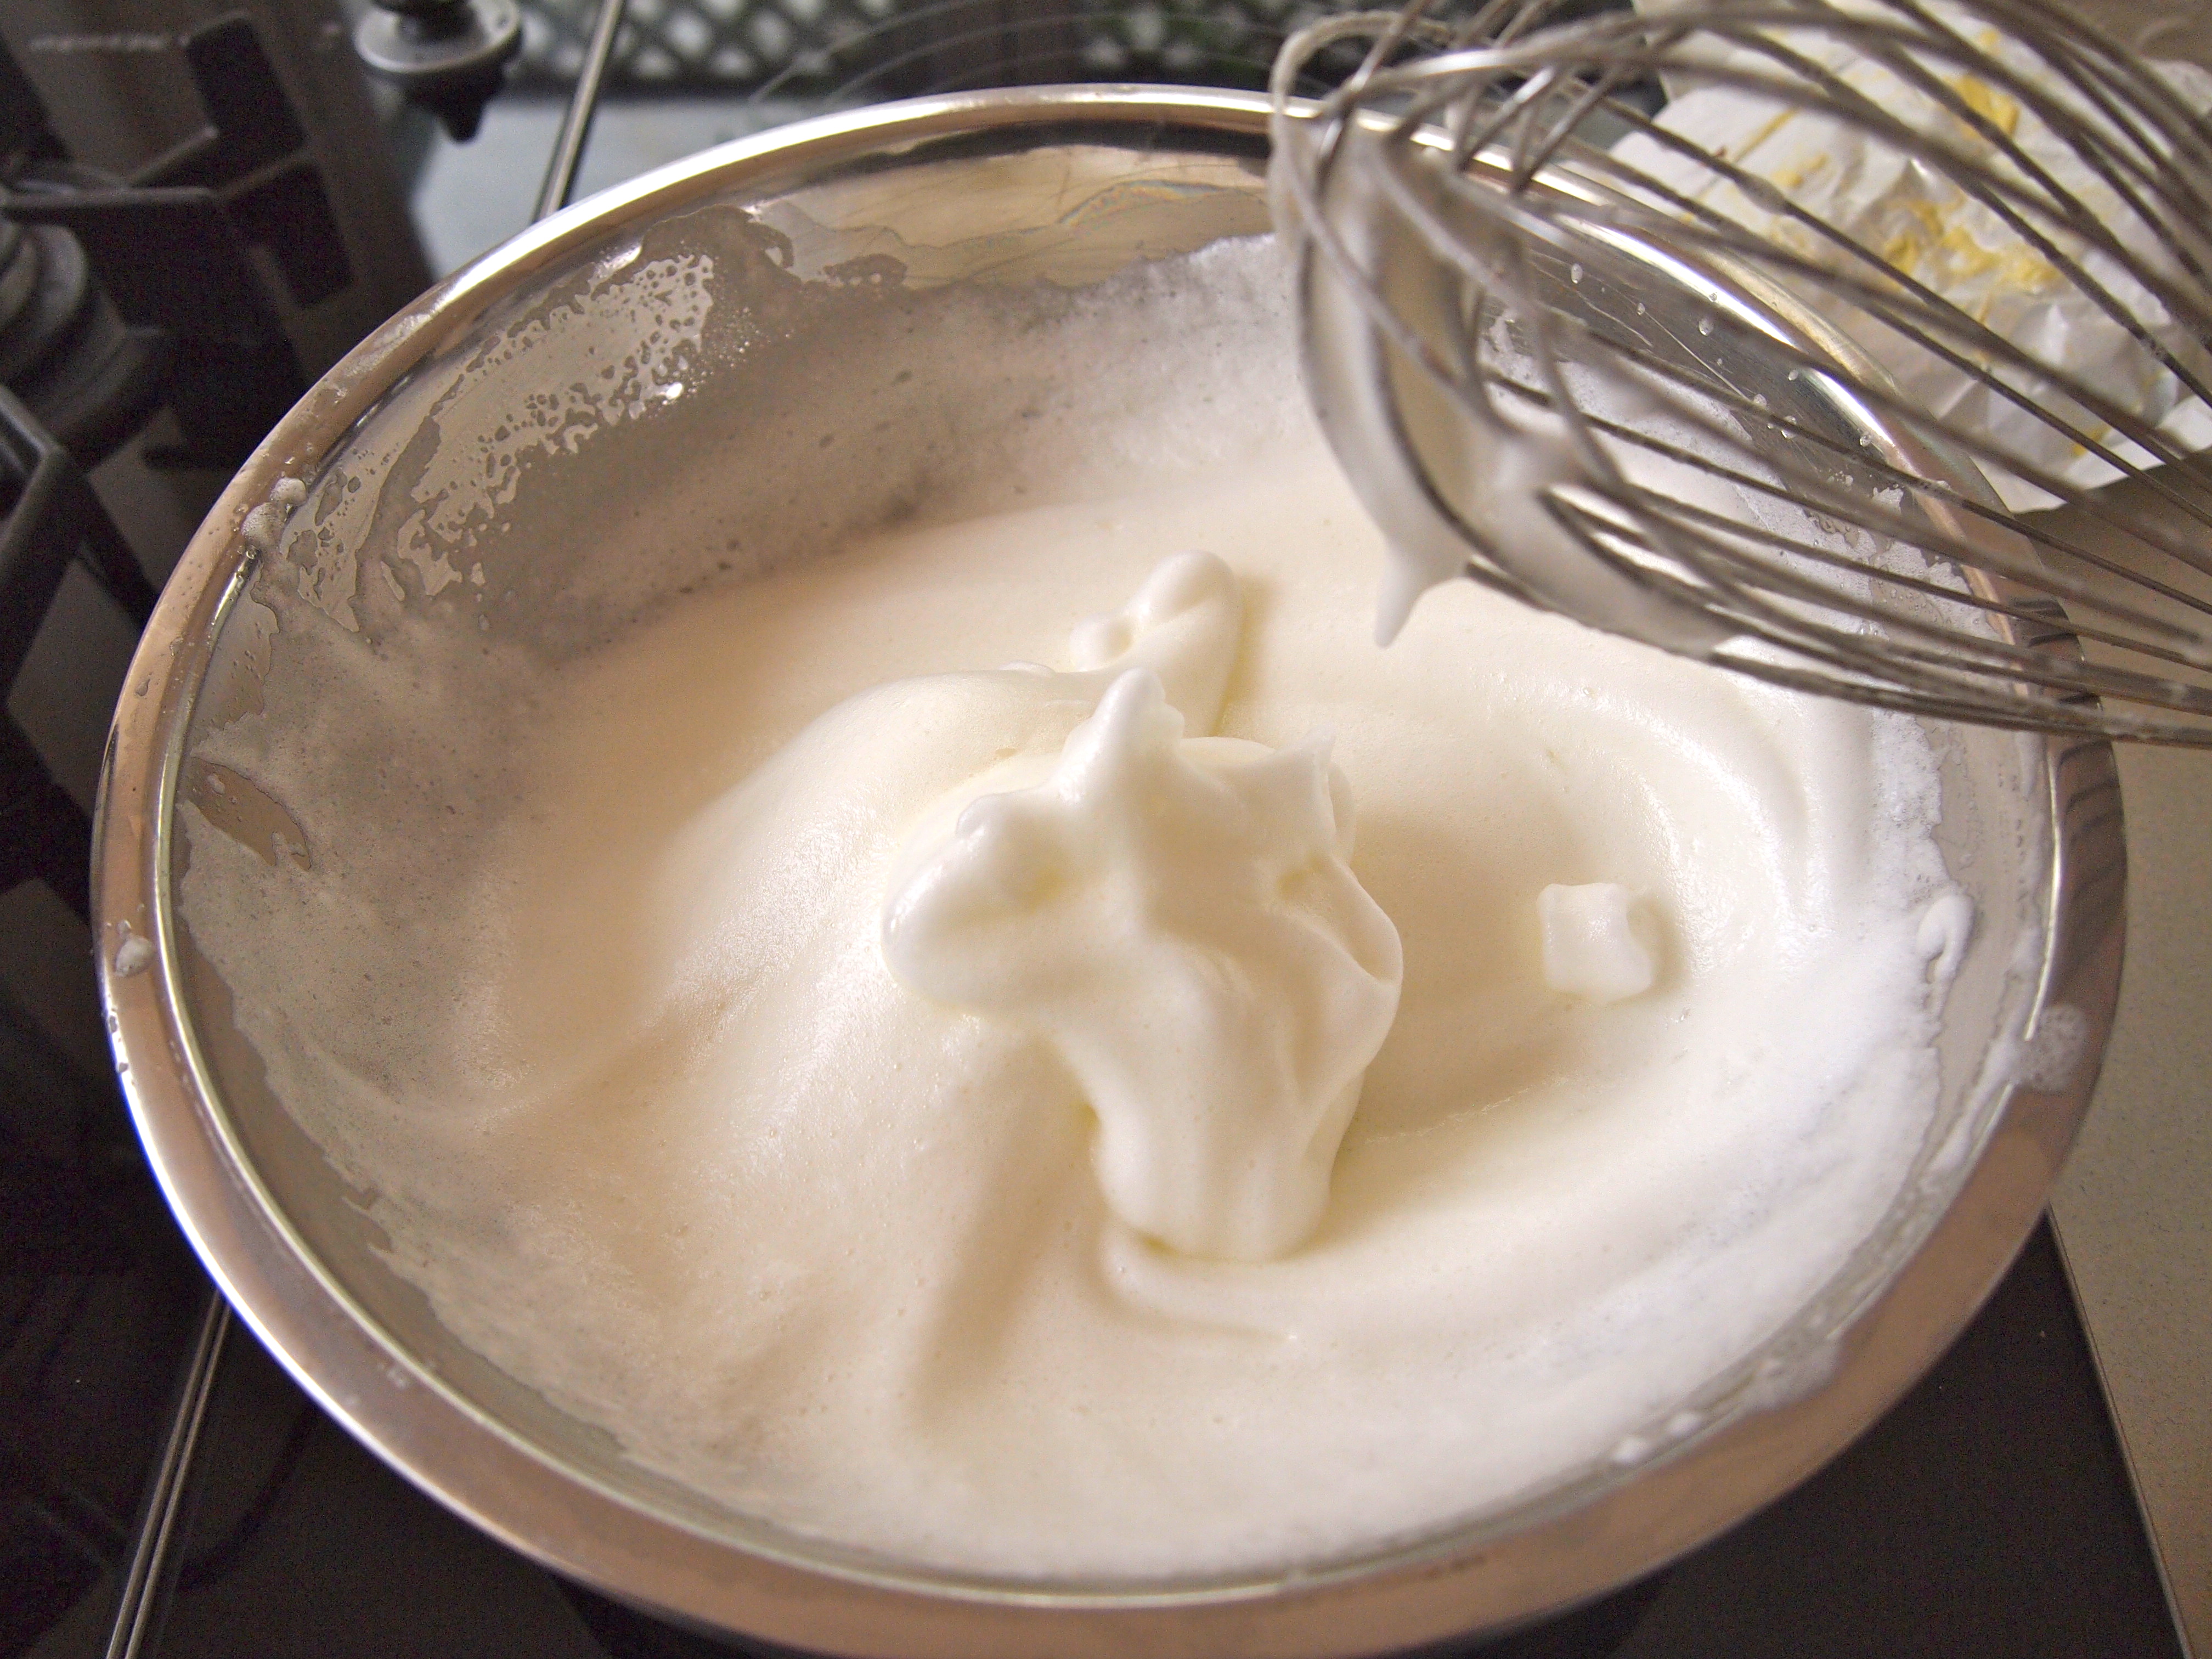
Preheat the oven to 180C. Butter a 9 inch cake pan and line the bottom and sides with baking paper. Melt the chocolate in a bowl set in a saucepan of simmering water. Mix in the butter and stir until melted. Transfer to a large bowl and add the sugar, flour, and lightly beaten egg yolks. Whisk the egg whites until stiff. Gently fold half of the whites into the chocolate mixture, blending thoroughly, then fold in the remaining whites. Pour the batter into the cake pan and bake for about 35 minutes. There will be a thin crust on top of the cake, and if tested with a toothpick the inside will appear undercooked (don’t worry, the cake will get firmer as it cools). Remove from the oven, and let cool in the pan on a wire rack.

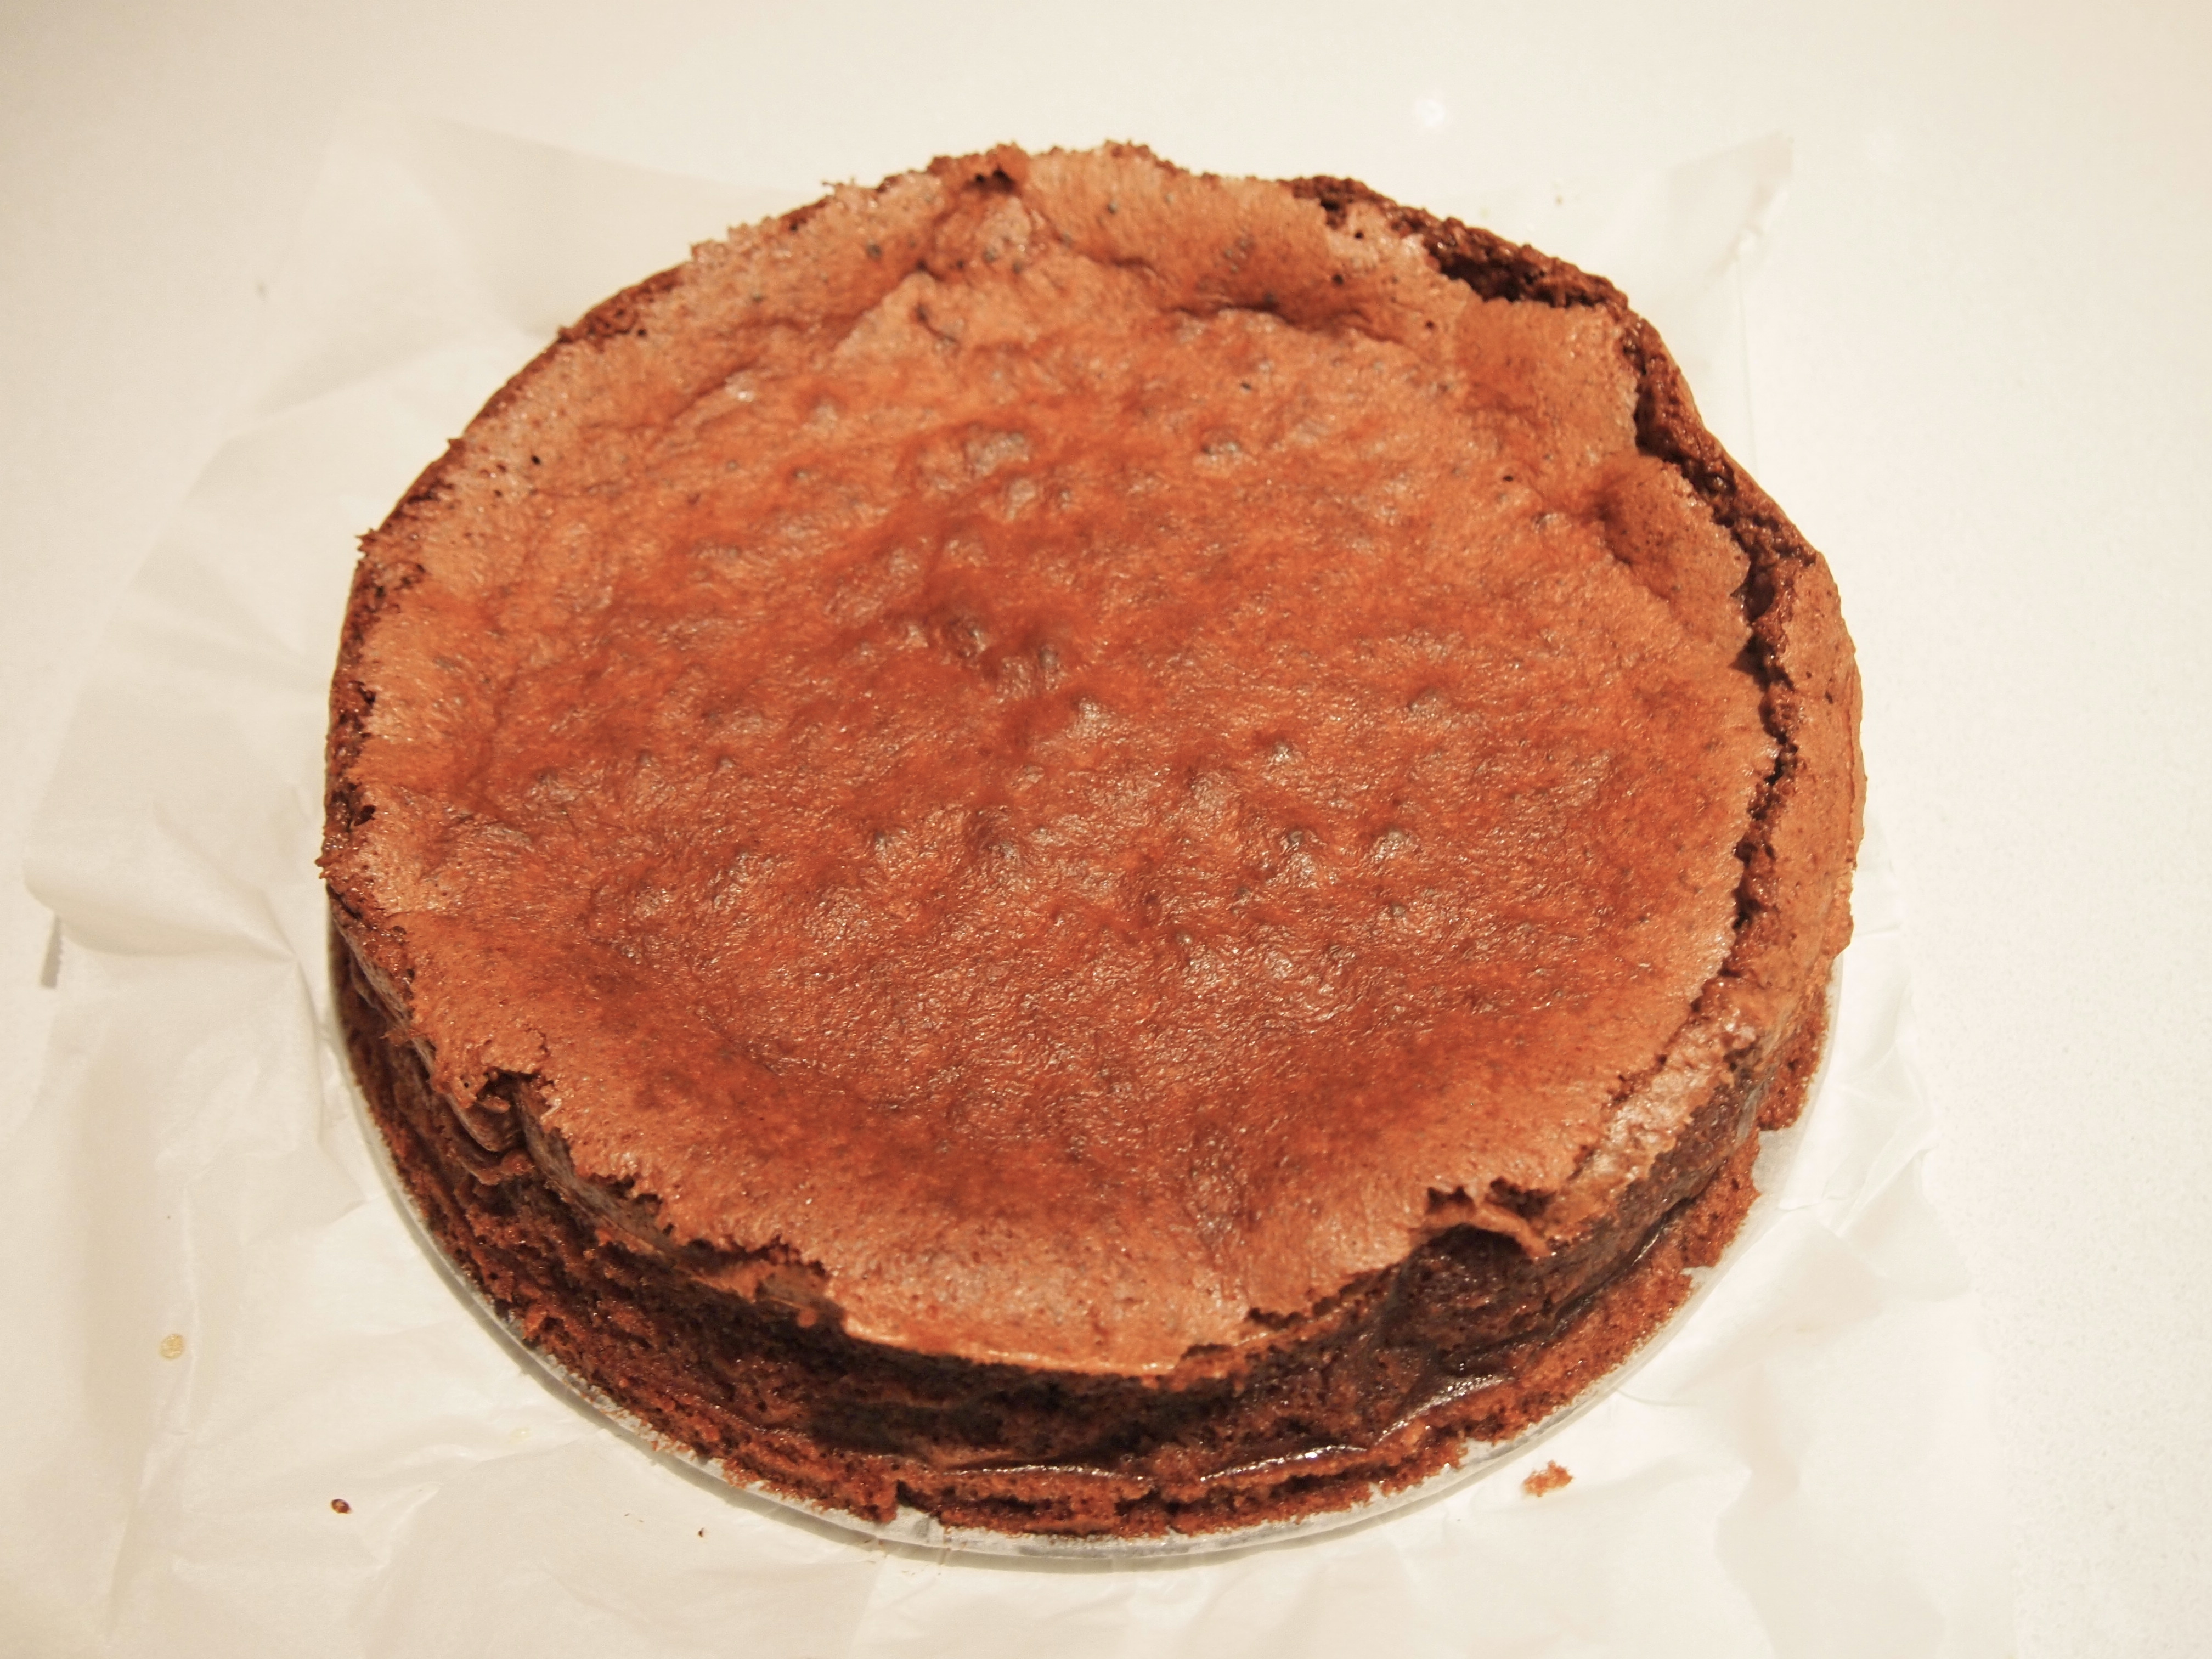
While the cake is cooling, make the icing. Melt the chocolate with the cream in a heavy–bottomed saucepan over lowest heat, stirring occasionally until the chocolate is fully melted and blended with the cream. Remove from heat and let cool slightly. When the cake is cool enough to handle, remove it from the pan and discard the baking paper. The cake is prone to sinking slightly in the middle, so flip it upside down before icing by placing a plate on top and carefully turning over the cake pan and plate together. Carefully spread the chocolate icing all over the cake with a spatula.

Bruce Bogtrotters Chocolate Cake - The Best Chocolate Cake Ever

Jul 17, 2013
mustardwithmutton

2 comments

Khoresht Bamieh – Persian Braised Lamb & Okra Stew

Khoresht Bamieh - Persian Lamb & Okra Stew

Okra, or ladies fingers as they’re sometimes called, is a vegetable that’s not often seen outside of the Middle East/India and, strangely enough, in the Southern United States where it’s used in such dishes as gumbo. Some people find the texture a little off-putting, referring to them as “slimy” but I prefer to think of them as luscious. The texture of okra though can vary dramatically depending on how they’re cooked and one way of controlling how glutinous they become is to ensure you only trim off the very tip of the stem and not cut into the actual flesh of the okra. Apart from being delicious they’re also incredibly good for you being high in antioxidants, fibre and vitamin C.

My sister and I adore okra and as it can be hard to come by in Sydney I snap them up whenever I see them to make a batch of this khoresht which is enriched with lots of caramelised onions, lamb and tomatoes. As with all Persian stews or khoresht, long slow cooking is the key. There are very few ingredients in this khoresht so taking the time to cook each one well makes a big difference to the quality of the finished dish. The quantities below makes enough to feed at least 6 people but even when there’s just two of us I make the same amount as it freezes and reheats beautifully, which means that on a busy weeknight all you need to do is defrost a portion and put on some rice.  If you’ve never tried okra this khoresht would be the perfect introduction and if you think you don’t like okra, give them another go – you’ll be surprised at just how delicious they can be.

Ingredients – Serves 6 – Freezes and reheats well

4 large onions, finely diced
Neutral flavoured vegetable oil, not olive or peanut oil
1 teaspoon turmeric
600g lean lamb, diced into bite size pieces – leg of lamb is preferable
Salt & freshly ground black pepper
2 x 400g tin diced tomatoes
Lemon juice
Sugar
500g okra – the smaller the okra, the better

Method

In a large saucepan or dutch oven heat a generous amount of oil, at least ¼ of a cup (there are a lot of onions to fry) and cook the onions over medium heat until they are golden brown, this will take a good 15-20 minutes. Add the turmeric and stir and cook for another minute. Whilst the onions are browning wash the diced lamb in several changes of cold water and drain well. Add the meat to the onion and turmeric mixture, turn up the heat and cook stirring until the meat has seared and changed colour. Add 1 teaspoon of salt, 1/2 teaspoon of black pepper  and stir well.

In a bowl mix the tomatoes with some lemon juice, sugar and a little salt . Stir well and taste – you want the tomatoes to be very tasty and for the flavour to be slightly sweet and sour, so adjust with more sugar, salt and lemon juice as required. Add the tomato mixture to the meat and stir to combine. There should be enough liquid to just cover the meat, with only the tips of the meat showing. If there isn’t enough liquid and some boiling water (don’t use cold water). Bring to the boil, reduce the heat to a gentle simmer and partially cover the pan with a lid. Cook until the meat is very tender – this can take anywhere from 1½ – 2 hours.

Whilst the sauce is cooking wash the okra well and soak them in a bowl of cold water for 10 minutes. With a small paring knife carefully trim the tough stem of the okra making sure you don’t pierce the flesh. In a small fry pan add a little oil and sauté the okra gently for about 5 minutes.

When the lamb is tender carefully stir in the okra until it is evenly distributed in the sauce, being careful not to split open the okra as you stir. Bring the sauce back up to a simmer and cook until the okra has heated through. Taste and adjust seasoning as required. If your sauce has too much liquid, cook it without a lid until it has thickened. You don’t want a thin sauce, it should be quite thick. You can serve straight away or place the lid on the pot and reheat gently when you’re ready to eat. Serve with plain basmati rice and a yogurt, grated cucumber and garlic raita.

Khoresht Bamieh - Persian Lamb & Okra Stew

Jul 12, 2013
mustardwithmutton

3 comments

Brussel Sprout & Taleggio Gratin – The Ultimate Brussel Sprout Side Dish

Ultimate Brussel Sprout Side Dish - Sprout & Taleggio GratinBrussel Sprouts have always gotten a bad wrap. Why I’m not sure as I love them. In fact if I had to choose between broccoli, or any other green veg, and sprouts, I’d choose sprouts every time. They actually have a very complex flavour profile that can stand up to a lot of different cooking methods and a lot of different flavours. Roasted, steamed or even shaved into salads they are incredibly versatile. I even love them boiled and slightly overcooked with salt and butter. If you’re one of those people whose always shied away from sprouts this recipe may change your mind. To be fair most things that are baked in a cheesey white sauce are going to be pretty awesome but this is taken up a notch with the use of Taleggio cheese, and the idea of making a gratin out of sprouts is sheer genius as far as I’m concerned. Taleggio is an Italian washed rind, cows milk cheese that has quite an intense aroma that stands up well to the robust flavour of the sprouts. This would make a fantastic holiday side dish at Thanksgiving or Christmas, especially if turkey or other poultry is on the menu.

Ingredients – Serves 6   Adapted from Delicious Magazine

500g Brussel Sprouts, tough outer leaves removed and stems trimmed
50g butter, chopped
1cup plain flour
400ml whole fat milk
150ml cream
100g Taleggio cheese, rind discarded, broken into small pieces
1 teaspoon thyme leaves

Method

Preheat oven to 190C. Cook Brussel sprouts in boiling salted water until almost cooked through, but still slightly underdone. Drain and place in a buttered oven proof dish.


Heat butter in a saucepan over medium high heat until foaming. Ad flour and stir continuously until sandy coloured, 1-2 minutes. Gradually add combined milk and cream, whisking continuously until smooth and incorporated. Bring to the boil, stir in Taleggio and season to taste.

Pour sauce over the sprouts, scatter with the thyme leaves and bake until golden and bubbly, 20-30 minutes. Serve hot.

Brussel Sprout & Taleggio Gratin - The Ultimate Brussel Sprout Side Dish

Jul 8, 2013
mustardwithmutton

2 comments

Individual Smoked Trout & Herb Tarts

Individual Trout & Herb Tarts

I love tarts of any kind; sweet or savoury, large or small. I particularly like individual tarts as they make such a lovely first course. The variations for fillings are endless but one thing I do prefer is for the tart to be more creamy than eggy, if you know what I mean – a soft luscious centre and filling rather than a stiff one bound together with too many eggs. This recipe is one of my favourites as it uses hot smoked trout which is such an underrated product. Hot smoked trout is very different to cold smoked trout or salmon, which is the kind one would normally have with a bagel for instance. Cold smoking is done at low temperatures, which essentially just flavours the ingredient with smoke, whereas with a hot smoke, you’re both flavoring and cooking the food simultaneously.

The trout in the tart is paired with dill and tarragon (although you can use any variety of herbs you like) and just a hint of mustard which makes for a wonderfully tasty filling that’s still light enough to serve for a first course. You can of course make one large tart and serve it in slices. I must say it also makes a wonderful addition to a picnic hamper.

Ingredients – Makes 4 individual tarts or 1 large tart

1 quantity savoury short crust pastry – I like to use this recipe, halved
1 whole smoked rainbow trout – skin removed and flesh taken off the bones in small chunks
1 tablespoon butter
1 leek, white and pale green parts only, washed well and finely sliced
200ml creme fraiche
100ml cream
3 egg yolks
1 heaped teaspoon Dijon mustard
Squeeze of lemon juice
1 tablespoon chopped fresh tarragon
1 tablespoon chopped fresh dill
Salt & freshly ground pepper
Rocket leaves dressed with a little salt and olive oil

Method

Preheat oven to 180C. Line the base of your tart tins with the pastry and refrigerate for a good half hour. Blind bake the chilled pastry by placing some baking paper into each tin and filling the cavity with rice or pastry weights. Place the tins on a  baking tray and bake for 15 minutes. Take the tins out of the oven, carefully remove the paper and weights and cook for a further 5-8 minutes. Put the shells aside to cool.

To make the filling, melt the butter in a small frypan and gently cook the leeks until just softened. Remove from the pan, draining off as much of the liquid as possible. Set aside. Place the creme fraiche, cream and egg yolks into a bowl and lightly whisk. Add the mustard, lemon juice, and herbs; mix well and season with salt and pepper.

Divide the leeks between the pastry cases, then top with the trout pieces. Carefully spoon over enough of the cream mixture to fill the tart shells. Place in the oven and cook for 25-30 minutes.

Smoked Trout & Herb Tarts

To serve place some dressed rocket leaves on each plate then top with a tart. Best served hot from the oven but can be baked ahead of time and served at room temperature.

Individual Trout & Herb Tarts

Jul 3, 2013
mustardwithmutton

7 comments

Malaysian Laksa – The Cheats Way

Curry Laksa - The Cheat WayLaksa is a spicy curry based noodle soup that’s very popular is Malaysia and Singapore, not to mention Sydney where die-hard laksa fans are always on the lookout for the best laksa vendor. Making an authentic laksa from scratch can be a time consuming exercise and sometimes the craving for a laksa can hit you all of a sudden and for those occasions when you need laksa right now (believe me, they can become addictive) and you don’t have the time to pound your own paste or simmer the broth for hours, this “cheats” version is perfect. I’d go so far as to say that given the depth of flavour that’s achieved I’m not sure I would bother making a laksa from scratch. The key to making this laksa work is to buy the very best laksa paste you can find. The other great techniques that makes this quick version taste almost as good as one made from scratch is the initial frying of the prawn shells and heads so all that intense seafood flavour is captured in the broth; the other is the addition of dried shrimps and a few other flavour enhancers to really give a boost to the commercial laksa paste. There are two main varieties of laksa – curry laksa, which is made using coconut milk and asam laksa, which is a sour fish broth using tamarind. I prefer curry laksa as the coconut milk gives a lovely rounded richness to the broth. It’s traditional to add fish balls and tofu puffs to the laksa broth but I’m not a fan so I’ve left these out. I’ve also added chicken thigh fillets to the broth rather than using cold shredded chicken breast as a garnish, which is the more traditional way. This dish can be prepared and on the table in 30 minutes and you’ll be surprised at just how flavour packed it is.

Ingredients – Serves 4   Adapted from Food Safari

4–5 shallots, chopped
6–7 garlic cloves, chopped
1 thumb-sized piece of ginger, chopped
1 red chilli (more if you want extra kick)
1 heaped tablespoon dried shrimp
1/2 cup water
12 green prawns, with shell and heads
4 chicken thigh fillets cut into bite size pieces – optional, you can just make it with prawns if you wish
80 ml vegetable oil
4 tablespoons laksa paste
1 litre best quality chicken stock
400 ml coconut milk
Fish balls – I left this out
Fried tofu puffs, cut in half – I left this out
1 teaspoon sugar
Fish sauce
Salt
1 lime, juiced, plus extra wedges to serve
Dried rice noodles – thin vermicelli noodles are the norm but I prefer slightly wider rice noodles
To Serve
Bean sprouts
Finely sliced spring onion
Finely sliced red chilli
Coriander leaves
Fried shallots

Method

Place the shallots, garlic, ginger, chilli, dried shrimp and water in a blender or food processor and blend to a smooth paste. Shell and devein the prawns. Heat the oil in a large saucepan and fry the prawn shells and heads for a few minutes, pressing down on them with a spoon to release as much flavour as possible. Scoop out the shells and heads leaving the coloured oil. Add the blended paste to the oil and fry for 5 minutes before adding the laksa paste. Fry for a further 5 minutes, then add the chicken and stir well to coat all the pieces in the paste, and cook for another two minutes. Add the stock and bring to the boil. Lower the heat to a simmer and add the coconut milk, the fish balls, tofu (if yore using them) sugar and lime, along with fish sauce and salt to taste. Let the broth simmer for a good 15 minutes, adding the prawns in the last 5 minutes.

Whilst the broth is simmering, cook the rice noodles in a separate saucepan of boiling water, then scoop into a colander. Put some noodles in each serving bowl. Ladle over the broth, making sure there’s an even amount of chicken and prawns in each bowl, and top with bean sprouts. Scatter with spring onion, chilli, coriander and fried shallots. Add a wedge of lime to squeeze in before eating.

Cheats Laksa

Jun 28, 2013
mustardwithmutton

2 comments

Mini Pommes Anna

Mini Pommes AnnaI’m always searching for new ways to make potatoes. As much as I love them roasted and mashed it can get a bit boring. Pommes Anna is a traditional French side dish of potatoes which have been very thinly sliced, coated in butter and then neatly layered in a skillet where they are first cooked on the stove top and then transferred to the oven to finish off. The final dish is carefully inverted onto a serving plate – the appearance being that of a cake made of golden potatoes with a crisp top and bottom and perfectly cooked potatoes in the middle. It’s very delicious. These mini ones are a take on the classic but I think they’re easier to prepare and they look fabulous plated individually. This recipe is great if you’re entertaining as the potatoes can be prepared and roasted ahead of time and then finished off again in the oven just before serving. I recommend using slightly waxy potatoes as they’ll hold their shape better and a mandolin is by far the easiest way to get the potatoes very thinly and evenly sliced. I make these in a muffin tin, so they’re not that big and you’ll need at least two per serve, but safer to count on three per person. The good news is that because the potatoes are so thinly sliced there’s roughly the equivalent of only one potato per serving!

Ingredients – makes 12

4-5 waxy potatoes, scrubbed but left unpeeled – try to find potatoes that are small enough to fit into the base of the muffin tin. Depending on how small your potatoes are you may need more than 4
40g butter, melted
1 teaspoon chopped fresh or dried rosemary – optional
Salt & freshly ground black pepper

Method

Pre-heat oven to 200C. Using a mandolin or V slicer cut the potatoes into very thin evenly sized rounds. Using some of the butter, thoroughly grease a 12 hole muffin tin (it’s important that the tins are well greased otherwise it’ll be hard to remove the potatoes later) and place a little rosemary into the bottom of each hole. Place the potatoes into a large bowl, add the remaining butter, salt and pepper and toss well, ensuring that each piece of potato is coated with some of the butter.

Starting in the centre of a muffin hole form the first layer by overlapping each slice of potato in a circular pattern. Arrange the second layer working in the opposite direction of the first. Continue layering potatoes in opposite directions, pressing down on each layer along the way until pan wells are filled to the top. The potatoes will shrink down once they are cooked so pressing down lightly will enable you to fit in more slices.

Cover the muffin pan with foil and bake for 30 minutes. Remove from the oven and carefully lift off the foil. Place a baking sheet on top of the muffin tin and carefully invert the tin onto the tray. The potato stacks should pop out onto the baking sheet, a few slices may go astray and you may need to reassemble them slightly, which is easily done.

The potatoes can be made ahead up to this point and set aside. 20 minutes before you’re ready to serve place the potatoes into a preheated 220C oven for about 15 minutes or until the potato are sizzling and crispy.

Jun 25, 2013
mustardwithmutton

no comments

Sour Cream Walnut Streusel Cake

Walnut Streusel Coffee CakeThis cake is what they refer to in America as a coffee cake. Not because it contains any coffee but because it’s the perfect type of cake to have with a cuppa – similar to what the Brits call tea cakes. It’s moist, light, sweet and just perfect for morning or afternoon tea. I made this on a Sunday when my parents were coming over for coffee and the rest of the cake was just as good by the end of the week, with my husband and I having a small slice every other day – that’s the problem with baking a cake, the guilty pleasure of the leftovers!

The streusel, which is a combination of cinnamon, brown sugar and walnuts is what really makes this cake stand out. It’s similar to a walnut cake that Ina Garten does but I prefer this one. I just love the way the streusel is not just at the top and bottom of the cake but through the middle as well which not only makes it taste amazing but looks so pretty when it’s sliced. The addition of the sour cream ensures a moist crumb despite the long cooking time. I’m already looking for another excuse to make it, seriously it’s that good. So heat up your oven, grease that bundt tin and call a friend to come over for coffee and a slice of cake.

Ingredients

Cake
3 cups plain flour
1 ½ teaspoons baking powder
1 ½ teaspoons baking soda
½ teaspoon salt
1 ¼ cups caster sugar
175g butter, softened
1 ½ teaspoons vanilla extract
3 large eggs, at room temperature
1 ½ cups sour cream, at room temperature

Streusel Filling
¾ cup brown sugar, packed
2 tsp ground cinnamon
1 cup finely chopped walnuts

Glaze
½ cup icing sugar
2 tablespoons real maple syrup

Method

Preheat oven to 175C (non fan forced). Grease and flour a 10 inch bundt or tube tin. In the bowl of a mixer fitted with the paddle attachment cream the butter and sugar until light and fluffy, this will take a good 8 minutes. Add eggs one at a time, beating well after each addition. Stir in vanilla. In a large bowl sift together flour, baking powder, baking soda and salt. Add to the creamed mixture alternating with the sour cream, mixing after each addition (beginning and ending with the flour mixture).

To make the streusel filling, combine brown sugar, cinnamon, and walnuts in a bowl, mixing well. Spoon one third of the batter into the prepared tin. Sprinkle one third of the nut mixture over the batter, and repeat this process two more times. It will seem like there’s not enough batter and it may be hard to spread it over the streusel – I find the easiest way is to spread the batter with wettened fingers.

Bake for 50 minutes to one hour or until a toothpick inserted into the center comes out clean. Let stand for 5 minutes before removing to cool on a wire rack.

Sour Cream Walnut Streusel Cake Sour Cream Walnut Streusel Cake Sour Cream Walnut Streusel Cake

To make the glaze, combine the sifted icing sugar and maple syrup in a small bowl. When cake is fully cooled, drizzle with the glaze.

Ultimate Sour Cream Walnut Coffee Cake

Jun 21, 2013
mustardwithmutton

no comments

Chicken & Dumplings

Chicken & DumplingsIf you come from the Southern States of America then this is a dish you’ve probably grown up eating, but it’s made it’s way into the hearts and plates of people all over the States, and for good reason – it’s darn delicious and comforting, a warm hug on a cold night. If you’ve never had this before it’s best to describe it as a mix between a thick soup and a stew, almost casserole like. The star of the show being the delicious broth that’s strewn generously with shreds of chicken, herbs and peas. Dumplings are dropped into the thickened liquor towards the end of the cooking time where they plump up into soft pillows of goodness.

It’s winter here in Sydney and it’s been pretty chilly lately, especially once the evening draws in and I can’t think of a better dish to come home to on a cold night than this. There are a lot of variations on cooking chicken and dumplings, ranging from the complicated to the ready made where store bought roast chicken and packet biscuit mix is used. I’ve tried the former and made my own chicken stock for the broth, using a whole chicken which I’ve then shredded and used in the final dish, but the recipe below is slightly less time consuming without compromising the end result. In fact, I think I even prefer it. This an updated version using leeks and tarragon which isn’t traditional but it works a treat. The dumplings are an important element in this dish and they need to be light and not too stodgy. Out of all the recipes I’ve tried, the one below yields plump dumplings that have just the right texture and lightness. The size of the dumplings is personal preference but I don’t like them too big and use about a tablespoon for each dumpling but you can certainly make them bigger if you wish.

Ingredients – Serves 6 (leftovers are delicious & reheats well)   Adapted from Smitten Kitchen

6 large chicken thighs – bone in, skin on. Organic or free range if possible
2 tablespoon vegetable oil
2 tablespoons butter
2 medium leeks, white and light green parts only, cut in half lengthwise and then into 1 inch pieces
1 large onion, finely chopped
1 stick celery, finely diced
6 tablespoons plain flour
¼ cup dry sherry
4 cups best quality chicken stock – the quality of the stock will have an impact on the finished dish
¼ full fat milk
¼ cup cream
2 teaspoons minced thyme leaves
2 bay leaves
1 cup frozen peas
3 tablespoons chopped fresh tarragon
Salt & freshly ground black pepper

Dumplings
2 cups all purpose flour
1 tablespoon baking powder
1 teaspoon salt
1 cup whole milk
3 tablespoons reserved chicken fat (or butter)

Method

Pat the chicken dry and season generously with salt and pepper. Heat the oil in large saucepan or dutch oven (A large le Creuset is ideal) over medium high heat. Add the chicken pieces (in batches if required) and cook until golden brown on both sides. Transfer to a plate and set aside. Pour off the chicken fat and reserve for the dumplings.

Add the butter to the pot and return to medium heat. Add the leeks, onion and celery along with a ¼ teaspoon of salt and cook until softened, about 7-10 minutes. Stir in the flour, whisk in the sherry, scraping up any browned bits. Stir in the stock, milk, cream, thyme and bay leaves. Remove the skin from the chicken and discard. Nestle the chicken pieces, with any accumulated juices, into the pot. Cover and simmer for one hour.

Transfer the chicken to a cutting board. Discard the bay leaves. Allow the sauce to settle for a few minutes then skim the fat from the surface using a wide spoon. Shred the chicken, discarding the bones, then return it to the stew.

To make the dumpling, stir the flour, baking powder and salt together. Microwave the milk and the chicken fat (or butter) in the microwave until just warm, do not overheat. Stir the warmed milk mixture into the flour with a wooden spoon until incorporated and smooth.

Return the stew to a simmer, stir in the peas and tarragon and season with salt and pepper. Gather a portion of the dumpling batter onto a soup spoon, then push the dumpling onto the stew using a second spoon. Cover the stew with the dumplings, leaving a small amount of space between each (when fully cooked the dumplings will double in size). Reduce the heat to low, cover and cook for 20 minutes by which time the dumplings will have doubled in size and cooked through.

Best Ever Chicken & Dumplings

Jun 17, 2013
mustardwithmutton

1 comment

Rag Pasta with Seafood Sauce – Stracci con Ragu di Pesce

Rag Pasta with Seafood Sauce - Stracci con Ragu di PesceA lot of the pasta sauces I tend to make are slow braises such as this bolognese or this chicken liver, veal and porcini ragu but sometimes the simplest things are often the best and in this less-is-more-pasta sauce of mixed seafood, chilli, fresh tomatoes and saffron that’s certainly the case. A short list of ingredients and a fast cooked sauce yield an amazing amount of flavour. This is quick enough for a midweek meal – dinner can literally be on the table in 30 minutes but impressive enough for entertaining. You could team this sauce with linguine as well but I love the look and taste of these pasta rags which wrap themselves around the sauce and the seafood almost like open ravioli. If you have the time and feel like making your own fresh pasta sheets that’s great but as I love this dish for it’s ease and simplicity I use ready made fresh lasagne sheets and cut them into uneven and freestyle rags or stracci as they’re called in Italian. For even more wow factor I’ve also made this with squid ink lasagne sheets which can be special ordered from Pastabilities if you live in Sydney – it looks stunning and tastes even better!

Ingredients – Serves 2 generously or 4 as an entree

1 small (about 200g) firm fleshed white fish fillet, cut into large bite size chunks
6 large scallops
6 large prawns, peeled and deveined
1 large squid tube, cut into large bite size pieces
Olive oil
8 cloves of garlic, crushed through a garlic press
1 large red chilli, diced – remove the seeds if you don’t like it too spicy
1cup vermouth or white wine
Small pinch of saffron threads
1 punnet baby tomatoes, cut in half
13 cup tomato passata
2 tablespoons finely chopped parsley
300g fresh lasagne sheets – use less if you’re serving two

Method

Cut each lasagne sheet in to large free form shapes/rags – anything from large triangles, diamonds or strips, just don’t make them too small. Bring a large pan of well salted water to the boil.

Whilst the water is boiling place the garlic, chilli and a good amount of olive oil, at least ¼ of a cup, in a large narrow sided sauté pan or fry pan. Turn the heat to medium and slowly cook the garlic and chilli until just beginning to colour. Increase the heat slightly and add the seafood along with a generous pinch of salt; cook until the prawns are almost opaque – the seafood doesn’t need to be cooked all the way through at this point. Add the vermouth/white wine and let it bubble away and reduce slightly. Add the tomatoes and saffron and with the back of a spoon press down on each tomato half so that it collapses and releases its juice. Add the tomato passata and little of the boiling pasta water. Bring to a simmer, lower the heat and give everything a gentle but thorough stir. Let the sauce simmer for a few moments on low heat. Add most of the chopped parsley, taste and add more salt if required.

Seafood Sauce for Pasta- Ragu di Pesce

Add the pasta to the boiling water and when cooked (it won’t take long for fresh pasta) drain and reserve a cup of the cooking water. Add the pasta to the sauce and gently toss it through. The pasta will start to soak up the pasta sauce so add as much of the reserved pasta water as required to avoid the sauce drying out. To serve, place the pasta on large warmed plates making sure there is an even amount of seafood, pasta and sauce in each serving. Sprinkle with the remaining parsley and a drizzle of your best extra virgin olive oil and serve straight away.

Rag Pasta with Seafood Sauce - Stracci con Ragu di Pesce

Jun 11, 2013
mustardwithmutton

1 comment

Caramelised Shallots

Caramelised ShallotsThere seems to be a lot of confusion between countries as to what a shallot is and what a spring onion is. Australia seems to have really muddied the waters by referring to spring onions (the long thin allium with the white and green sections) as shallots, which is the opposite to most countries. But on this blog I always refer to spring onions as just described and shallots as the small purple onions which are commonly used in French cooking. So caramelised shallots, as you can see in the picture, refer to the latter and make a wonderful accompaniment to many meals. I most often use them as an addition to roast dinners. For example, slices of roast loin of lamb sitting on a bed of smashed peas; I like to plate a meal like this individually for dinner parties and to give that little extra oomph, both in presentation and taste, I add a few of these golden gems. But they can certainly be served as a vegetable accompaniment in their own right. They’re deliciously sweet and tender (think caramelised onions on steroids) with a wonderful tangy caramelised sauce. These don’t last very long so I always make a lot and find they disappear faster than the roast potatoes which is really saying something!

Ingredients – serves 4-6  Adapted from Ina Garten

90g unsalted butter
1kg fresh shallots
3 tablespoons sugar
4 tablespoons good red wine vinegar
½ tsp salt
¼ tsp freshly ground black pepper
1 tablespoon fresh thyme leaves

Method

Preheat the oven to 200C. The easiest way to peel this amount of shallots I find is to parboil them first, so bring a saucepan of water to the boil and add the unpeeled whole shallots. Boil them for just a few minutes and then drain them. The skins will now be much easier to remove as well as starting the cooking and softening of the shallots. Make sure that when you peel them you keep the root section in tact.

Melt the butter in a non stick skillet or frypan, add the shallots and sugar, and toss to coat. Cook over medium heat for 10 minutes, tossing occasionally, until the shallots start to brown. Add the vinegar, salt, and pepper and toss well.

Caramelised Shallots

Transfer the shallots and sauce to an oven proof baking dish – I like to use something that I can take straight to the table. Place the dish in the oven and roast for 15 to 30 minutes, depending on the size of the shallots, until they are tender. Season to taste, sprinkle with the thyme leaves, and serve hot.

Caramelised Shallots - Ina Garten