Oct 20, 2021
mustardwithmutton

1 comment

Roasted Shrimp Salad

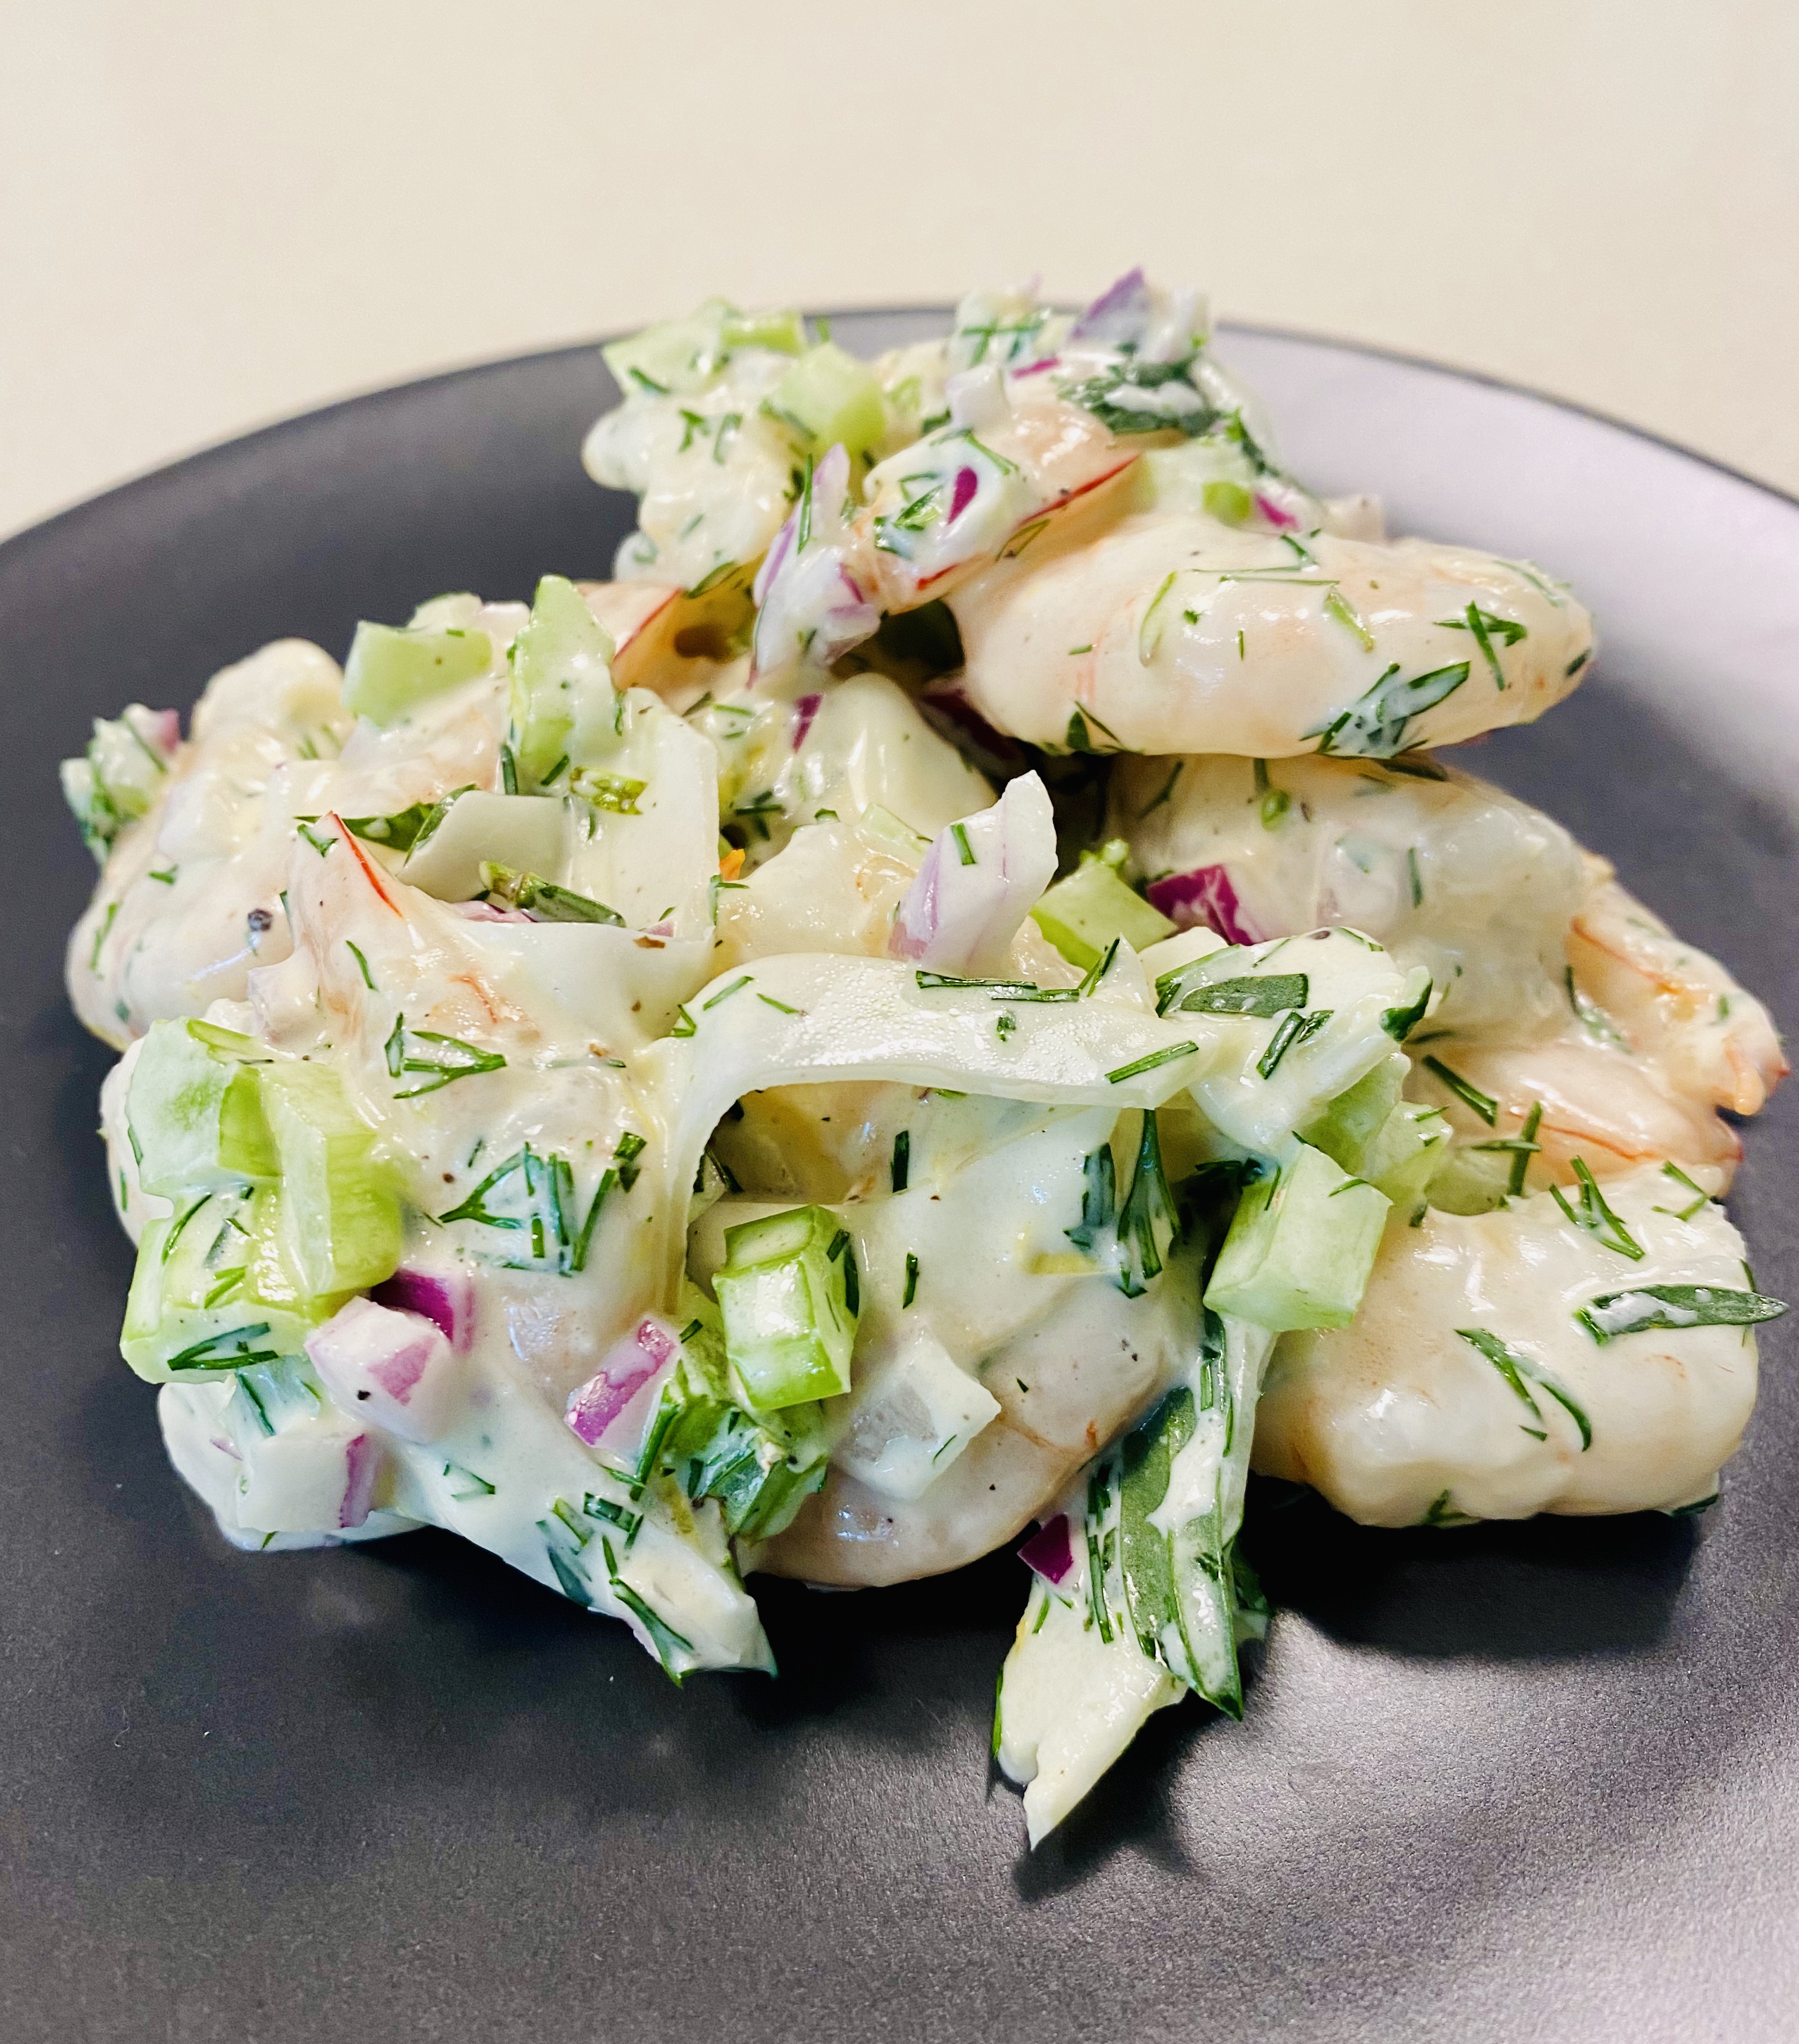
A shrimp (or prawn) salad makes a wonderful lunch or first course. We recently took one to a picnic and at a pinch one could also use it to fill a crusty baguette and have an amazing sandwich. You could of course buy pre cooked shrimp but I think roasting uncooked shrimp in the oven with olive oil, salt and pepper makes for a much tastier salad. This recipe is inspired by Ina Garten and is a mix up of a couple of her salad recipes. I love the crunch form the celery and the fennel adds a lovely subtle anise flavour.

Ingredients – Serves 4-6

1.2kg shrimp or prawns (medium size is best), peeled and deveined
Olive oil
Salt & freshly ground black pepper
1 cup good quality mayonnaise (I use Hellmans)
1 teaspoon dijon mustard
1 tablespoon white wine vinegar
1 tablespoon lemon juice
1/4 cup finely chopped fresh dill
1/2 cup finely diced celery
1/2 a small fennel very finely sliced – I like to do this on a mandolin
1/2 a small red onion finely diced

Method

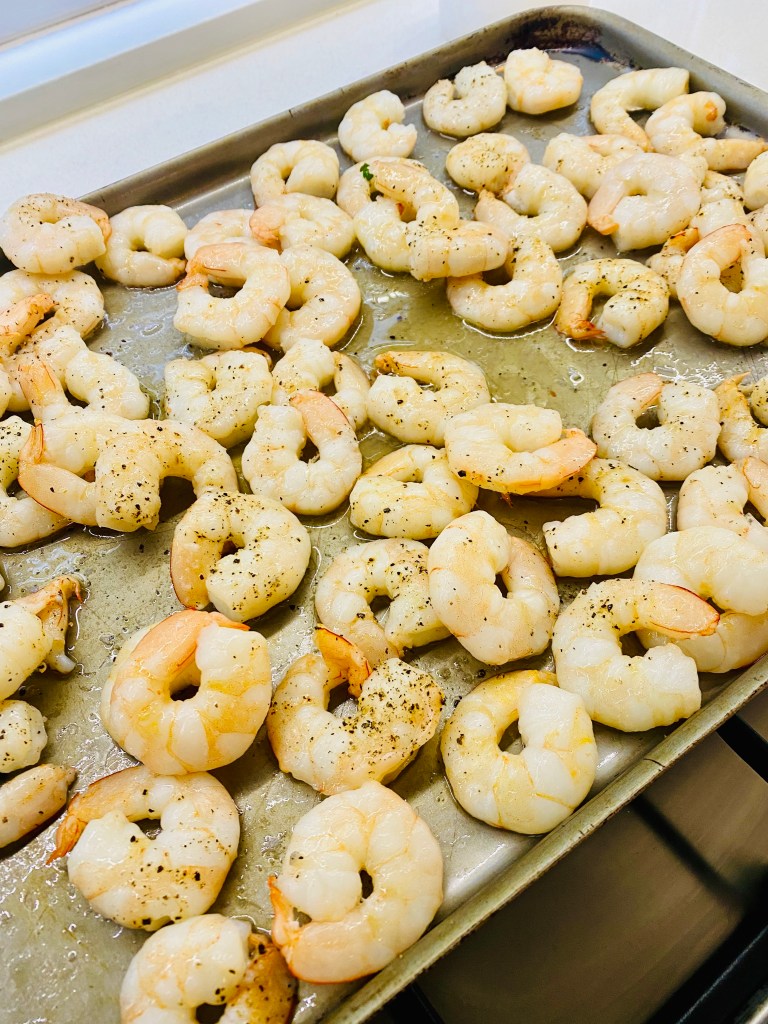
Preheat oven to 200C. Place prawns on a large sheet pan that can hold them in a single layer. Drizzle with a few tablespoons of olive oil and season generously with salt and pepper. Place in the oven and cook for 10-12 minutes until pink firm and cooked through. Allow to cool for 5 minutes.

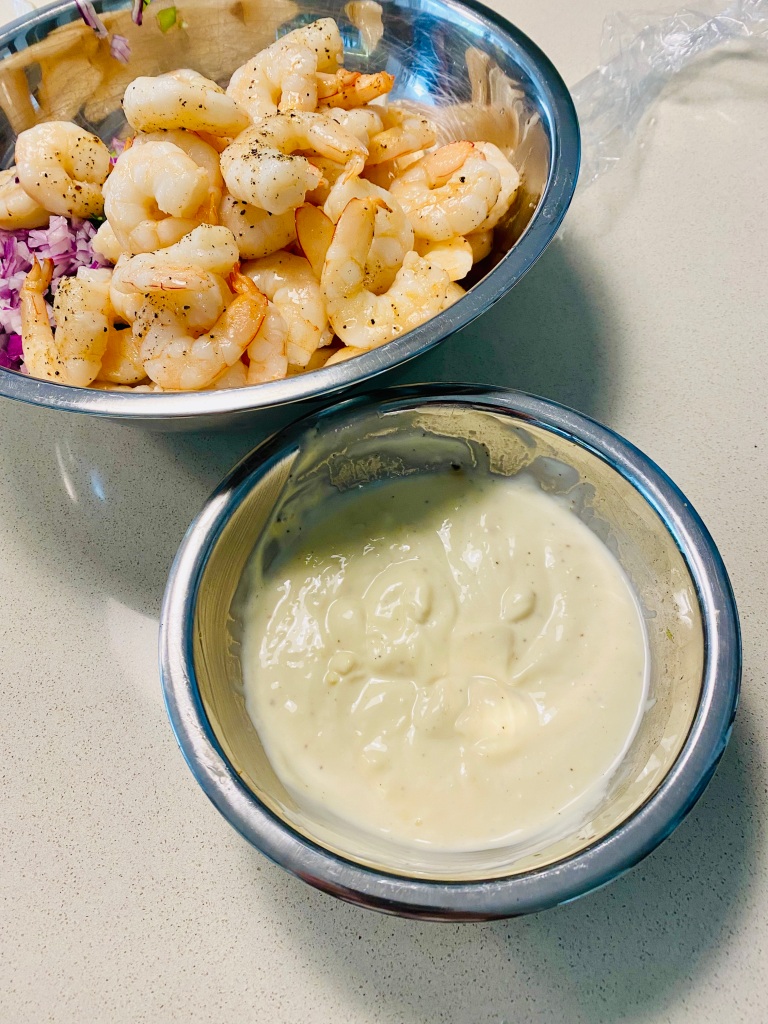
Meanwhile, make the sauce. In a large bowl, whisk together the mayonnaise, lemon juice, vinegar, Dijon mustard, 1/2 teaspoon salt, and some freshly ground black pepper. When the shrimp are cool, add them to the sauce and toss. Add the dill, fennel, celery and red onion and toss well. The flavors will improve if you allow the salad to sit at room temperature for 30 minutes. Otherwise, chill and serve at room temperature.

Sep 28, 2021
mustardwithmutton

no comments

An Old Fashioned Tea Time Treat – Date & Walnut Loaf

I always look forward to a cup of tea or coffee of an afternoon, especially if there’s something home-made to have with it! More often than not I prefer something that isn’t creamy, chocolatey or too sweet and this walnut loaf always hits the spot. There’s something about the old fashioned taste and texture of this loaf that’s very comforting. The other advantage is it’s super easy to whip up. You don’t need to drag out the stand mixer or even soften any butter. Whilst you can certainly eat this the day you make it, I think it tastes better as it ages and you can keep it for a good 5 days without it going stale. It’s lovely plain but also very good spread with butter.

Ingredients
1 generous cup coarsely chopped dates
1 teaspoon bicarbonate soda
1 cup strong black boiling tea
1 cup firmly packed brown sugar
1 egg, lightly beaten
1 tablespoon butter, melted
1 teaspoon vanilla extract
2 cups self raising flour
3/4 cup roughly chopped walnut pieces

Method
Place coursely chopped dates in a large mixing bowl. Sprinkle with baking soda and cover with boiling-hot black tea. Set aside for 1 hour for dates to soften and cool.

Heat oven to 160C. Grease and line a standard loaf tin with baking paper. Stir brown sugar, egg, butter and vanilla into the cooled date mixture. Add the sifted flour and walnuts and stir until just combined. Spoon mixture into prepared loaf tin. Bake for 1 hour or until loaf tests cooked when a skewer inserted comes out clean.

Sep 20, 2021
mustardwithmutton

2 comments

Kung Pao Chicken

Kung Pao chicken is something I always order when we eat at Chinese restaurants. One of my favourite versions is the one served at Mr Wong in Sydney. This recipe is very similar in taste to the one we order at Mr Wong’s – it’s quite spicy, as it should be, with the addition of some numbing heat courtesy of Sichuan peppercorns. Lots of bang for your buck in this recipe which is fairly easy to pull together, even on a weeknight. The one ingredient that you will need to go to the Asian grocer for is the chilli bean paste. It really is worth the effort of seeking out this condiment and having a jar of it in your fridge as it’s essential to many Sichuan dishes and the flavour it imparts can’t be easily replicated with anything else.

Ingredients Serves 4

650g chicken breasts
1 teaspoon salt
1/2 teaspoon onion powder
3 teaspoons Chinese cooking wine
1 egg white
2 tablespoons cornflour
Vegetable oil or peanut oil
2 tablespoons Sichuan Dou Ban Jiang/ chilli bean sauce
2 tablespoons light soy sauce
1 tablespoon rice vinegar
1 tablespoon black vinegar – you can substitute balsamic vinegar
1 teaspoon dark soy sauce
A handful of red dried chilies, cut into short pieces
1/2 tablespoon Sichuan peppercorns finely diced, or roughly ground in a mortar and pestle
1 tablespoon diced garlic
1 teaspoon diced ginger
3 tabelspoons brown sugar
1/2 cup water with 2 teaspoons corn flour mixed in
4 spring onions cut into 1 inch lengths
1/2 cup of roasted peanuts

Method

Cut the chicken breasts into 1 inch cubes. Marinade it with the salt, onion powder and Chinese cooking wine. Then coat the chicken with 2 tablespoons of corn flour and the egg white. Keep mixing it until it gets to a creamy and velvety texture. Set it aside for 20 minutes. This method is called velveting in Chinese cuisine and makes the chicken very tender.

Heat your wok over a high flame and add a generous amount of oil. Give it a toss so the oil covers the bottom. Wait for it to get very hot then add the chicken. Spread the meat so most pieces are touching the bottom of the wok. Do not stir and flip the meat, wait and let one side of the meat sear before stirring the chicken to cook and brown the other sides. Once the chicken is cooked and you’ve got some nice brown colour remove it from the wok and set aside.

Drizzle in a little more oil and add the chilli bean paste. Stir this on low heat for a couple of minutes. When you see all the oil becomes a red-orange colour, add the garlic, ginger, diced Sichuan peppercorn, red dried chilies and brown sugar. Stir until the sugar melts then add the chicken back into the wok. Add the soy sauce, vinegars and dark soy sauce. Pour in the corn flour water and stir immediately. When the sauce thickens, throw in the toasted peanuts and the spring onions. Toss everything together. Taste it to adjust the flavour, checking to see if it needs more vinegar or sugar. Give it a final stir and serve straight away.

Sep 10, 2021
mustardwithmutton

2 comments

Persian Kotlet – Delicious Breaded Meat Patties

These delicious beef patties are very popular in Iran, sort of our equivalent of meatloaf or rissoles. It was one of my favourite comfort foods growing up and I still enjoy them just as much. Kotlet are comprised of a simple combination of ingredients – similar in some ways to a classic meatball mixture. Russians also have a similar version of kotlet and I’m unsure of where they actually originated. Interestingly both these versions are formed into flat tear shaped patties which to me cries Russian angst! There are versions of kotlet where soaked bread his added to the minced beef and there are versions where grated boiled potato is used, similar to meatballs where soaked bread is often added to produce a more tender and moist meatball. Growing up my mother used soaked bread which is a little less time intensive. In the recipe below I’ve used a little of each but I think my preference is for just soaked bread. The perfect side dish for kotlet is mashed potato and a green salad, and for me a dollop of ketchup is a must. I always make extra kotlet as they make wonderful sandwiches the next day and reheat well.

Ingredients – Serves 4 with leftovers for sandwiches the next day
800g lean minced beef
1 large white onion, finely grated and excess juice drained off
4 slices white bread, crust removed and diced
1/2 cup of milk
1 egg
1/3 cup finely chopped flat leaf parsley
Salt and freshly ground black pepper
Dried bread crumbs (about 1 cup) – I used Panko as that’s all I had but regular bread crumbs work better
Vegetable oil for shallow frying

Method
Place the bread and milk in a bowl and mix it well to ensure that all the bread is coated. Let sit for 15 minutes then squish it all up very well in your hands so as you have a mushy looking mixture, if there is excess liquid, drain it off. To a large bowl add the egg, bread mixture, grated onion, parsley, 2 teaspoons of salt and half a teaspoon of black pepper. Combine this mixture very well. I like to put on disposable gloves and do this by hand. Once the mixture is combined add the meat and again work it all together. This is best done with your hands. Give it a good knead for at least a couple of minutes. At this point I like to cover the bowl and refrigerate it. You can do this overnight but just 20 minutes is enough. But if you are short of time you can just proceed straight to shaping them.

To form the kotlet take a large handful of the meat mixture, not too much – if I had to guess I would say it should weigh about 100 – 120g and flatten it out in your palms. You want the finished kotlet to be about 12-15cm in length and no more than 1.5cm thick. It helps to have a bowl of water handy to wet your hands so as the meat doesn’t stick. Then place the kotlet on a flat surface and shape it with your hands into a tear drop shape. Form all the kotlet and then bread them. For this you just need to put the bread crumbs into a large shallow bowl and one by one place each kotlet into the crumbs and press down gently so as the surface is covered with crumbs. Turn it over and do the same with the other side. Lay each crumbed kotlet onto a tray lined with baking paper. Again I like to pop these into the fridge for about 20 minutes before frying. You could if you wish make them to this point the day before.

To fry the kotlet place a large heavy potted non stick fry pan over medium heat. Once hot add a generous amount of oil – enough to cover the bottom of the pan well. Wait until the oil is hot and add the kotlet to the hot oil. Make sure not to over crowd the pan and that your heat isn’t too intense. Cook for about 4-5 minutes per side or until golden brown, if your heat is too high they will brown too quickly without coking through to the middle. Continue cooking until all the Kotlet are done. As the kotlet are cooked I like to put them on an oven tray and place them in a 120C oven, this not only keeps them all warm but also aids in finishing off the cooking process. Serve hot.

Sep 3, 2021
mustardwithmutton

no comments

Something for the Weekend – Ina Garten’s Rigatoni with Sausage & Fennel

I’ve seen a lot of rave reviews for this recipe from Ina Garten’s book, Cooking for Jeffrey. The hype was warranted, a delicious comforting pasta full of flavour. If you don’t think you like fennel try it in this recipe and you might just change your mind. This doesn’t have an overt aniseed flavour but there’s a hint of something that makes the pasta sauce a bit more interesting. You really do need fresh fennel for this one.

Ingredients – Serves 4

3 cups chopped fennel (1 very large fennel bulb)
1 large onion chopped
750g Italian sausage, casing removed
2 tsp. minced garlic (2 cloves)
½ teaspoon whole fennel seeds, crushed with a mortar and pestle
½ tsp. crushed red pepper flakes
Salt and Freshly Ground Pepper
1 cup dry white wine
1 cup heavy cream
2/3 cups half-and-half – I used whole milk
2 tbsp. tomato paste
500g Rigatoni, preferably De Cecco
½ cup chopped, fresh Italian parsley leaves
1 cup freshly grated Reggiano Parmigiano cheese, divided

Method

Heat the olive oil in a large, heavy pot or Dutch oven, such as Le Creuset, over medium heat.  Add the fennel and onion and sauté for 7 minutes, stirring occasionally, until tender.  Add the sausage and cook for 7 to 8 minutes, crumbling it with a fork, until nicely browned. Add the garlic, crushed fennel seeds, red pepper flakes, 2 tsp. salt and 1 tsp. black pepper and cook for a couple of minutes.

Pour in the wine, bring to a boil and add the heavy cream, half-and-half (or milk), and tomato paste.  Bring back to a boil, lower the heat and simmer for 20-30 minutes, until the sauce has thickened. It may look like there’s too much liquid but the pasta, once it’s added will soak up a lot of the liquid.

Meanwhile, bring a large pot of water to a boil, add 2 tbsp. salt and cook the rigatoni according to package directions – you really want the pasta to still have a bit of a bite to it as it will finish cooking in the sauce. Drain and add to the sauce, stirring to coat the pasta.  Cook over low heat for 5 minutes to allow the pasta to absorb the sauce.

Off the heat, stir in the parsley and ½ cup of the Reggiano Parmigiano. Serve hot in shallow bowls with passing the remaining ½ cup of Parmigiano. If you’re making this ahead, a nice way to serve it is to put it into shallow, individual, oven proof ramekins (or a large lasagna dish) and top with grated mozzarella or gruyere and bake in a 200C oven for 20 minutes.

Feb 18, 2021
mustardwithmutton

no comments

Methi Gosht – Fenugreek & Meat Curry

I was so excited to find frozen fenugreek in the freezer aisle of our local supermarket (Coles). Methi/fenugreek is a wonderfully fragrant herb used a lot in Indian cooking and also in many Persian recipes. It has a warm exotic fragrance that smells, well it smells like curry. That’s the best way I can really describe it. Ground fenugreek and fenugreek seeds can be found quite easily in the spice section of most good grocers but fresh/frozen fenugreek leaves are not that easy to come across. I stocked up on a few packets and promptly made this fenugreek curry, or Methi Gosht. This is traditionally made with lamb but you could definitely substitute the lamb for beef. I bulked up the fenugreek with some frozen spinach – not sure if that’s traditional but I liked the extra bulk of greens it added to the curry.

Ingredients – Serves 4-6
700g lean diced lamb. Cut in large bite size pieces, not too small. You can also use beef.
Vegetable oil 
3 medium onions finely diced
1 tablespoon grated garlic
1 tablespoon grated ginger
1 teaspoon turmeric
1 teaspoon coriander
1 teaspoon garam masala
1 teaspoon chilli powder (you can use less or leave it out altogether if you don’t want any heat)
Salt
3 tomatoes, roughly chopped
300g frozen fenugreek leaves, defrosted and drained
100g frozen spinach, defrosted and drained

Method
In a large heavy bottomed saucepan heat a good amount of oil, at least enough to cover the base of your pan and when hot add the onions and fry over medium heat, stirring often, until the onions start to turn golden. Add the grated ginger and garlic and cook for a few more minutes, stirring constantly. Add the turmeric, coriander, garam masala and chilli powder. stir again to incorporate all the spices into the onion mixture. Make sure you don’t burn the spices, you can turn your heat down and add a small amount of water if you feel they are scorching.

Turn up the heat and add the lamb and cook stirring until it has changed colour add a teaspoon and a half of salt and stir again. Add the tomatoes and cook until they have wilted slightly which should only take about 5 minutes. Bring a kettle to the boil and add enough boiling water so as just the tips of the meat are uncovered. Bring to a boil, and then lower the heat to a gentle simmer. Cover and cook until your meat is half cooked about an hour to an hour and a half, depending on the cut of meat.

Once your meat is half cooked remove the lid and add the defrosted fenugreek and spinach. Once the green have been added you don’t want to cover it again as it will lose it’s vibrant colour. Continue simmering, uncovered, for a further hour or so or until your meat is completely tender, probably another 45 minute to an hour. If you find your pan is running dry add a little bit of boiling water and if your curry is to thin you can increase the heat to reduce the sauce. Best served with basmati rice, raita and naan.

Aug 9, 2020
mustardwithmutton

no comments

Italian Potato, Mussels and Rice Tray Bake

Silvia Colloca Apulian tray bake of mussels potatoes and rice

Like most people right now we’ve been cooking (and eating) a hell of a lot more than we usually do and this tray bake of mussels with potatoes and rice is one of the best things we’ve had during the last few months. There’s something about the simplicity of the flavours that makes it just so so delicious. I saw this recipe on Silvia Colloca’s television programme Cook Like an Italian and I must have made it at least 3 times now. I made one change from the original and that was to briefly cook the mussels first to open them – Sylvia shucks them raw but I found this quite time consuming. This is one you really have to try if you love mussels.

Ingredients – Serves 4   Adapted from Silvia Colloca

100 ml extra-virgin olive oil
1 kg mussels, scrubbed and de-bearded
1-2 large French shallots, thinly sliced
500g potatoes, peeled and cut into 5 mm-thick slices (I used Desiree)
Sea salt flakes and freshly ground black pepper, to taste
350g cherry tomatoes, halved (I like to plunge them in hot water for a minute and remove their skins)
200g arborio rice, well washed in cold water
40g freshly grated pecorino
Small handful parsley leaves, coarsely chopped

Method

Preheat the oven to 220°C. Lightly grease a large, deep baking dish with olive oil (I use a 26 cm long, 7 cm deep dish that is perfect).

Mussel, Potato & Rice Tray Bake

Place a large pan with a lid over high heat and when hot add the drained mussels and put the lid on straight away. Shake the pan a little and leave for 30 seconds. Remove the lid and take the mussels out as soon as they start to open. Place the mussels in a bowl and remove and discard one half of the shell making sure to catch any juices.

Mussel, Potato & Rice Tray Bake

Place half the sliced shallots on the bottom of the dish, then cover with a layer of potatoes. Season with salt and drizzle with a few tablespoons of olive oil. Top with half the cherry tomatoes. Place the opened mussels in one layer (if they won’t fit in one layer, I place any extra mussels onto one shell so some shells with have 2 mussels on it), then scatter the rice and remaining shallots over the top. Sprinkle with half the pecorino, the reserved mussel juices, more olive oil, salt and pepper and some chopped parsley. Add a top layer of potatoes, then the rest of the cherry tomatoes, a drizzle more oil, salt and pepper to taste, then the remaining parsley and pecorino.

Mussel, Potato & Rice Tray Bake

Pour enough water carefully down the sides of the dish (you don’t want to disturb the layers) to reach to just under the top layer. Bake for 20 minutes, then reduce the heat to 200°C and bake for another 35 minutes. At the very end turn on the grill and cook for 2-3 minutes or until the top is golden and crunchy. Serve at the table in the dish.

Mussel, Potato & Rice Tray Bake

Apr 15, 2020
mustardwithmutton

no comments

Ina Garten’s Crispy Mustard Chicken with Frisee and Potatoes


Ina Garten Crispy Mustard Chicken

Ina knocks one out of the park again with this chicken dinner. It’s a complete meal on one platter and it’s super delicious. I wish more cookbook authors would test their recipes as thoroughly as the Barfoot Contessa. It’s reassuring to know that you can pick any of Ina’s recipes and, if you follow her instructions, end up with a fabulous dish. Having said that I did improvise a little with this recipe. Instead of using wine in the marinade I used buttermilk (actually I used cream with a splash of lemon juice to replicate buttermilk as I didn’t have any) – I wanted to really tenderise the chicken and the sturdier nature of buttermilk meant the breadcrumbs attached better to the chicken. I also used mainly fresh bread crumbs instead of Panko and I think it delivered more crunch. My husband declared this one of his all time favourite meals. There’s something about the vinaigrette over the salad leaves and potatoes and the crispy crumbed chicken pieces that makes this meal both comforting and elegant.

Ingredients – serves 2-3 (I made it for the two of us and the small amount of leftovers were delicious)
Adapted from Ina Garten’s cookbook, Cook Like a Pro

2 garlic cloves
1½ teaspoons fresh thyme leaves – I used a couple of tablespoons finely chopped parsley
Salt and freshly ground black pepper
1 cup fresh bread crumbs and ¼ cup Panko crumbs
1 ½ teaspoons grated lemon zest
Good olive oil
1 tablespoon unsalted butter, melted
¼ cup good Dijon mustard
½ cup of buttermilk, you can sub with cream and a splash of lemon juice if you don’t have buttermilk
4 large skin-on chicken thighs
750g fingerling potatoes, halved lengthwise 
300g baby frisée or chicory salad greens – I used mixed salad leaves and tried to find a mixed pack that used sturdier varieties

Mustard Vinaigrette
¼ cup minced shallots
¼ cup apple cider vinegar
½ cup good olive oil
1 tablespoon good Dijon mustard
½ teaspoon salt and a few grinds of black pepper

Method

Preheat the oven to 200C

To make the vinaigrette place all the ingredients in a small bowl and whisk until combined and emulsified.

Place the garlic, thyme (or parsley), 1 teaspoon salt, and ½ teaspoon pepper in a food processor fitted with the steel blade and process until the garlic is finely minced. Add the breadcrumbs, lemon zest, 1 tablespoon olive oil, and the butter and pulse a few times to moisten the crumbs. Pour the mixture into a shallow bowl. In another shallow bowl, whisk together the mustard and buttermilk.

Season the chicken thighs with salt and pepper and then place them in the buttermilk mixture making sure the marinade is all over the chicken and leave for 30 minutes (you can leave them for longer in the fridge if you like but just make sure you bring them to room temperature for dipping and cooking).

Whilst the chicken is marinating wash the potatoes well and halve them lengthways. Place in a pan of cold salted water and bring to the boil. Cook until just tender then drain and spread on a sheet pan with 1/4 cup of olive oil and season with salt and pepper.

After the marinade time is up dip each thigh on the skin side only in the crumb mixture, pressing gently to make the crumbs adhere. After the first couple of pieces I found it easer to just pat the crumbs onto the chicken. Place the chicken on a sheet pan, crumb side up, and press any remaining crumbs onto the chicken.

Roast the chicken and potatoes for 40 to 50 minutes, turning the potatoes once during roasting. The chicken and potatoes should be done at the same time. Ina places the chicken and  potatoes on the same sheet pan which makes for easier clean up but I used two separate pans.

Meanwhile, place the greens on a serving platter. When the chicken and potatoes are done, toss the salad with enough vinaigrette to moisten and place the chicken and potatoes on top, adding any crumbs from the sheet pan. Sprinkle the remaining vinaigrette over the potatoes and serve straight away.

Ina Garten Crispy Mustard Chicken

Apr 4, 2020
mustardwithmutton

2 comments

Lyonnaise Potatoes – Oven Baked but just as Delicious

138F8174-0A3F-4187-8CF4-CF04F4642195_1_201_a

I’m always searching for different potato recipes to add to our rotation and one classic I forgot about, until a recent holiday, is Lyonnaise potatoes. Crispy buttery potato discs with sweet caramelised onions, I can’t tell you how seriously delicious these are – so much so that it’s the only potato dish I’ve made for the last few weeks. When I searched for  recipes on-line I noticed nearly all of them required the potatoes to be pan fried. I’m not a fan of crisping up potatoes on the stove top. They need too much looking after and let’s face it when you’re trying to juggle various elements to bring dinner together you don’t want to be flipping and frying potatoes as well. So I decided to make my own version that are oven baked. The potatoes are sliced and par boiled then roasted. You caramelise some onions beforehand and then stir them through the potatoes in the last 10 minutes in the oven. All the prep can be done earlier in the day and the potatoes popped into the oven an hour before you want to eat. This is one you have to try!

Ingredients – serves 3-4, depending on how greedy you are
1kg yellow fleshed potatoes (large fingerlings are good), peeled and sliced – not too thin
2 good sized onions, peeled and sliced into thin round moons
Light olive oil or vegetable oil
2-3 tablespoons butter
Salt & pepper

Method
Preheat oven to 220C. Rinse the sliced potatoes in a couple of changes of cold water. Place them into a saucepan and cover with cold water and a couple of teaspoons of salt. Bring to the boil and cook for a 2 minutes then drain.

7EF485DA-4BB8-4792-951F-DCB11A5E75B8_1_201_a

Place enough oil in a shallow sided baking tray/sheet (non stick is best) until you have a thin coating on the bottom of the pan. You want to use a tray that will fit the potatoes snugly with most of the potatoes in one layer or only slight overlapping. Drizzle some more oil on top and season with some salt and pepper. Dice the butter and scatter over the potatoes. You can make it to this point ahead of time if you wish.  Place in the oven and roast for 25 minutes.

41AEBD91-C9ED-4DDA-B508-9B7BC4DFAC4C_1_201_a

Whilst the potatoes are roasting, heat a few tablespoons of oil in a non stick skillet or frypan and add the onions along with a pinch of salt. Cook over medium heat, stirring the onions regularly, to ensure even browning until they are nicely golden and staring to caramelise. You don’t want to get them too dark as they’ll finish cooking in the oven.

1C71225C-096D-49A7-A07F-A8E0078B0C98_1_201_a

After the potatoes have had their first 25 minutes of cooking, turn them over gently and roast for a further 20 minutes or until the potatoes are mostly golden and crispy. Add the cooked onions and stir them gently through the potatoes and cook for a further  10 minutes.

AF15C059-5C6B-4E01-AC6C-FF9F6734BD82_1_201_a

B3D5B35F-7793-4B6A-9DC9-610AE55D2621_1_201_a

Aug 31, 2018
mustardwithmutton

2 comments

Kimchi Gratin

Restaurant Hubert Kimchi Gratin Recipe

Just when I thought I had gratinated everything possible, from potatoes and Brussel sprouts to chicken, I came across this Kimchi gratin at Restaurant Hubert in Sydney. What a fantastic concept – I love Kimchi in any form but it never occurred to me to use it in a gratin. If you’re not a fan of Kimchi don’t be deterred from trying this because the cream in the gratin (and the sweetness from caramelised onions) rounds out some of the more stringent Kimchi flavours, not enough to diffuse the essence of the Kimchi for those of us who love it, but enough to make it approachable for those who aren’t as keen. This pairs incredibly well with roast pork and chicken – I love having a side dish for a traditional roast that strays away from the usual offerings and has a little kick.

Ingredients – Serves 4  Adapted from Restaurant Hubert, Sydney

4 tablespoons olive oil
1 kg onions, thinly sliced
500 gm cabbage kimchi, thinly sliced
200 ml pouring cream
20 gm panko crumbs
100 gm finely grated Gruyère
Finely grated parmesan, to serve
15 gm butter

Method

Heat olive oil in a saucepan over medium heat and sauté onions, stirring often, until softened and lightly caramelised (25-30 minutes) – add more oil if you need it. Add kimchi and cook, stirring occasionally until warmed through (5 minutes). Add cream and reduce until the mixture thickens slightly (3-5 minutes). Remove from heat and cool. While still warm, but not hot, stir in three-quarters of the Gruyère and transfer to a baking dish or individual shallow gratin dishes.


Heat a grill to high. Combine panko crumbs and remaining Gruyère and parmesan in a bowl, then sprinkle evenly over kimchi, dot with butter, then grill until gratin is golden and bubbling. You can can also prepare the gratin in advance then pre-heat the oven to 200C and cook for 20 minutes or until golden and bubbling. Serve hot.

Best Side Dish for Roasts - Kimchi Gratin