Feb 12, 2013
mustardwithmutton

1 comment

Apple Tart with Salted Caramel Glaze

French Apple Tart with Salted Caramel Glaze
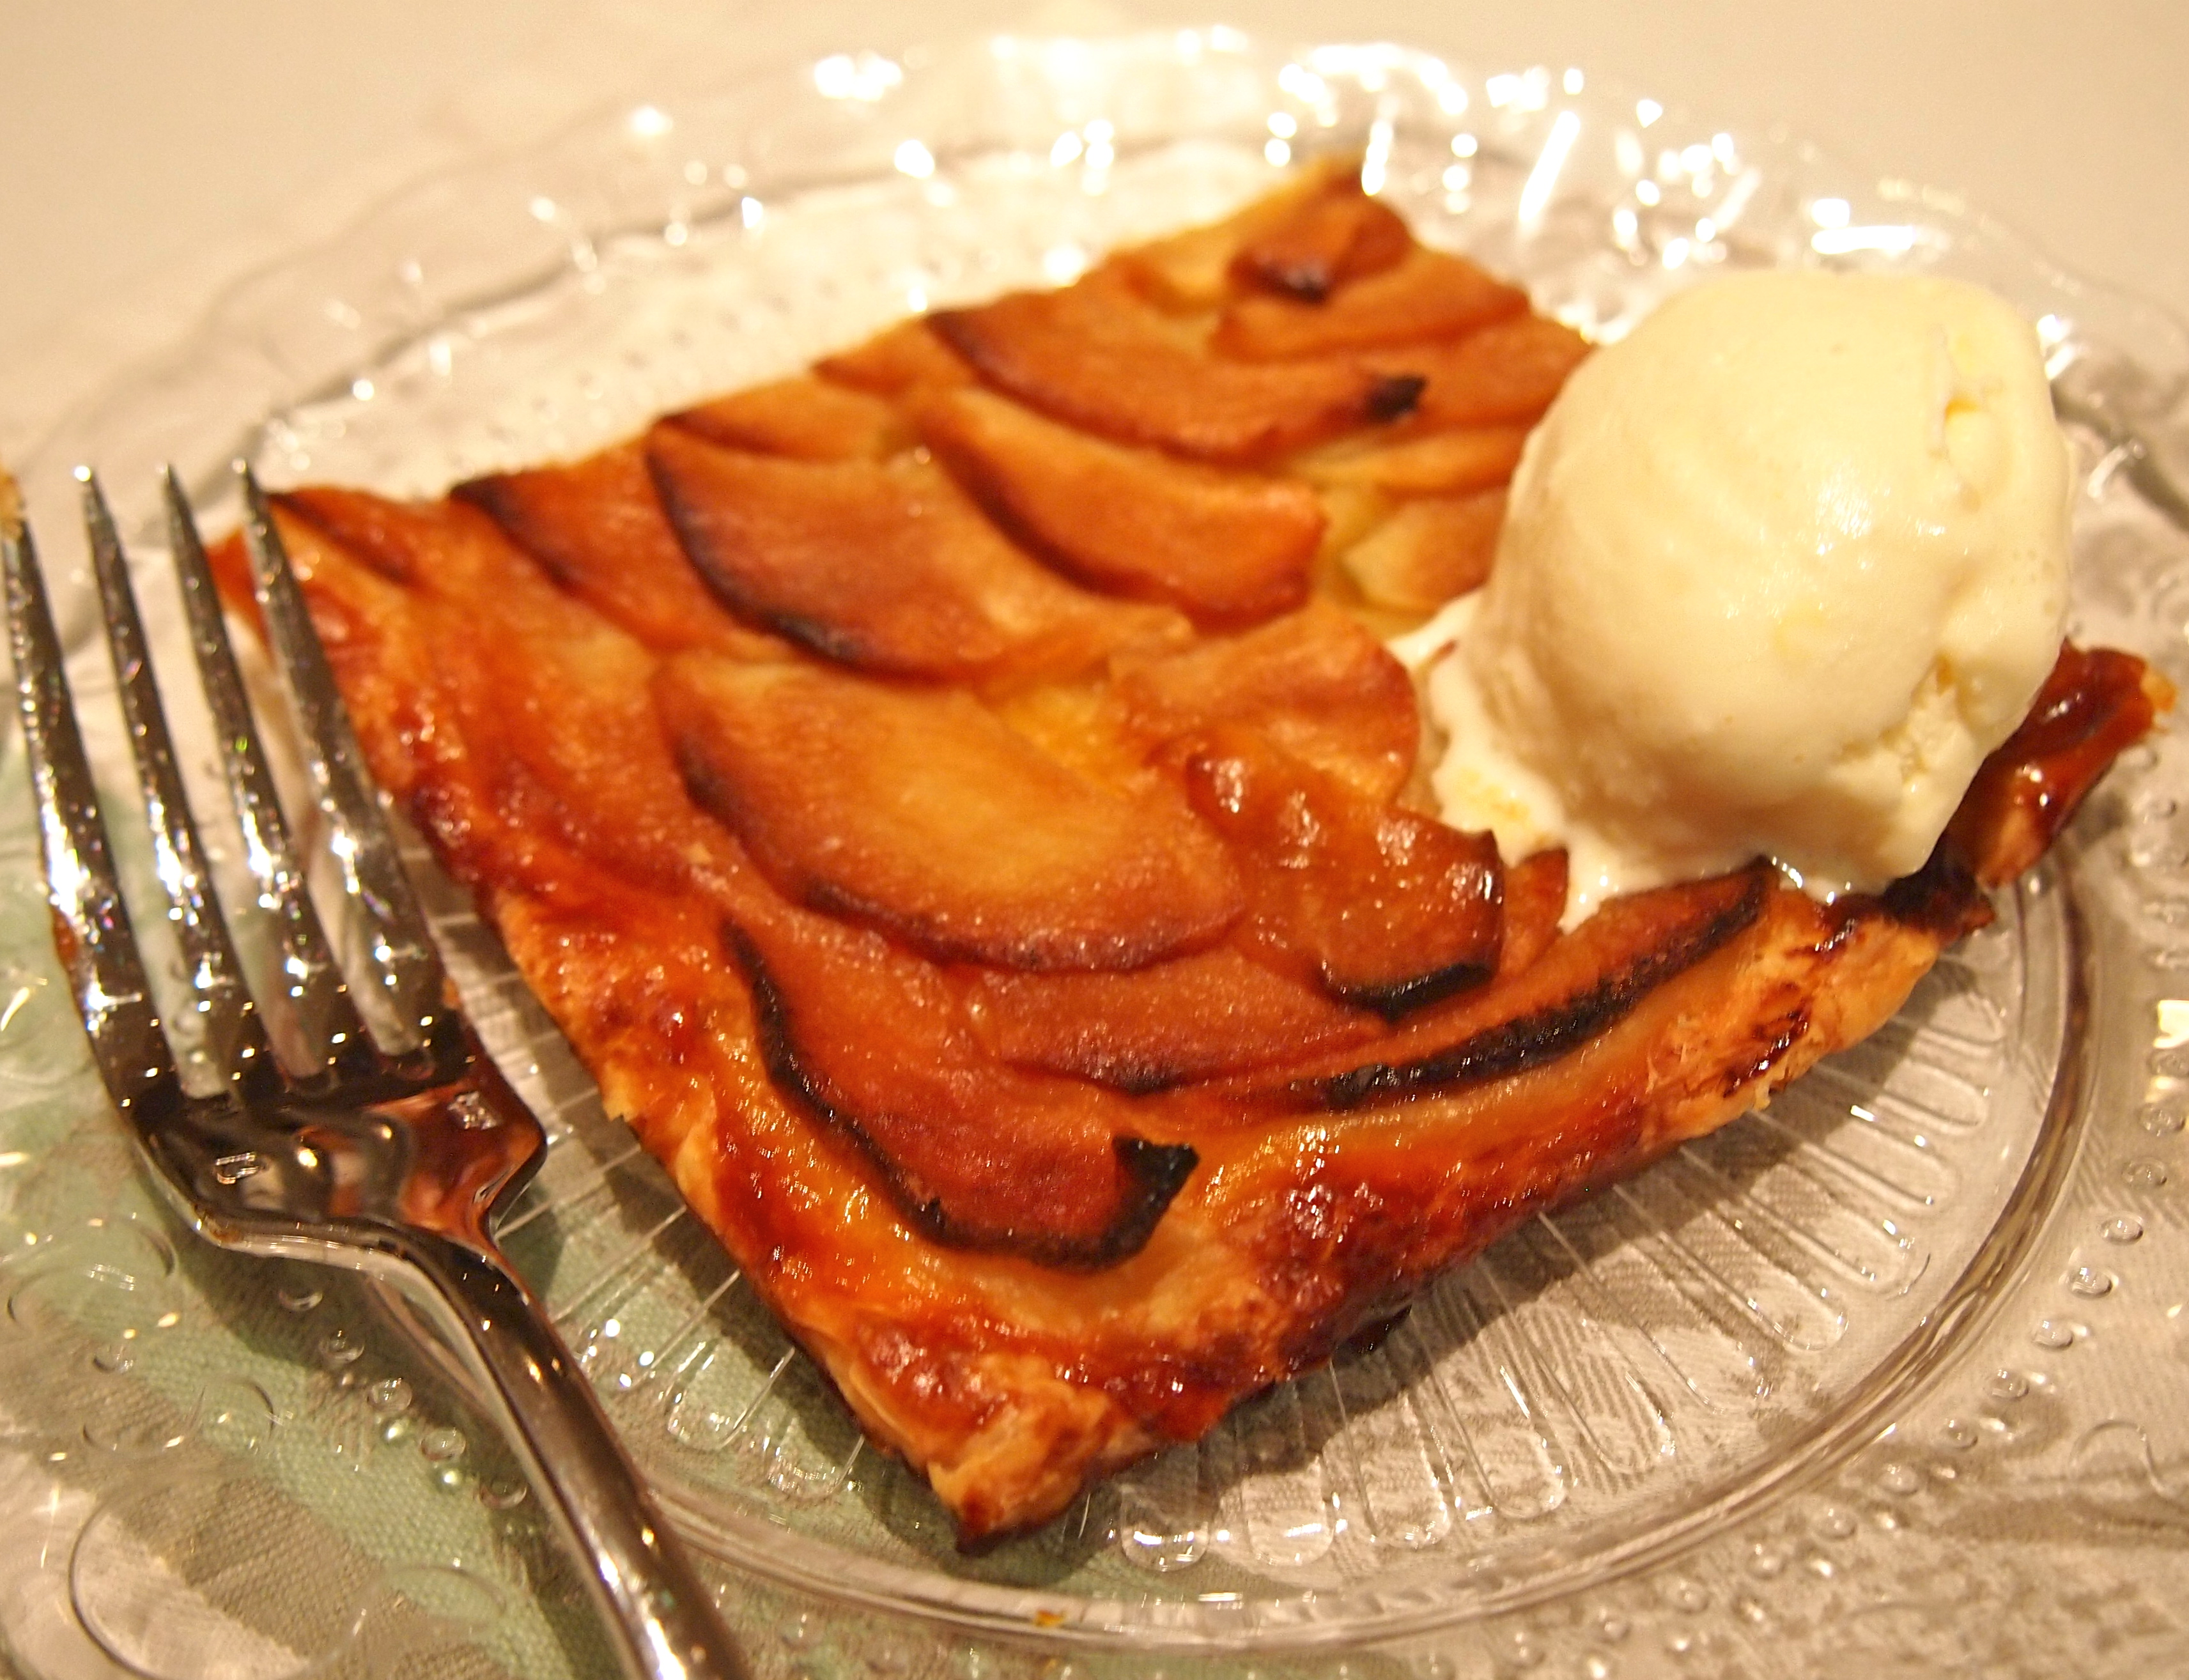
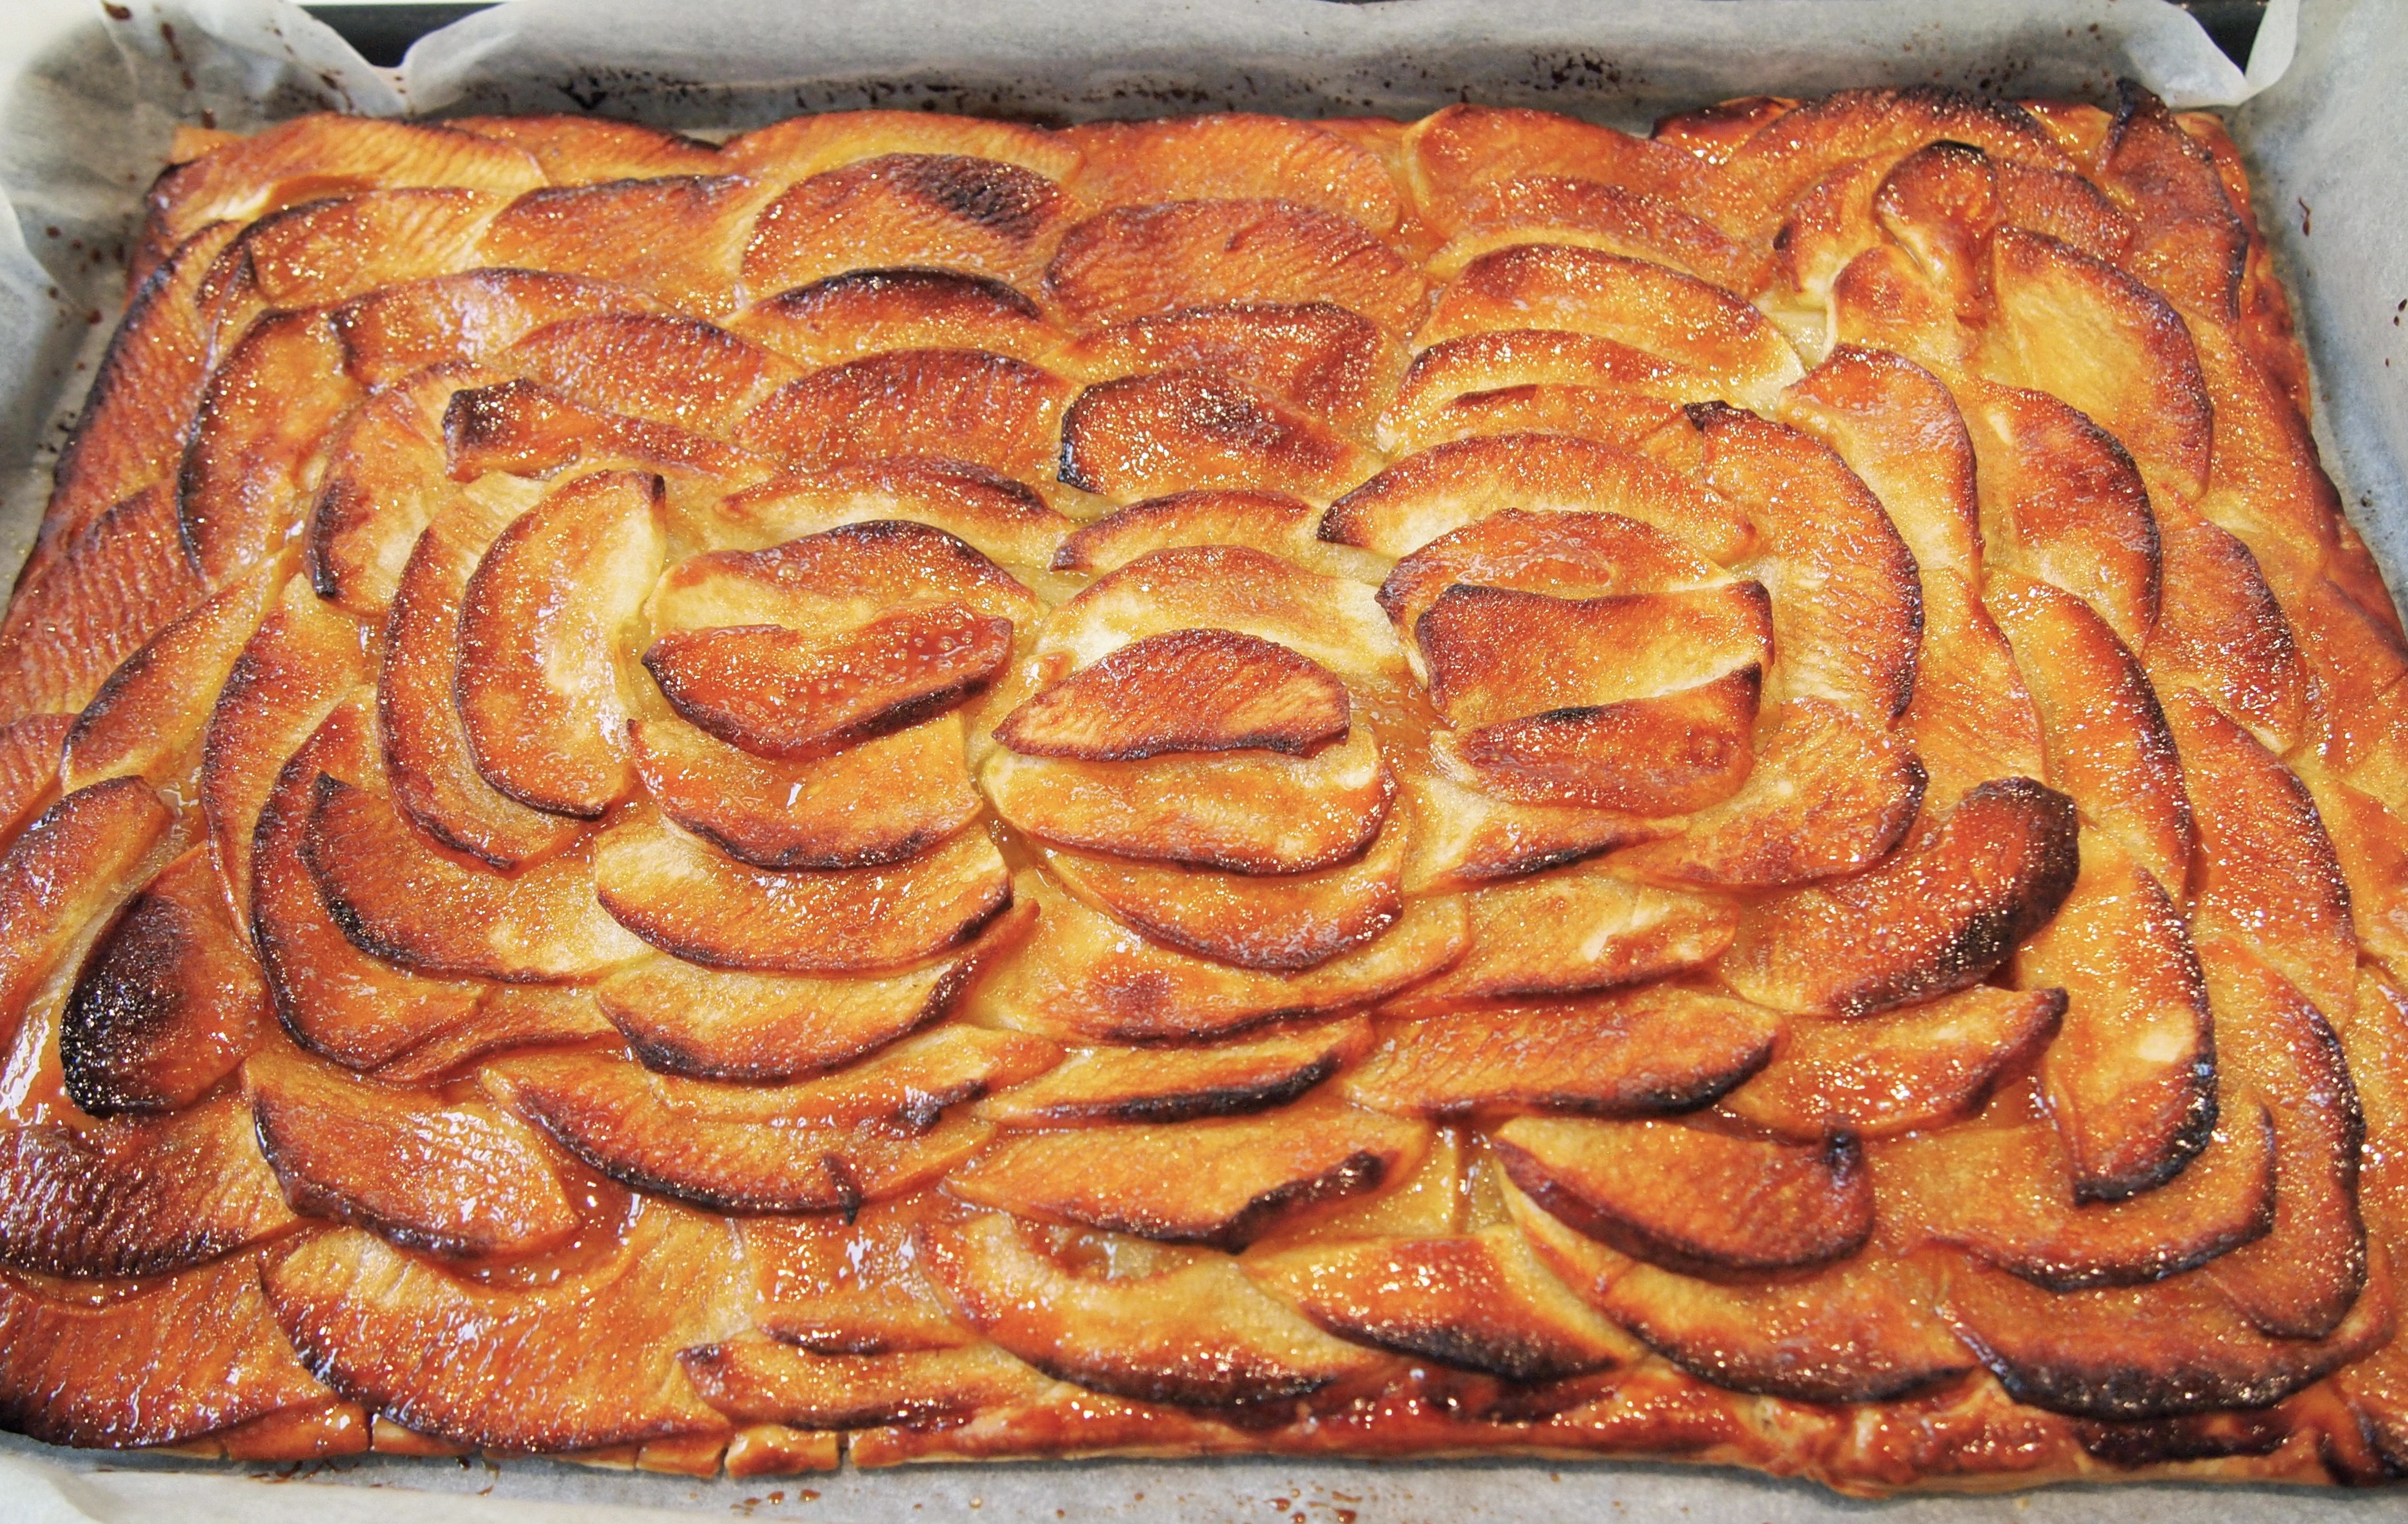
This is such an easy dessert yet it looks so impressive and tastes wonderful. The hardest part is slicing the apples thinly but if you have a mandoline even this is a cinch. Store bought all butter puff pastry – and it does need to be a really good quality all butter one, is placed on a sheet pan and topped with very thinly sliced apples. The apples are then dotted with butter and sugar before being baked. While the tart is baking a very simple caramel needs to be made which is then brushed onto the tart before being baked for a few more minutes. What comes out of the oven is a rich, deeply caramel coloured, ever so thin buttery tart. The hint of salt in the caramel transporting it to another level. Ina Garten makes a similar tart but brushes it at the end with some warmed apricot jam, which is the more classical French method. I’ve been wanting to try Ina’s French apple tart for a while but after seeing this version on Smitten Kitchen I knew it was going to knock the traditional tart out of the park. Serve it with vanilla ice cream if you’re having this as a dessert but it’s perfect on it’s own for morning or afternoon tea.

Ingredients    Adapted from Smitten Kitchen

Tart Base
1 package all butter puff pastry, defrosted in fridge overnight 0r 2 sheets ready rolled pastry which is what I used
3 large or 4 medium apples
2 tablespoons granulated sugar
2 tablespoons unsalted butter, cold, cut into small dice

Salted Caramel Glaze
¼ cup granulated sugar
2 tablespoons unsalted butter
¼ teaspoon flaky sea salt
2 tablespoons heavy cream

Method

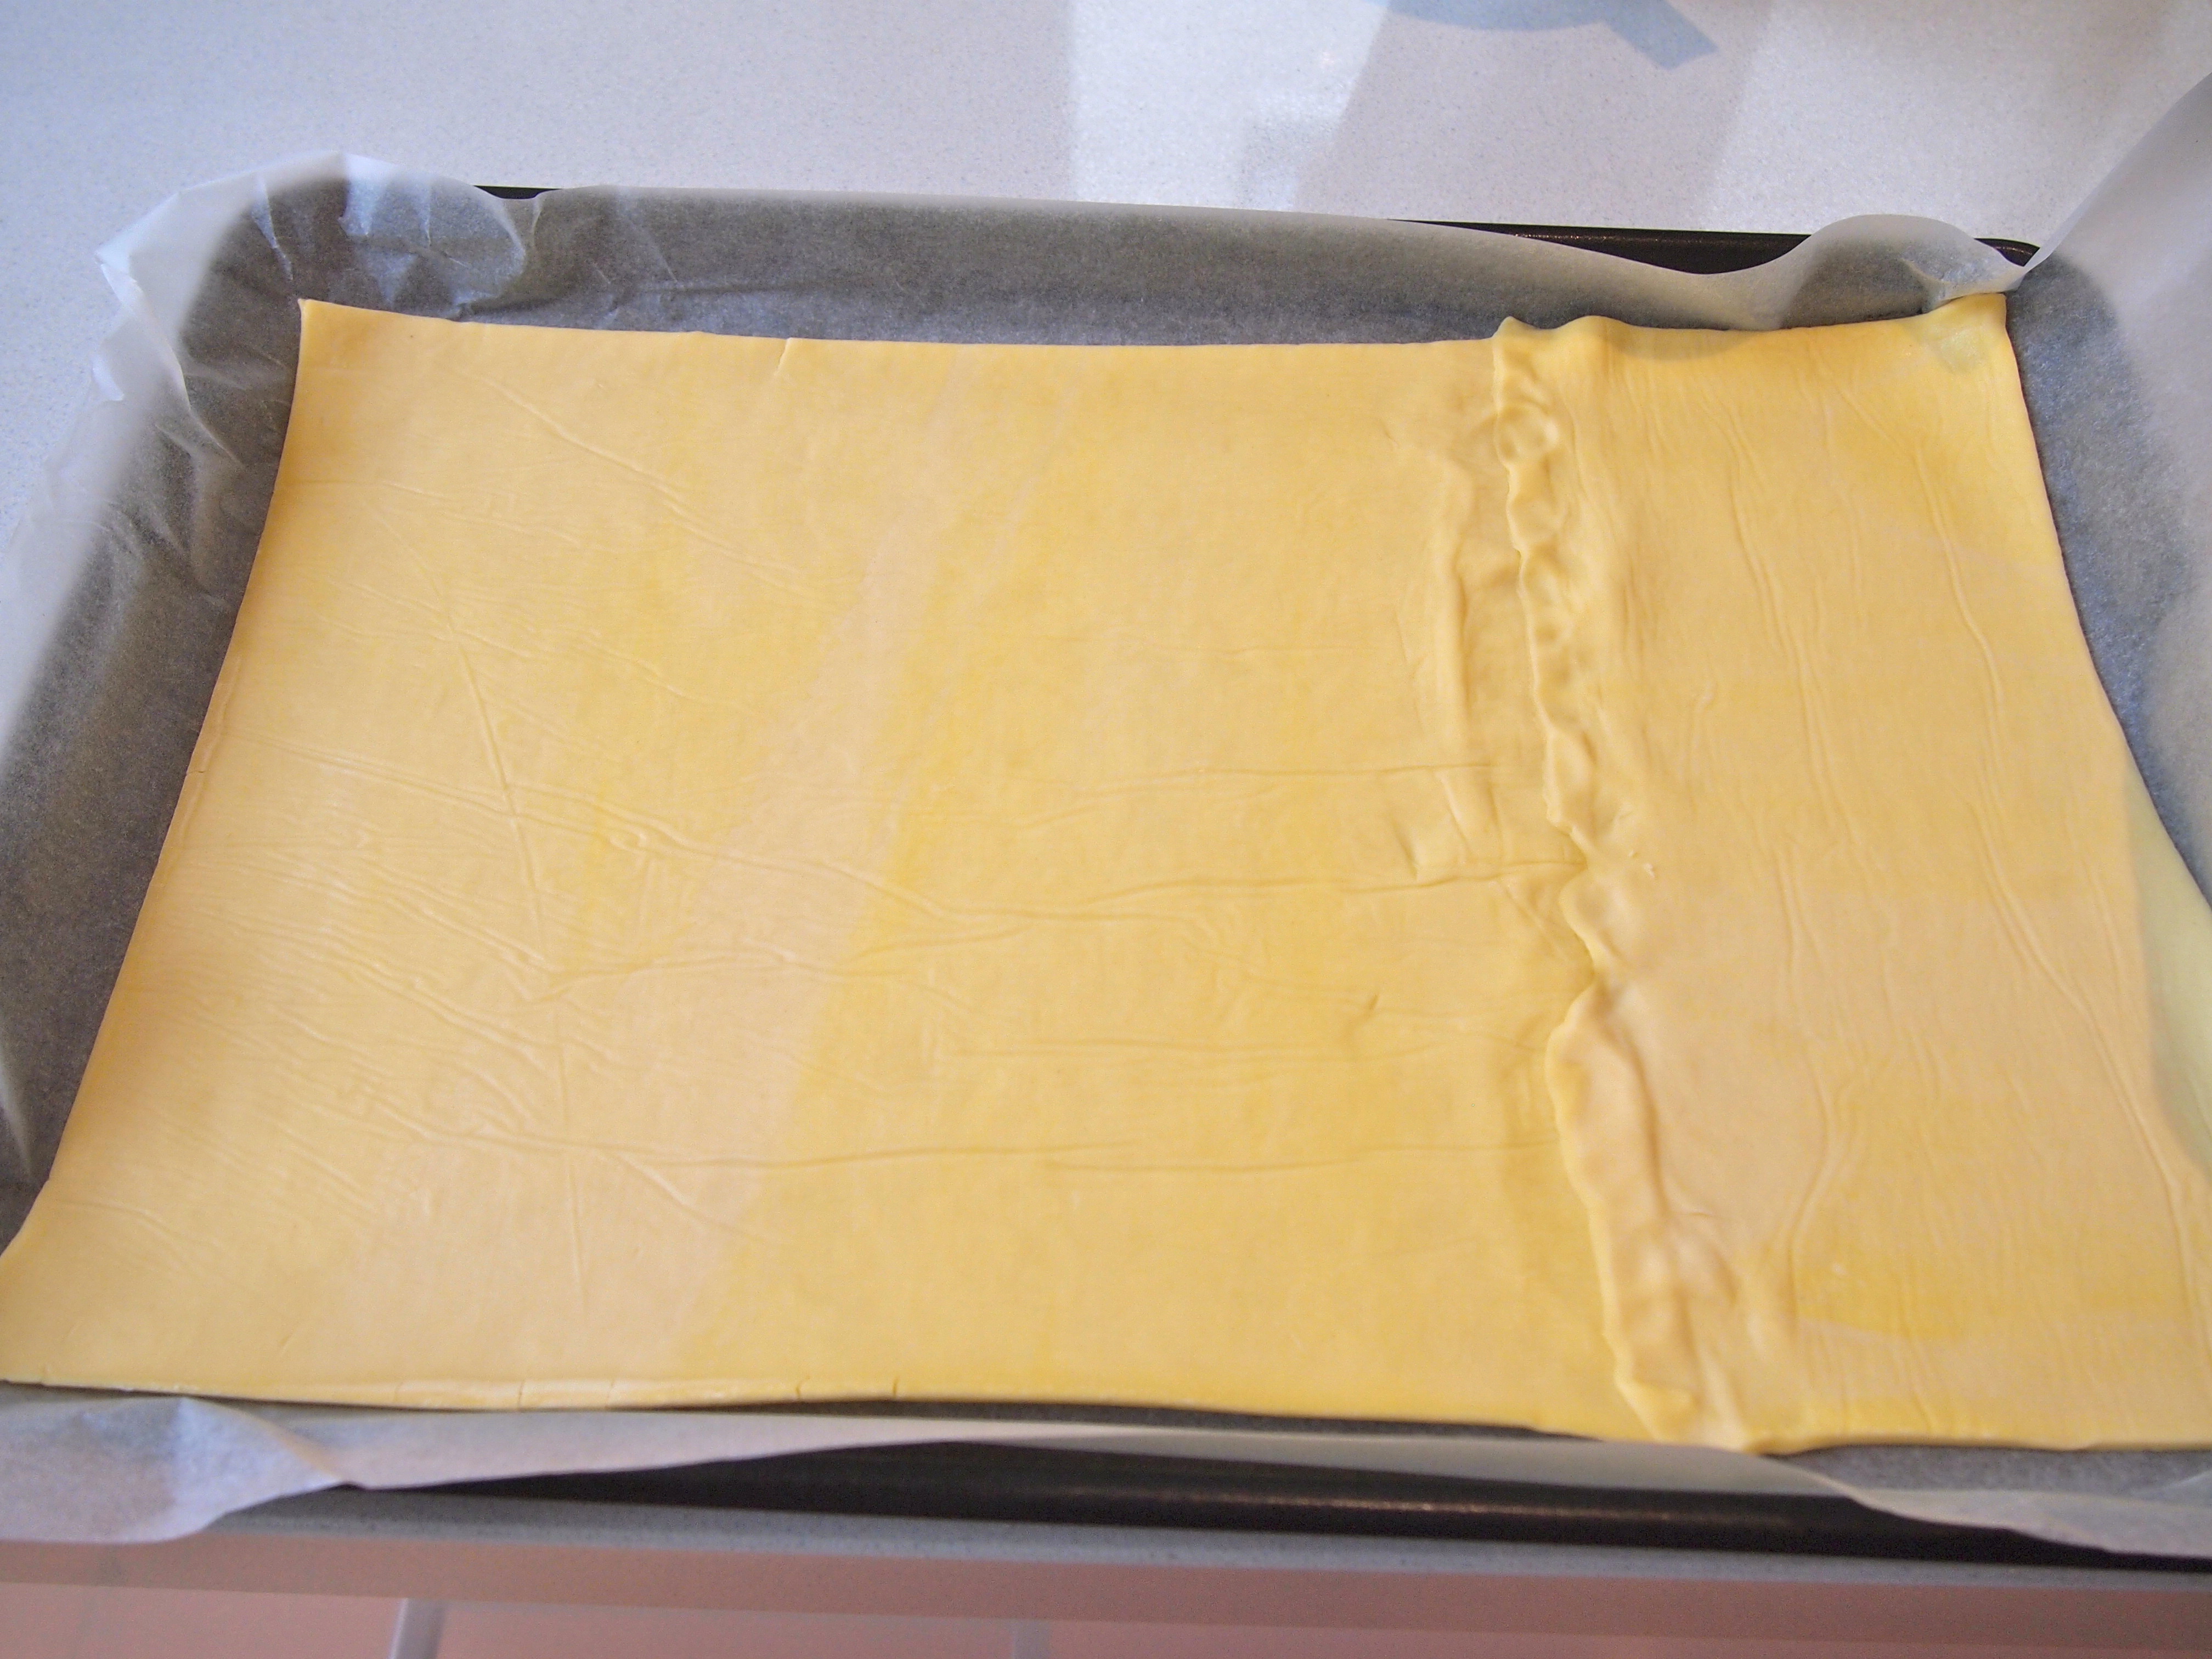
Heat oven to 200C. Line a rimmed baking sheet or jelly roll pan with parchment paper. The ideal size is a 10×15-inch jelly roll pan. If you’re using a block of pastry then roll it out on a lightly floured board to the size of the jelly roll pan. I used ready rolled puff pastry as it’s the only all butter pastry my supermarket sells. In which case you’ll need to do a bit of a cut and paste job as in the picture below. Carefully transfer the pastry onto the parchment paper and put back into the fridge while you prepare the apples.


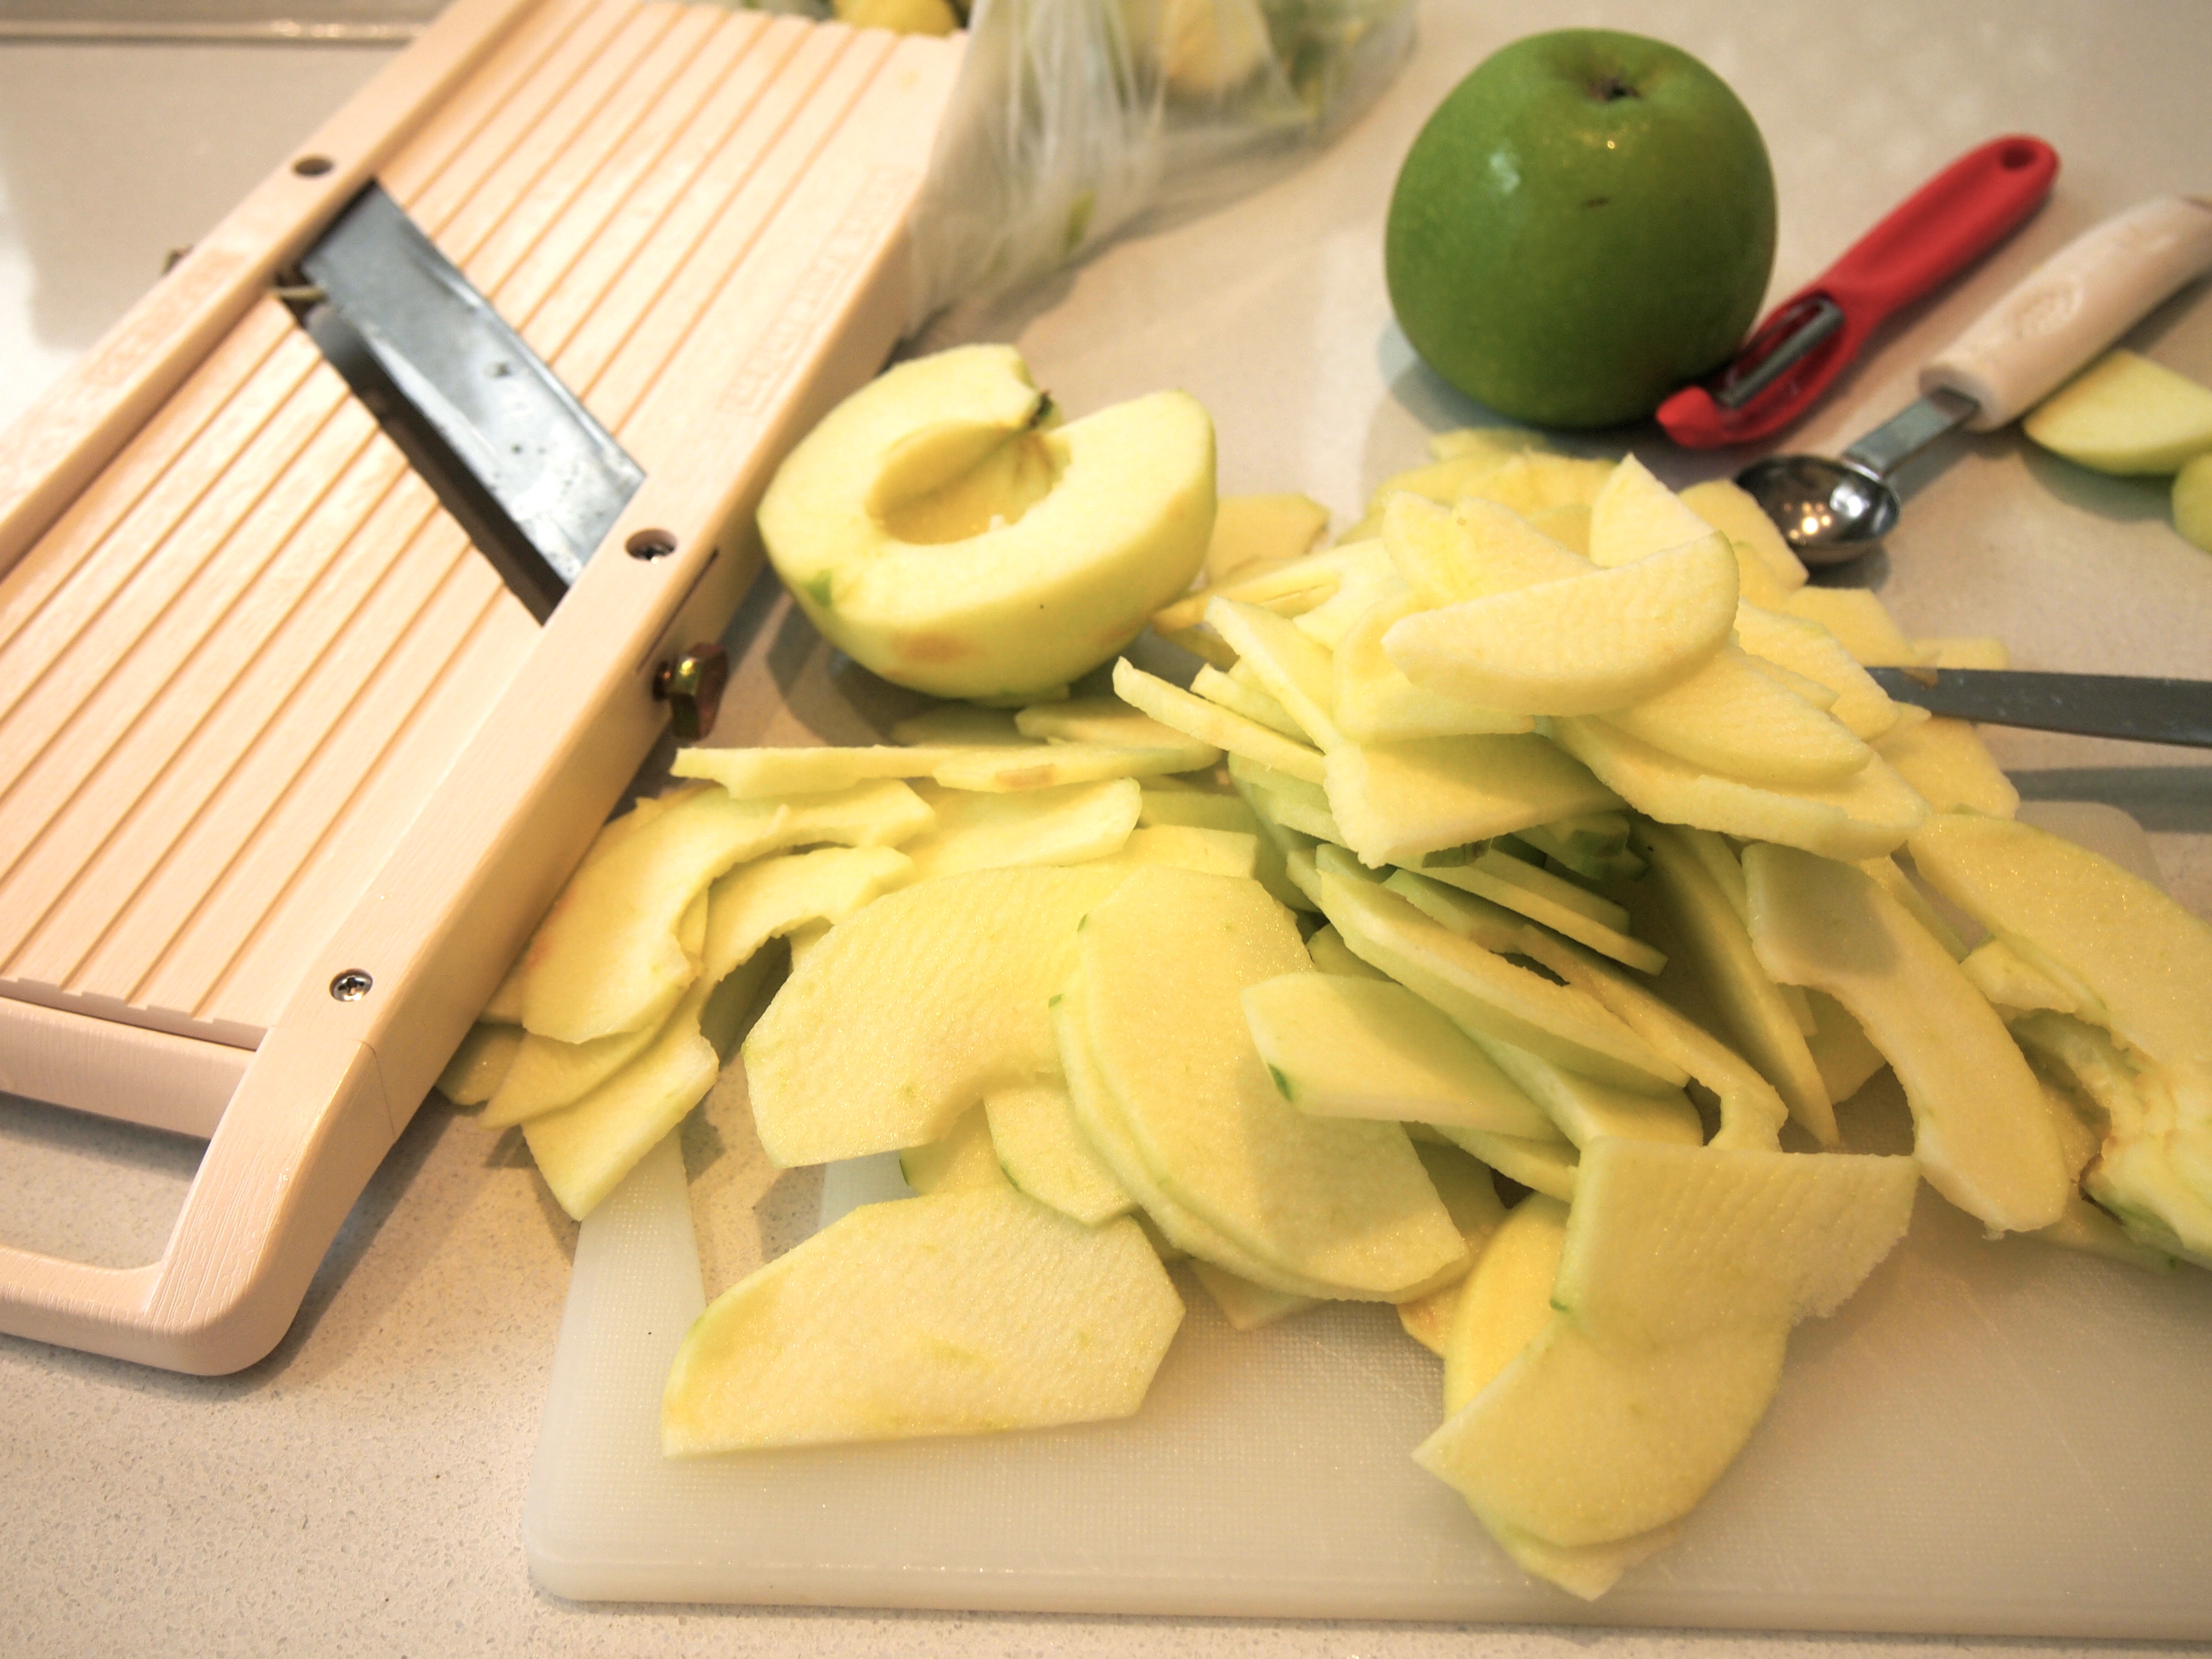
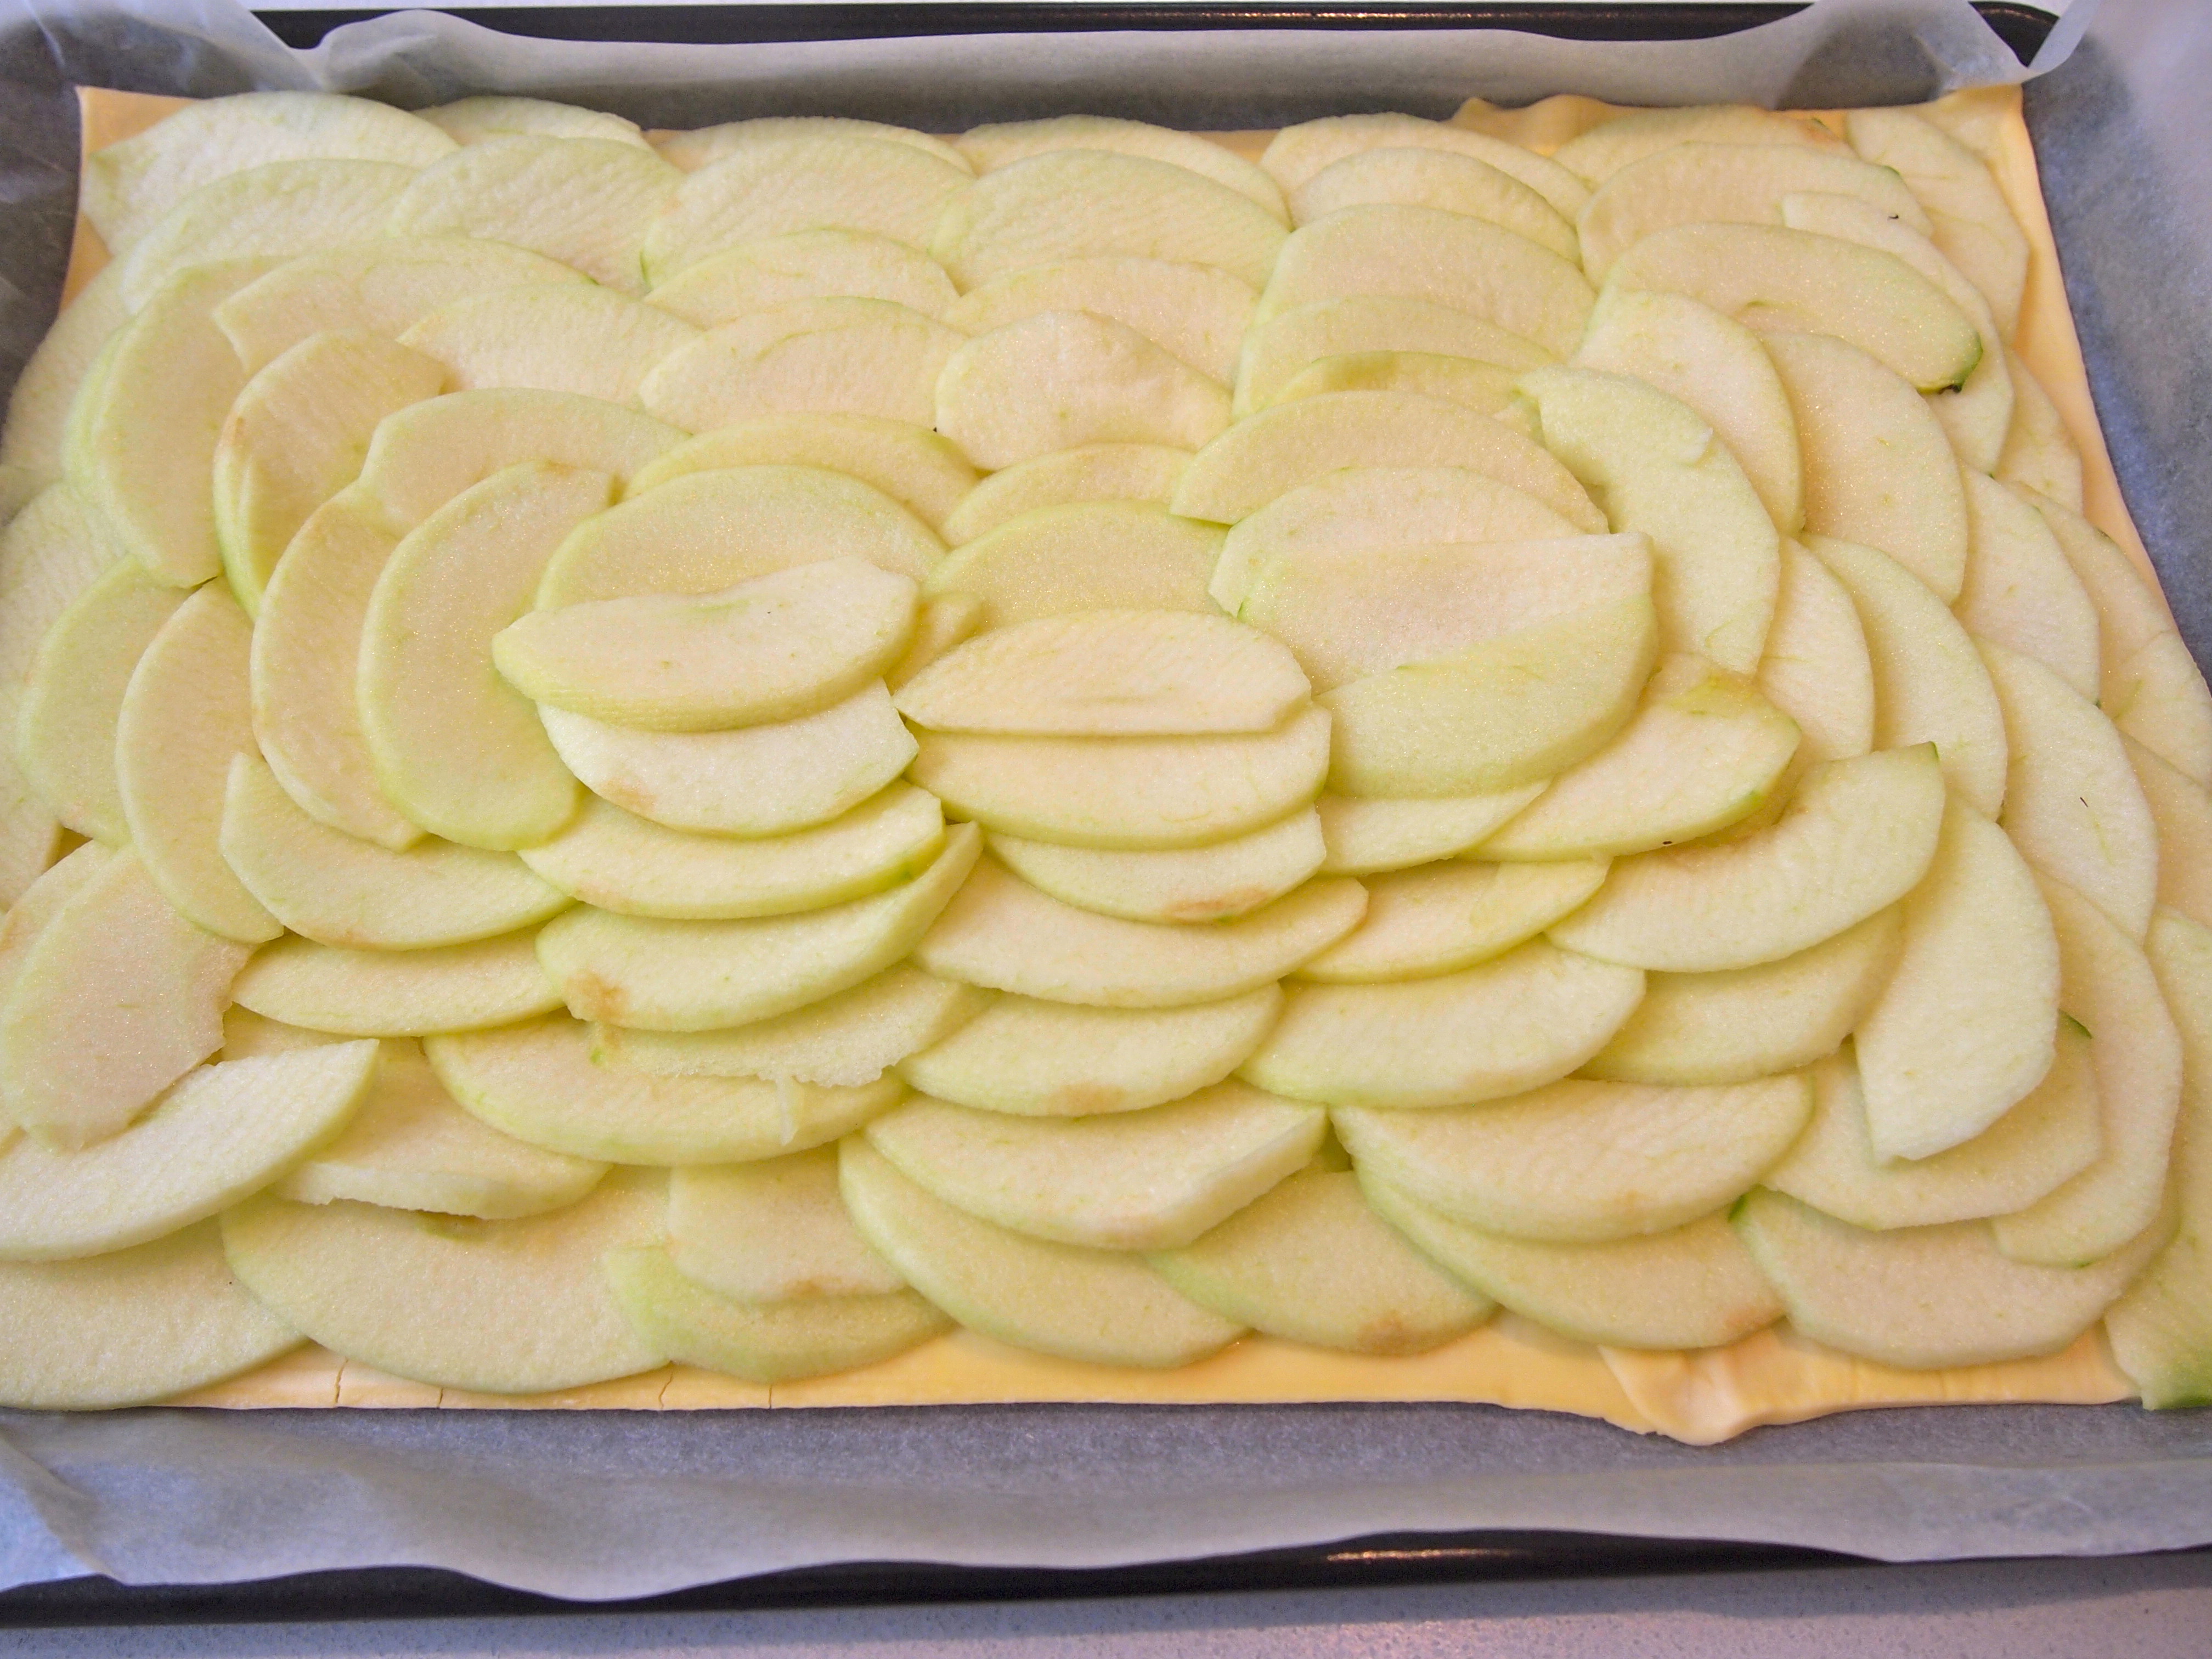
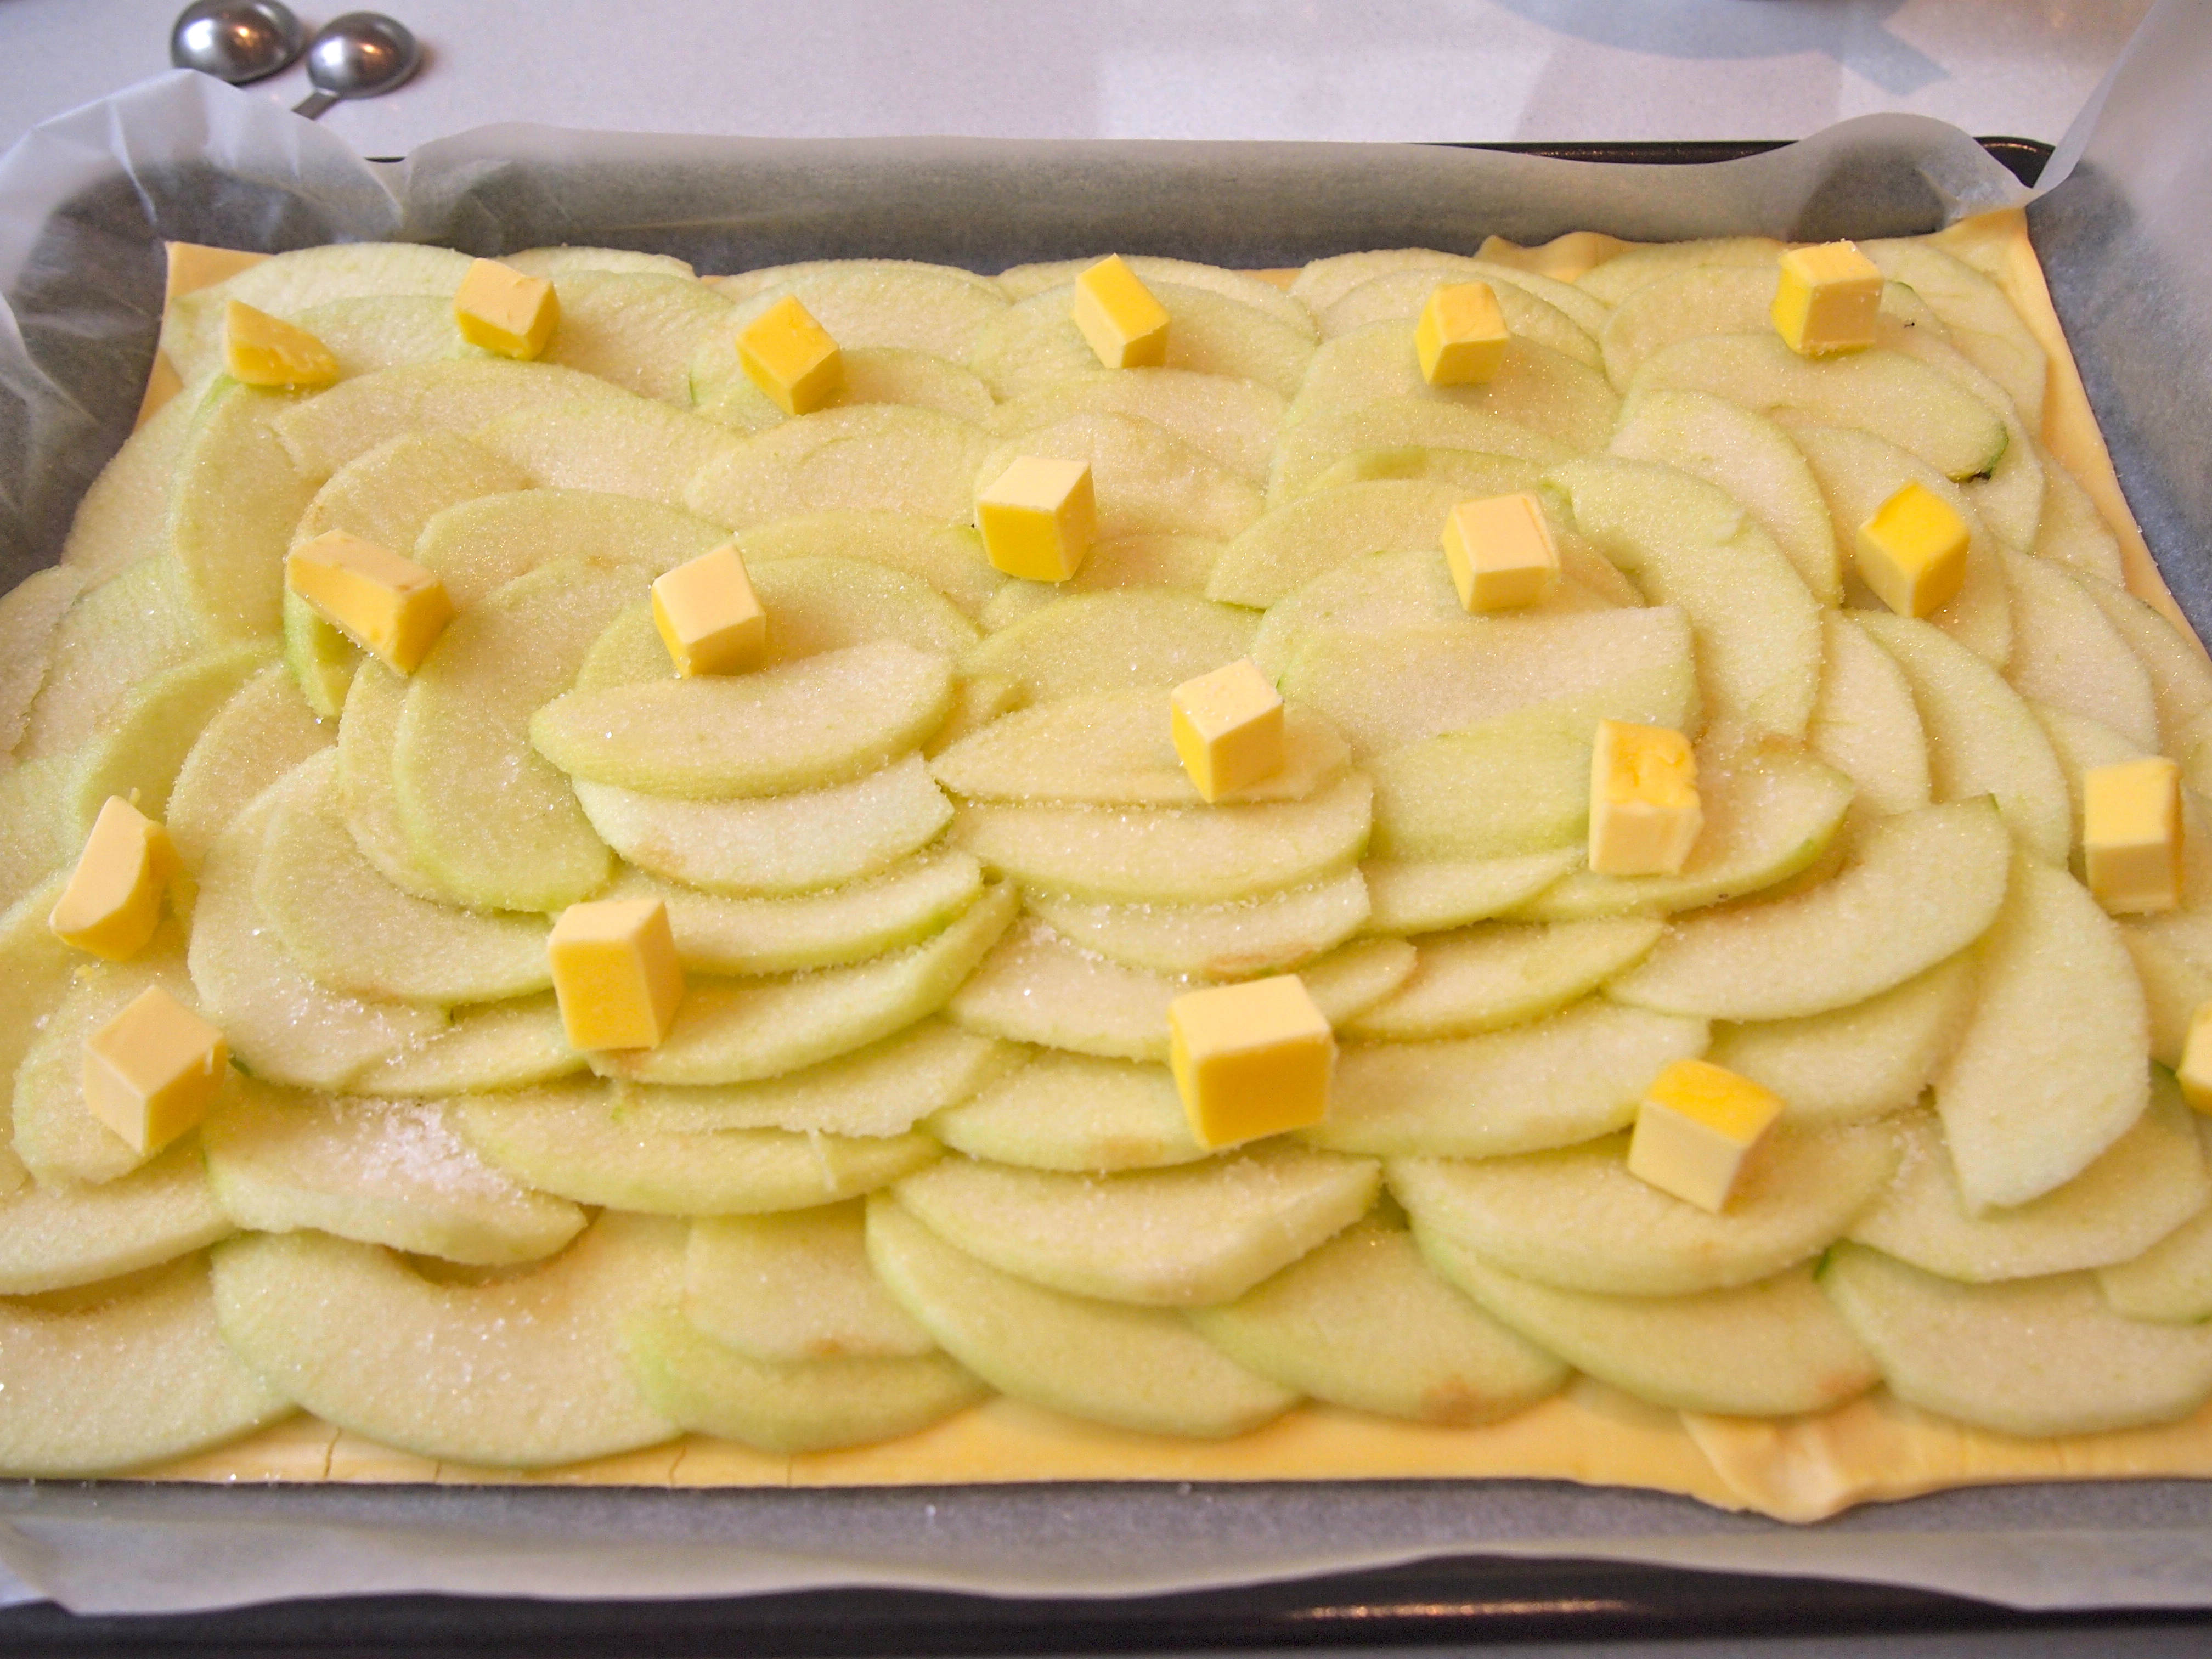
Peel the apples and cut them in half top-to-bottom. Remove the cores and stems (use a melon baller and/or a pairing knife). Slice the apples halves crosswise as thinly as you can with a knife, or to about 1/16-inch thickness with a mandoline. Remove the pastry from the fridge and fan the apples around the tart in slightly overlapping concentric rectangles — each apple should overlap the one before so that only a little bit of the previous apple will be visible — until you reach the middle. Sprinkle the apples evenly with the first two tablespoons of sugar then dot with the first two tablespoons butter.


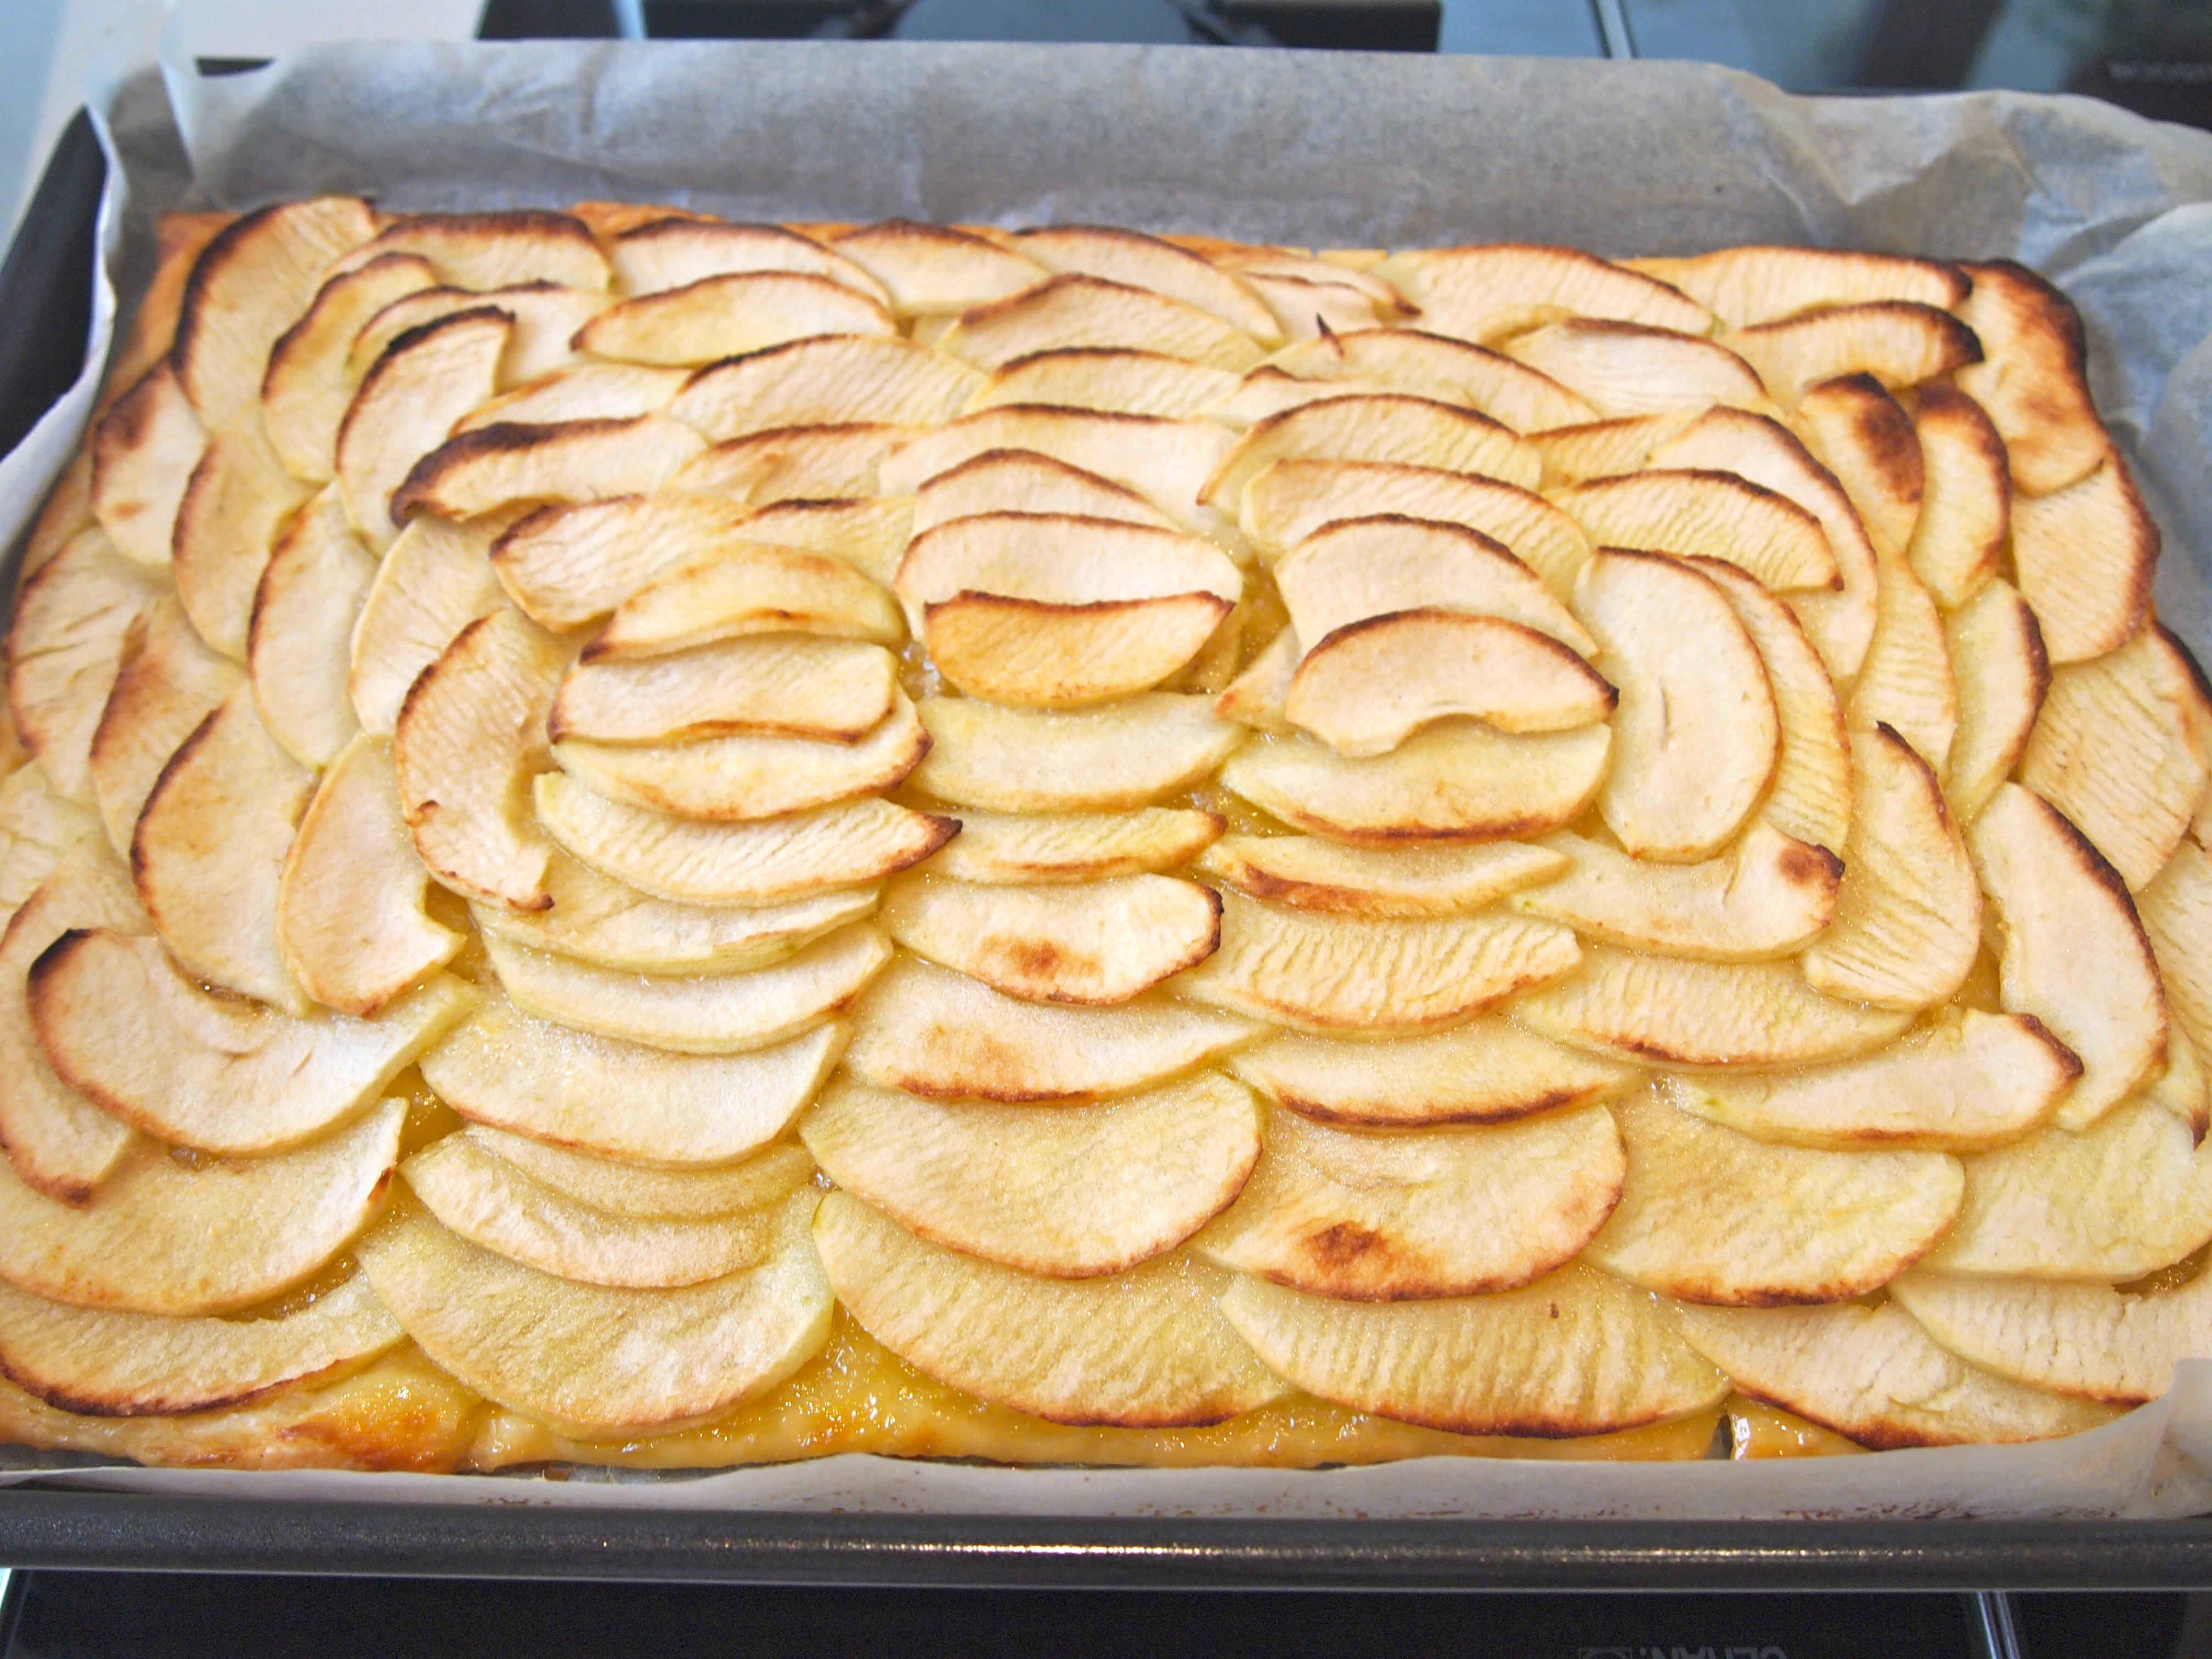
Bake for 30 minutes, or until the edges of the tart are brown and the edges of the apples begin to take on some color. If you sliced your apples by hand and they were on the thicker side, you might need a little more baking time to cook them through. The apples should feel soft, but dry to the touch.

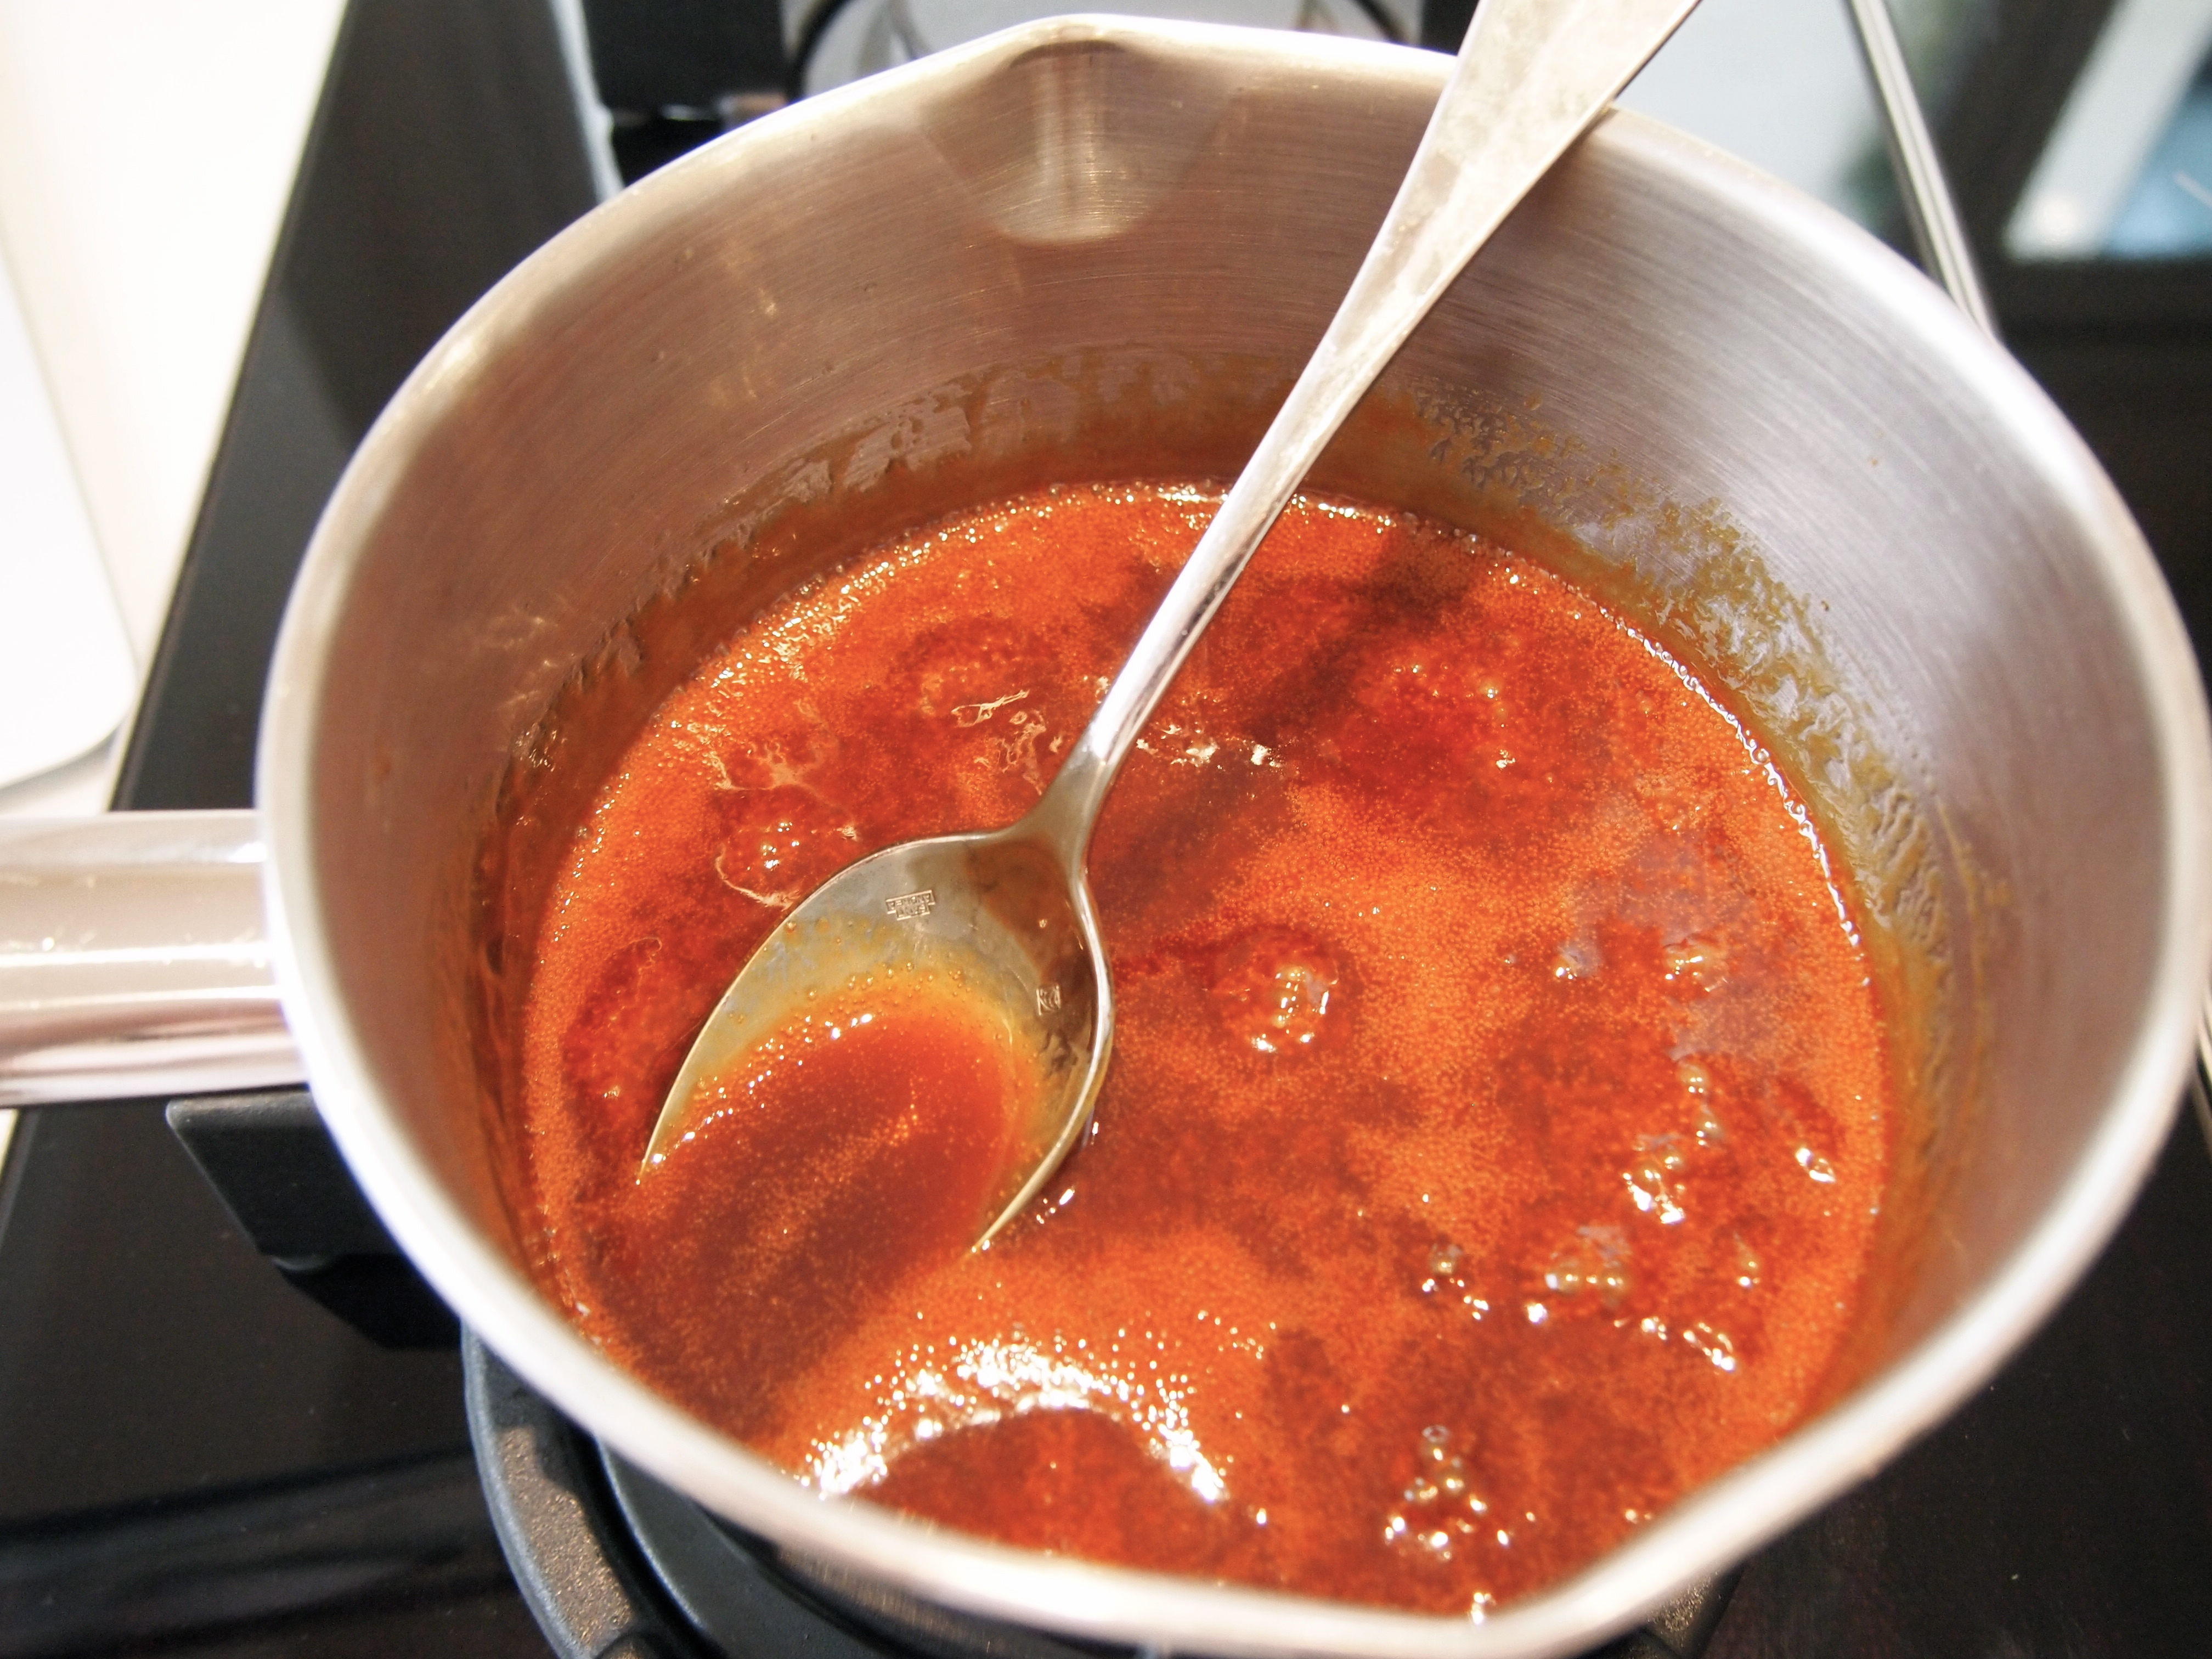
While the tart is baking make the glaze. In a small saucepan over medium-high heat, melt the last ¼ cup sugar, this will take about 3-4 minutes. Cook the liquefied sugar to a nice copper color, another minute or two. Off the heat, add the sea salt and butter and stir until the butter melts and is incorporated. Add the heavy cream and return to the stove over medium heat. Cook, stirring constantly, until you have a lovely, bronzed caramel syrup, just another minute, two at the most. Set aside until needed.


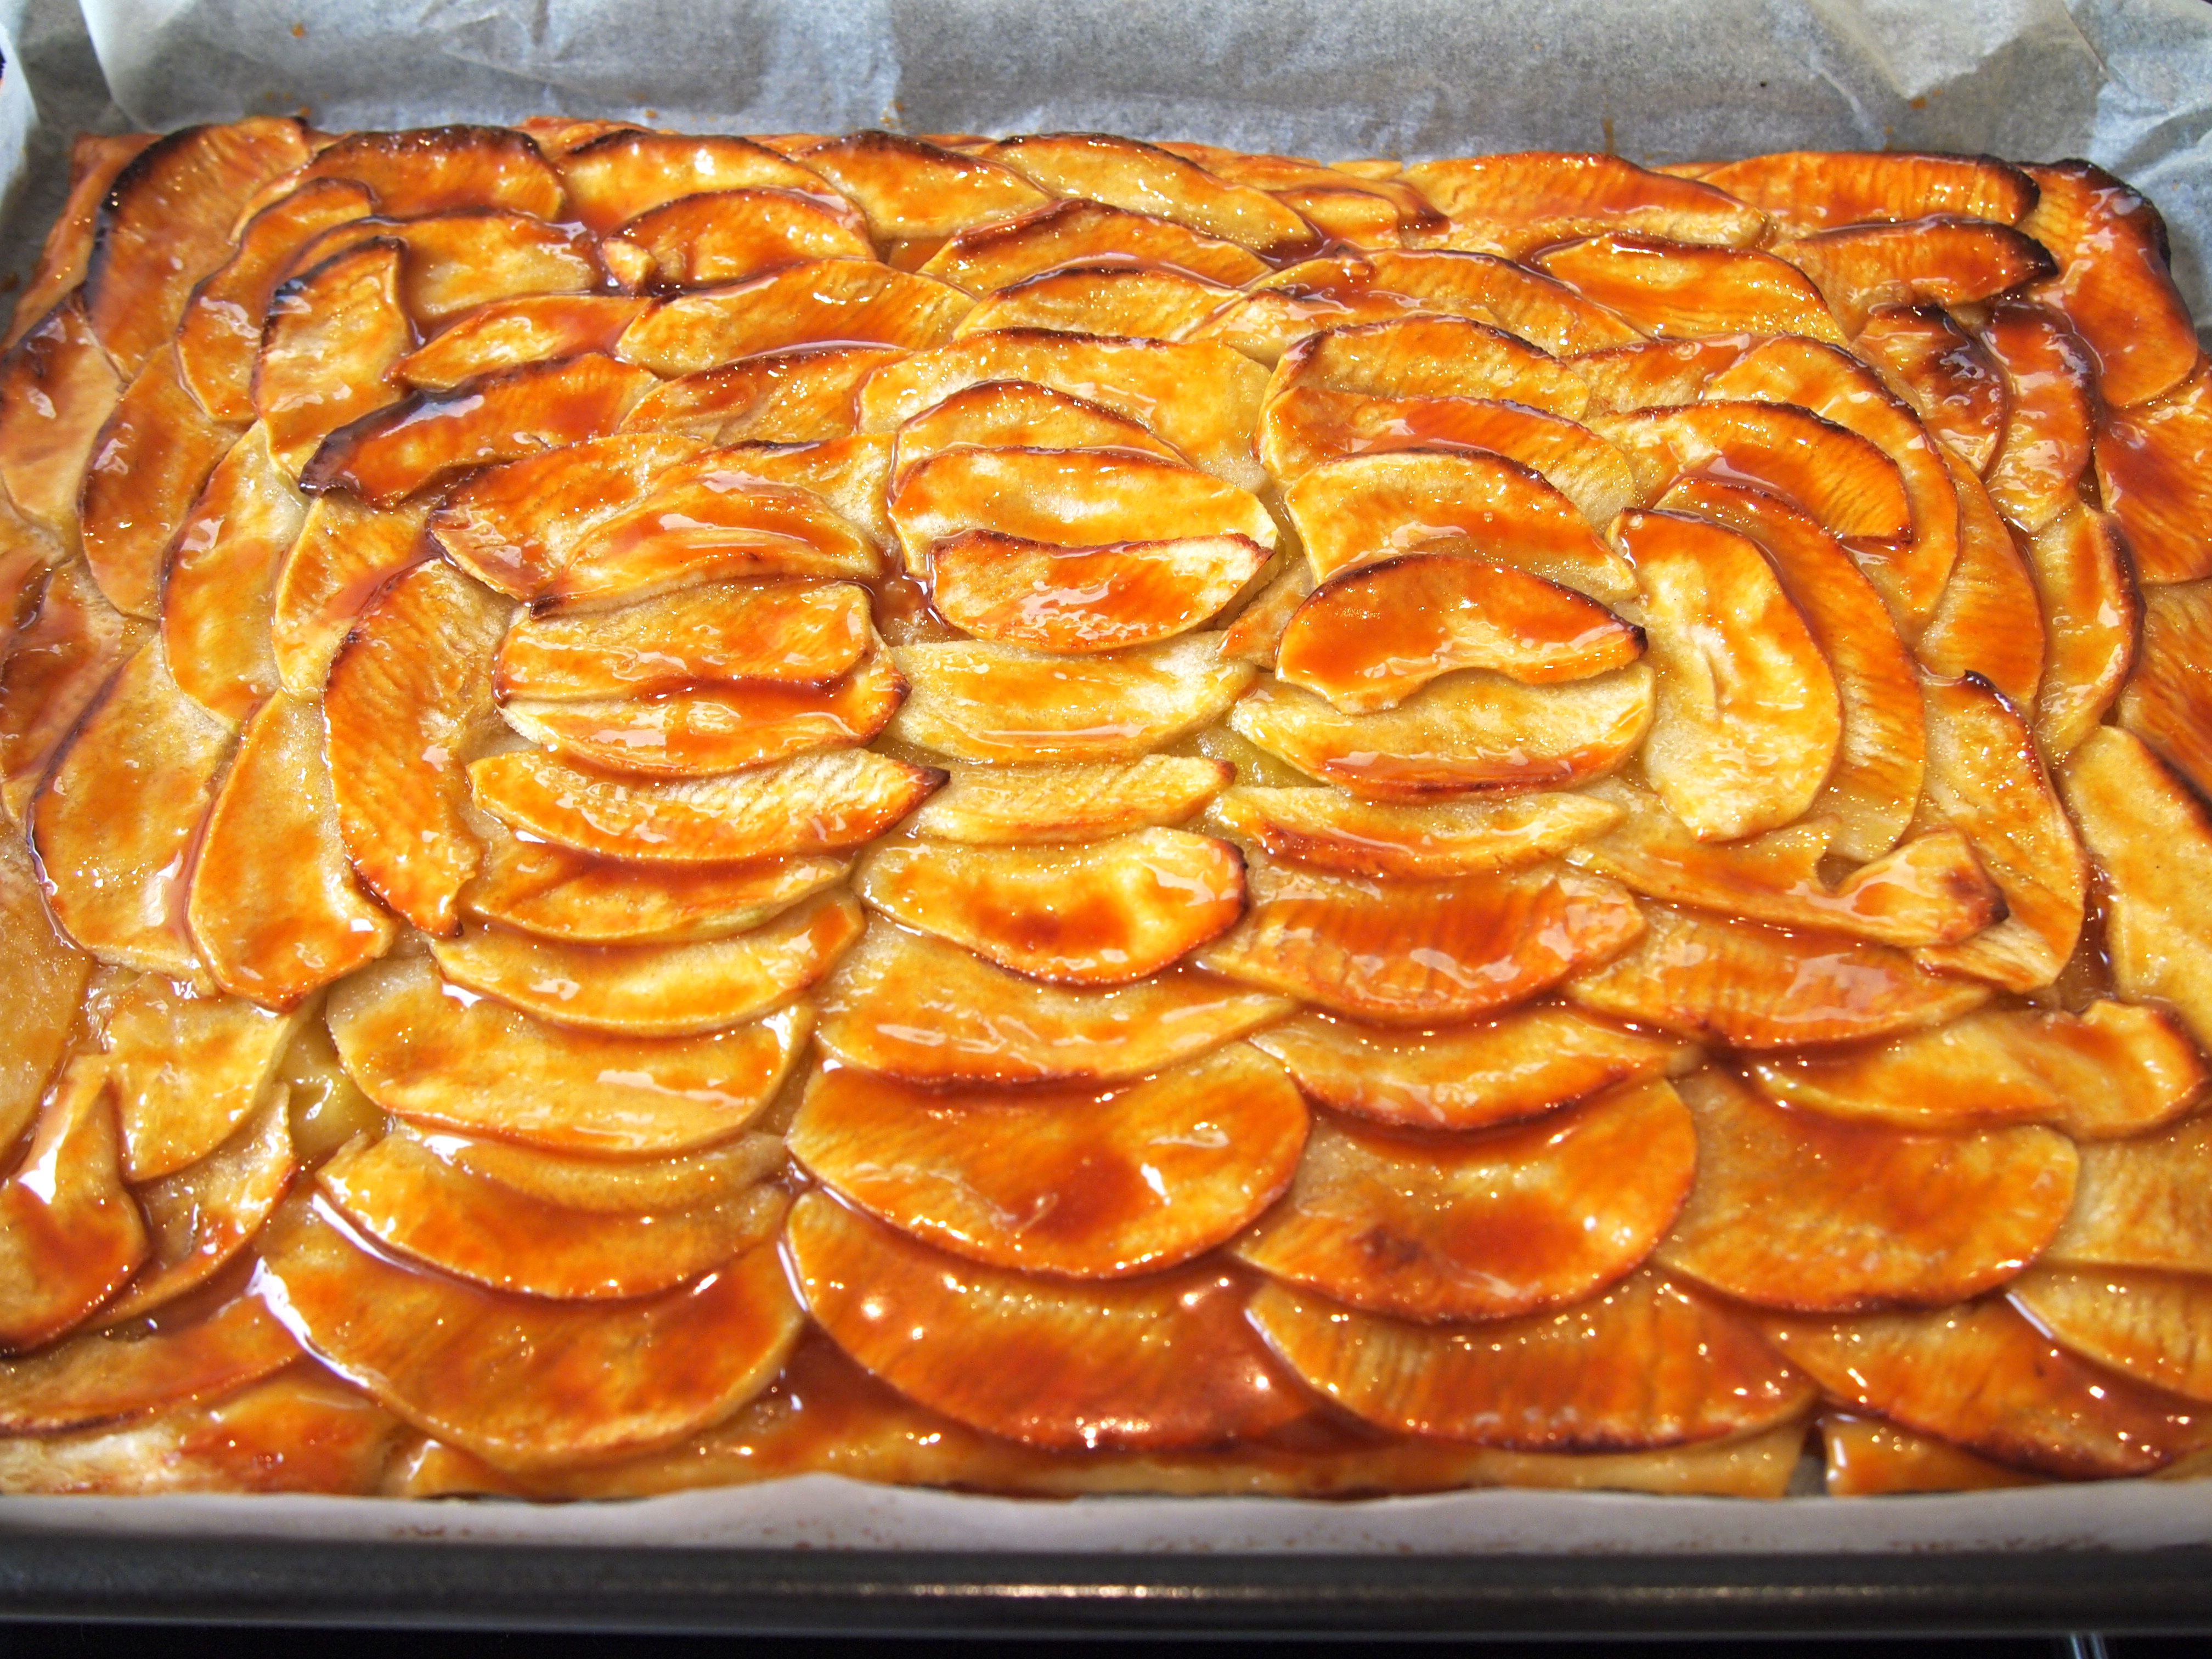
After the tart has baked, remove it front the oven. Using very short, gentle strokes, and brushing in the direction that the apples fan to mess up their design as little as possible, brush the entire tart, including the exposed pastry, with the salted caramel glaze. You might have a little leftover. Return the apple tart to the oven for 5 to 10 more minutes, until the caramel glaze bubbles. Let tart cool complete before cutting into squares. Serve plain, with coffee or tea, or with a scoop of vanilla ice cream, for dessert.

French Apple Tart with Salted Caramel Glaze

Feb 8, 2013
mustardwithmutton

3 comments

Tandoori Lamb Cutlets with Bombay Potatoes

Tandoori Lamb Cutlets with Raita  Oven Roasted Bombay Potatoes

Next time you feel like firing up the barbecue and want a break from the same old steak dinner I can highly recommend these tandoori lamb cutlets. I needed to provide a barbecue meat and salad dish to take along to a family gathering and I was trying to think of something a little different. I knew my sister was making some Asian style grilled chicken (a great recipe that I’ll post shortly) and I thought something in keeping with those Asian flavours would work well. My favourite Indian restaurant in Sydney serves fantastic tandoori lamb cutlets so I thought I’d try and recreate them and serve them with Bombay potatoes and some raita. Bombay potatoes are a lovely Indian side dish normally made with par boiled and cubed potatoes and mustard seeds which are pan fried with some other spices until crispy. I went down a slightly different, and I think easier, route by using baby potatoes and roasting them in the oven before introducing them to the spices in the frypan. The potatoes were crispier and didn’t become mushy, which can tend to happen if cooked in a frypan. The lamb cutlets were excellent and can easily be served on their own without the potatoes and the potatoes can also be served as an accompaniment for an Indian dinner or as a side dish to just about anything. I served it all one one big platter with the lamb cutlets placed over the potatoes and the chutney infused raita spooned over the cutlets – delicious!

Ingredients – Serves 6

For the Lamb Cutlets
3-4 lamb cutlets per person
½ cup yogurt
2 tablespoons honey
1 teaspoons ground cumin
1 teaspoon ground coriander
1 teaspoon tumeric
2 cloves of garlic, grated
1 inch piece of ginger, grated
1 teaspoon curry powder
1 teaspoon imitation saffron – this is instead of red food colouring and optional
2 tablespoons tomato paste
1 teaspoon smoked paprika
1 teaspoon garam masala
1 teaspoon salt
3 tablespoons vegetable oil

For the Bombay Potatoes
1kg baby potatoes, halved lengthways
¼ cup vegetable oil
3 teaspoons black mustard seeds
2 teaspoons mild curry powder
1 teaspoon garam masala
2 teaspoons grated fresh ginger
2 tomatoes, seeds removed and cut into thin wedges
150g baby spinach
Salt

For the Raita
2 cups Greek yogurt
2 Lebanese cucumbers, grated and excess water squeezed out
1 small clove of garlic grated
pinch of salt
1 heaped tablespoon mango chutney

Method

To make the lamb cutlets place all the ingredients except the lamb into a large bowl and mix until well combined. Add the lamb cutlets and stir them into the marinade making sure each cutlet is well coated. Leave to marinade over night if possible but even an hour or two will suffice. When ready to eat, heat the barbecue and cook the lamb cutlets for a couple of minutes on each side for medium, or longer if you prefer them well done.


To make the raita place all the ingredients into a bowl and mix to combine.


To make the bombay potatoes heat the oven to 200C.  Place the potatoes on a  baking tray and season with salt. Add 2-3 tablespoons of the oil to the potatoes and stir to coat well. Place in the hot oven and roast for 45-50 minutes until crisp and golden. Half way through the cooking time turn the potatoes over. When the potatoes are almost ready place a large frypan over a medium flame and add the rest of the vegetable oil. Add the mustard seeds and cook for 1 minute. Add the rest of the spices and ginger and cook for a few more minutes, adding more oil if the pan looks too dry. When the potatoes are ready add them to the frypan and stir to coat them in the spices. Add the tomatoes and spinach and cook until the spinach has wilted.  Taste for seasoning and add more salt if necessary.

 OLYMPUS DIGITAL CAMERA 

To serve place the Bombay potatoes onto a large platter.  Place the cutlets over the potatoes and top each cutlet with a little raita and serve the rest at the table.

Tandoori Lamb Cutlets with Bombay Potatoes

Feb 5, 2013
mustardwithmutton

no comments

Simon Hopkinson’s Baked Red Peppers

Simon Hopkinson's Piedmontese PeppersThis recipe by Simon Hopkinson, sometimes referred to as Piedmontese Peppers, has been around for a very long time. Delia Smith even featured it in her hugely successful Summer Collection cook book published back in 1993. Somehow though the recipe never really grabbed me until I saw Simon Hopkinson make it on his recent TV series The Good Cook and I knew I had to make it fast. I’m so glad I did and yet so upset that I’ve missed out on cooking and eating this for all these years! I say missed out on cooking it because it’s one of those dishes that for some undefinable reason is actually very soothing and therapeutic to cook. Maybe it’s that whole European thing of taking a handful of the freshest in-season ingredients and turning them into something so much greater than the sum of their parts. This is amazing served on it’s own with some crusty bread for lunch or a light supper. It’s also great as a side dish to some roasted or grilled meats. I cooked the recipe below for the two of us and had half the peppers left over so a few nights later I sliced them up and turned it into one of the best pasta dishes we’ve had in a very long time. There are two stipulations I would recommend for this dish; use the very best olive oil and anchovies you can afford. And please don’t skip the anchovies. Even if you’re not a fan just try them in this recipe but only try them if they are excellent quality. i.e. not the ones that are sold in glass jars. They’re fine for cooking but this requires something a little more special so Ortiz anchovies would be excellent or I’ve recently found a brand called Rizzoli which are just about as good and slightly less expensive.

Ingredients – Serves 4 as a side dish, or 2 for a light meal

2 red peppers, stalks left on (for decoration), cut lengthways in half, seeds removed
4-6  baby truss tomatoes
4 garlic cloves, sliced
5-6 tbsp extra virgin olive oil
Salt and freshly ground black pepper
8 best quality canned anchovies
Small handful fresh basil

Method

Preheat oven to 190C. Pour boiling water over the tomatoes, leave for 15 seconds, carefully remove from the water and peel off the tomato skins. Place the halved peppers into an ovenproof dish, cut-side up. Place the garlic inside the peppers and then fit the tomatoes inside too, pushing them gently into the space. Add a good pinch of salt and a grinding of freshly ground black pepper. Spoon over the olive oil and then place into the oven. The recipe calls for 5-6 tablespoons but really you can’t go wrong with adding a bit more.


Bake for about 45 minutes to one hour, turning the heat down a little if you notice any excessive scorching of the peppers. Once they are nicely softened and have slightly collapsed, remove the peppers from the oven. Criss-cross each pepper half with an anchovy, baste with the oily juices. Top with basil leaves and serve warm or at room temperature.

Simon Hopkinson's Baked Red Peppers

Feb 1, 2013
mustardwithmutton

1 comment

Hot Crab Dip – A Great Snack for Super Bowl

Perfect Super Bowl Snack - Hot Crab DipThis is another appetiser that’s very quick to throw together and with Super Bowl just around the corner a perfect snack to add to your party table. Hot, gooey and cheesy this dip is a real crowd pleaser. I normally serve this with thinly sliced and toasted baguette but any firm cracker will do. It’s quite rich so a little bit of dip goes a long way and the quantities below would be enough, as a pre dinner appetiser, for at least 4-6 people. I use pre-cooked and vacuum packed crab which is readily available here in supermarkets and fishmongers and for a dip like this it works just fine. Try to avoid using canned crab meat if you can as it has an inferior flavour. The alternative is fresh crab meat which can cost a pretty penny in Sydney but if your lucky enough to live somewhere where crab meat is cheap and plentiful then by all means use it. If you’re looking for more Super Bowl snack ideas try this and this.

Ingredients

250g cream cheese, softened
¼ cup mayonnaise
1 tablespoon lemon juice
¼ teaspoon tabasco
3 spring onions, white and green parts finely chopped
180g cooked crab meat
½ teaspoon each salt and freshly ground pepper
½ cup grated gruyere cheese
3 tablespoons freshly grated Parmesan cheese
Cayenne pepper

Method

Heat oven to 200C. Mix cream cheese and mayonnaise in a bowl until well combined. Stir in lemon juice, tabasco and spring onions. Fold in crabmeat, gruyere cheese, salt and pepper. Spread in shallow baking dish. Sprinkle with the parmesan and a light dusting of cayenne pepper. Bake for 15 – 20 minutes until bubbly and golden. Serve hot or warm with sliced bread or crackers.


 Perfect Super Bowl Snack - Hot Crab Dip

Jan 29, 2013
mustardwithmutton

no comments

Green Chicken Curry

Thai Green Chicken CurryI’ve been on a bit of a Thai kick lately. I can’t seem to get enough of those spicy, sour, tangy flavours.  This is the curry I made to go alongside the Thai beef salad I recently posted and it encapsulates all those flavours I love in Thai cuisine. I usually use ready made curry paste, Mae Ploy or Maesri brands I find are the best. If I have the time I love to make my own paste from scratch but unfortunately that doesn’t happen too often so I always have sachets of good quality ready made paste in the pantry and they work just fine. One ingredient which I think is a must is fresh kaffir lime leaves. The aroma they impart is really crucial and makes for a much more authentic tasting curry, be it red or green. Whilst lime leaves are readily available in supermarkets and green grocers, Thai apple and pea eggplants are not and these are the usual vegetable additions to a green curry. I didn’t have time to go to a Thai grocer so I used baby corn and Japanese eggplant instead which will do in a pinch but if you’re able to lay your hands on Thai eggplants, pea or apple, then grab them for the next time you want to make a green curry. The slightly bitter note they contribute is very pleasing against all the other flavour elements. Unlike Indian curries which can take a while to make, Thai curries are relatively quick, especially with a ready made paste. Dinner can be on the table in less than an hour which makes this a great mid week meal.

Ingredients – Serves 4

1⁄3 cup coconut cream
3 tablespoons green curry paste
1 stalk lemongrass, tough outer leaves removed and tender white section finely sliced
700g chicken thigh fillets, cut into bite size pieces – you can use breast but I find thai fillets more tender and flavourful
2 tablespoons palm sugar
3 tablespoons fish sauce
Juice of 1 lime
1 x 400ml can coconut milk
6 kaffir lime leaves, torn in half to release their aroma
3 Japanese eggplant, cut into 1 inch slices
10 baby corn
Garnishes
Fresh Thai basil leaves
finely sliced green chillies

Method

Place the coconut cream in a wok or saucepan over medium heat and add the curry paste and sliced lemongrass. Cook, stirring until the curry paste starts to release oil and has become very fragrant. This should take about 5-8 minutes but be careful to not scorch the paste, lower the heat if it looks like it’s cooking too fiercely. Add the chicken and stir to coat it well in the paste and cook until it’s just changed colour. Add all the other ingredients except the eggplant and corn and bring to the boil. Reduce the heat to a low simmer and cook uncovered for 20 minutes.


Add the lime leaves, eggplant and baby corm and cook for a further 15-20 minutes.  If the sauce looks like it has reduced too much then cover it for the final stage of cooking, you can also add some hot chicken stock if you like it looser. Just before serving check the seasoning and add more lime juice, sugar or fish sauce to create a good balance of flavours. Serve with steamed jasmine rice and garnish with fresh thai basil leaves and finely sliced green chillies.

Thai Green Chicken Curry

Jan 22, 2013
mustardwithmutton

3 comments

Mini Wonton Wrapper Quiches

Spinach & Fetta Mini Wonton Wrapper Quiches There’s nothing I love more than having little bites of something delicious with drinks before dinner. Obviously this isn’t something I indulge in everyday but if we have friends or family over for dinner then it’s a given, and truth be told, it’s my favourite part of the meal. So I’m always looking for easy, no stress appetisers and these little mini quiches are just that. No matter how many I make, and I make a lot, they always disappear in a matter of moments. Using wonton wrappers as the pastry case makes them so easy. I’m a huge fan of wonton wrappers, there seems to be no end of uses for them! You can use any variety of fillings you want – the ones I make most often are leek and Gruyère and spinach and fetta but I’m keen to try mushroom and truffled pecorino next.

Ingredients – Makes 30 mini quiches
Spinach & Fetta – Leek & Gruyère

Olive oil spray
2 tablespoons melted butter
Wonton wrappers, round or square
2 tablespoons melted butter
Olive oil
250g baby spinach leaves
3 spring onions, white and green parts finely sliced
1 leek, cleaned trimmed and diced
1 large clove of garlic, minced
¾ cup crumbled fetta
¾ cup grated Gruyère
Salt & freshly ground black pepper
1 cup cream
3 large eggs

Method

Preheat oven to 180C. Spray mini muffin tins well with olive oil spray. Brush one side of about 30 wonton wrappers with butter and gently press and pleat a wrapper into each muffin tin, buttered side up. Bake until golden brown, 6-8 minutes. Remove from the oven and let cool. In a medium size frypan heat a little olive oil and add the spinach and spring onions. Season with salt and pepper and cook over medium heat until the spinach has wilted. Remove from the heat and drain as much liquid as possible and place in a bowl to cool. In the same fry pan heat some more olive oil and fry the leek and garlic until very soft. Season with salt and pepper and set aside to cool. Once the vegetable mixtures have cooled, mix in the fetta with the spinach and the gruyere with the leeks. To make the custard whisk together the eggs and cream until well combined. Season with salt and pepper.


To assemble, place the cooked wonton shells on a baking sheet and add a teaspoon or two of each filling into the wonton case. Pour the custard mixture into a jug and carefully pour enough into each case to fill to the top. Bake for 10-15 minutes until cooked through and golden.  Leave to rest for about 5 minutes before serving.

Leek & Gruyere Mini Wonton Wrapper Quiches

Jan 18, 2013
mustardwithmutton

2 comments

Thai Grilled Beef Salad – Yam Neua

Thai Grilled Beef Salad - Yam NeuaThis is one of my favourite Thai salads.  It has so many different levels of flavour and texture – tender grilled meat, large handfuls of fragrant mixed herbs, crunchy shallots and cucumbers all topped with a spicy dressing that’s sour, sweet, tangy and really delicious. If you use lean steaks it’s virtually fat free so if you’re after a healthy, no guilt, flavour packed meal then this is just the ticket. Getting the balance of flavours in the dressing right is crucial and makes the difference between an okay Yam Neua and a great one, so be vigilant about tasting it and adjusting with more lime juice, fish sauce or palm sugar to make it just right and by that I mean it should be quite acidic and sour. It’s very traditional to top the salad with ground roasted rice.  I unfortunately didn’t have any glutinous rice at home but it’s an extra step well worth taking and adds another level of texture. Just dry fry a handful of glutinous rice until golden brown then grind to a fine powder in a spice grinder and sprinkle over the salad just before serving. Yam Neau can be served as part of a shared meal, alongside a curry and perhaps a stir fry or on it’s own with some steamed jasmine rice.

Ingredients – Serves 4

2 good size sirloin steaks
2 tablespoons sweet soy sauce
Salt & freshly ground black pepper
2 Lebanese cucumbers, cut into slices on an angle
2-3 shallots, finely sliced
1 lemongrass, tough outer leaves removed then very finely sliced
8 fresh kaffir limes leaves, put on top of one another, rolled into a tight cigar and then very finely shredded
3 coriander roots, washed well and finely sliced
2 cups of mixed herbs consisting of mint leaves, coriander leaves and Thai basil
1 red chilli, finely sliced on an angle – deseeded if you don’t want it too hot
13 cup fresh lime juice
3 tablespoons fish sauce
1½ tablespoons palm sugar
1 large clove of garlic, grated
½ teaspoon ground chilli powder

Method

Season the steaks well with salt and pepper, pour the sweet soy over them and rub into both sides of the steak. Leave to marinade for 30 minutes or longer. Whilst the steaks are marinading prepare the dressing by mixing the lime juice, fish sauce, palm sugar, garlic and chilli powder in a small bowl.  Stir well to combine, making sure the palm sugar has dissolved.  Taste and adjust to achieve a good balance of salty, sweet, sour and spicy.  Place the cucumbers, herbs, shallots, lemongrass, lime leaves, coriander roots and red chilli on a large platter. Pour a little of the dressing over and gently mix with your hands.


Heat a ridged griddle pan (or barbecue) over high heat.  Add the steaks and cook for a couple of minutes on each side for medium rare – or longer if you prefer your meat well done. Leave to rest for at least five minutes then thinly slice against the grain.  Add the meat to the remaining dressing and then arrange the slices over the salad.  Drizzle over the remaining dressing and once again, using your hands, mix lightly to combine everything. Serve while still warm.

Thai Grilled Beef Salad - Yam Neua

Jan 15, 2013
mustardwithmutton

no comments

I Can’t Believe They’re Not Fried Buffalo Wings

Super Crispy Oven Baked Buffalo WingsA lot of people outside America might not be familiar with Buffalo wings but once you’ve tried them you’ll understand why they’re such an institution in the States. These chicken wings were created in the mid 1960’s in Buffalo New York, most say at the Anchor Bar but there seems to be some dispute over this. Traditional Buffalo wings are sectioned chicken wings that are not breaded, but deep fried and then coated in a vinegar based chilli sauce and butter. Served alongside blue cheese dip and celery sticks it’s a winning combination and a must do appetiser for any party, especially if it involves football on the television!  Now I’m not a fan of deep frying at home and lets face it chicken wings are pretty unhealthy to begin with so this recipe cuts down some of the guilt but none of the flavour. Buffalo wing purists look away now because these wings are floured and then oven baked with no extra oil.  They come out super crispy and the flour on the wings creates nice crusty crevices for all that hot sauce and butter to cling to. Sound good? You’re right , they are and if you didn’t know they weren’t deep fried you’d be none the wiser. If you live in Australia you can lay your hands on Franks Hot Sauce, which is the hot sauce preferred by most people for Buffalo wings, from David Jones Food Halls or buy it on line from www.usafoods.com.au

Ingredients – Serves 2 -3   

8 organic chicken wings, sectioned into 3 and the wing tips discarded
½ cup of plain flour
Salt and freshly ground black pepper
1 tablespoon olive oil
½ cup of Franks Hot Sauce – either the Traditional or the one made for Buffalo wings
25g butter
1 teaspoon worcestershire sauce
¼ – ½ teaspoon of Cayenne pepper if you like it extra spicy – I used the Franks hot sauce for Buffalo wings and found it needed some extra kick
Celery sticks

Blue Cheese Sauce
180g strong blue cheese, crumbled
½ cup mayonnaise
¼ cup sour cream
1 tablespoon lemon juice
1 tablespoon vinegar
Salt to taste

Method

To make the blue cheese dip place the cheese into a bowl and using a fork mash it to form a paste.  Add all the other ingredients, bar the salt and whisk to combine well. Taste and add more salt if necessary.


To make the wings preheat oven to 200C. Drizzle the oil onto a baking sheet and spread to coat the bottom. Rinse the chicken wings and pat dry.  Season well with salt and pepper and coat each wing in flour.  Place on the baking sheet and bake for 25 minutes.  Turn the chicken pieces over and bake for a further 15 minutes until both sides are golden and crispy. Whilst the wings are cooking place the hot sauce and the butter in a small saucepan and heat until the butter has just melted.  Remove from the heat and add the worcestershire sauce and some cayenne pepper if you like it spicier.  Mix well to combine and set aside.


When the wings have finished cooking place them into a large bowl and whilst they are still screaming hot from the oven pour the hot sauce over them and toss to coat well with the sauce.  Place on a platter and serve with the blue cheese dip and celery sticks.

Ultimate Oven Baked Buffalo Wings

Jan 11, 2013
mustardwithmutton

no comments

Khao Soi – Egg Noodles with Rich Chicken Curry Sauce

Khao Soi - Egg Noodles with Rich Chicken Curry SauceI’d bookmarked this recipe from The Kitchn for a while and the other night when I was craving something Asian for dinner I decided to try it. Apparently it’s Burmese in origin but it has all the hallmarks of Thai cuisine and is eaten widely in Northern Thailand. Khao Soi is normally served quite soupy but this version is thicker and I think more satisfying. The combination of noodles and chicken curry are addictive, the flavours are spot on and so delicious. Imagine a thick laksa, but even better. I adapted the original recipe slightly as I always think that curries, be they Thai or Indian, benefit greatly form having the spices and pastes fried for a nice amount of time so the flavours have a chance to develop. I’m also not a fan of adding the meat in curries with the liquid element as I find the meat can veer towards having a “boiled” quality to it. I prefer to add the meat to the spices/paste and let the meat, in the case chicken, cook a little before adding any liquid. If you can, try to find wide Chinese egg noodles but if you don’t have a Chinese grocer nearby I think egg fettucini would also work. Serve in large bowls with trimmings of deep fried shallots, red chillies, coriander and lime cheeks.

Ingredients – Serves 2 generously   adapted from The Kitchn

2 tablespoons vegetable oil
3 garlic cloves, chopped
2 shallots, chopped
3 tablespoons Thai red curry paste
2 tablespoons mild curry powder
1 cup coconut milk
½ cup chicken stock
4 boneless skinless chicken thighs, cut into bite-size pieces
1 tablespoon fish sauce
1 tablespoon palm sugar
Juice of 1 lime
6 Kaffir lime leaves, torn in half to release aroma
300g fresh wide Chinese egg noodles or dried fettucini
Garnishes
Thinly sliced shallots, fried
Coriander leaves
Sliced red chillies
Lime wedges

Method

Heat the oil in a medium saucepan over medium heat. Add the garlic and shallots and cook for a few minutes until softened. Add a few tablespoons of the coconut milk, the curry paste and curry powder and cook for about 5 minutes, stirring constantly, being careful not to burn the spices. Add the chicken thighs and stir to coat in the spices and cook until the chicken has changed colour. Add the rest of the coconut milk, the chicken stock, fish sauce, palm sugar, lime juice and lime leaves. Stir everything together, scraping up any curry paste that has stuck to the bottom of the pan. Bring to a boil, then lower heat and simmer uncovered for about 40 minutes.


Taste and adjust seasoning by adding more fish sauce, lime juice or palm sugar to get a good balance of flavours. Meanwhile, bring a large pot of salted water to a boil. Cook noodles according to package directions, timing it so that the noodles will be cooked when the curry is done simmering. Drain and divide between two bowls. Top with curry and the garnishes. Serve immediately.

Khao Soi - Noodles with Rich Chicken Curry Sauce

Jan 8, 2013
mustardwithmutton

2 comments

Rigas Lamb – Slow Cooked Lamb with Tomatoes, Onions and Pasta

Rigas Lamb - Slow Cooked Lamb with Onions, Tomatoes & PastaThis recipe has become one of my family’s favourite meals. Especially when we’re entertaining large numbers of people because it’s so darn easy, ridiculously easy – there’s no frying, sautéing or caramelising involved, in fact you don’t even need to boil any water for the pasta! A true one-pot meal that only requires time, and you do need to be around when it’s in the oven but the only taxing thing required of you is to occasionally baste the lamb. The quantities below feed ten, but fear not, the recipe is easily halved to serve four. I often halve it and make it just for the two of us as the leftovers are so good and reheat beautifully. Apart from being a cinch to make, it also tastes amazing. The long slow cooking produces wonderfully sweet and tender lamb and the tomatoes and onions meld with the lamb juices to make enough sauce to just coat the pasta. Truly one of the great pasta dishes ever.

Ingredients – serves 10   Adapted from Leon 2 Cookbook

2 small lamb shoulders, about 1.5kg each, trimmed of excess fat but don’t trim too much off
4-5 cloves of garlic, cut into slivers
Leaves from a few sprigs of fresh mint
3 large onions, chopped
3 x 400g cans of tinned diced tomatoes
Large pinch of chilli flakes
3 tablespoons olive oil
700ml beef stock
Salt & freshly ground black pepper
750g of mini penne pasta or other small pasta shape – I used a mixture of mini penne and mini bow tie pasta as that’s what I had on hand but I prefer just mini penne.

Method

Preheat oven to 160C. Make several deep gashes in the lamb with a sharp knife and insert a piece of garlic and a mint leaf into each hole.  Season well with salt and pepper. In a large deep baking dish large enough to hold the lamb in a snug single layer place the onions, tinned tomatoes, chilli flakes, 1 teaspoon salt and olive oil.  Place half a cans worth of water into each can and add it to the onion mixture.  Mix well to combine and sit the lamb shoulders, fat side up, on top of the onion and tomatoes.  Place the baking tray on top of the stove top and bring the the boil.  As soon as it reaches a boil place the tray into the preheated oven and bake for 4 hours.


 Riga's Lamb - Slow Cooked Lamb with Onions, Tomatoes & Pasta

During the cooking time it’s important to baste the lamb with the tomato and onions mixture every 30 minutes.  This will create a nice dark crust on the lamb. If the pan ever looks to be running dry add a small amount of water from a recently boiled kettle. After 4 hours take the tray out of the oven and add the pasta. pushing it under the lamb and into the sauce.  Add enough beef stock to just cover the pasta, if you need more liquid add some water.  Season with another large pinch of salt and place back into the oven for another 30-40 minutes until the pasta is tender.  The easiest way to serve this is to place the lamb on a baking sheet and remove the bones, they will just slip out as the lamb will be fork tender. Using tongs shred the lamb into large chunks.  Once all the lamb has been shredded add it to the pasta in the baking dish and stir to combine.  Serve in large pasta bowls with some parmesan cheese on the side as well as some finely sliced red chillies for extra heat.

Riga's Lamb - Slow Cooked Lamb with Onions, Tomatoes & Pasta