Dec 10, 2013
mustardwithmutton

no comments

A Baked & Glazed Ham for Christmas

Baked & Glazed Christmas Ham

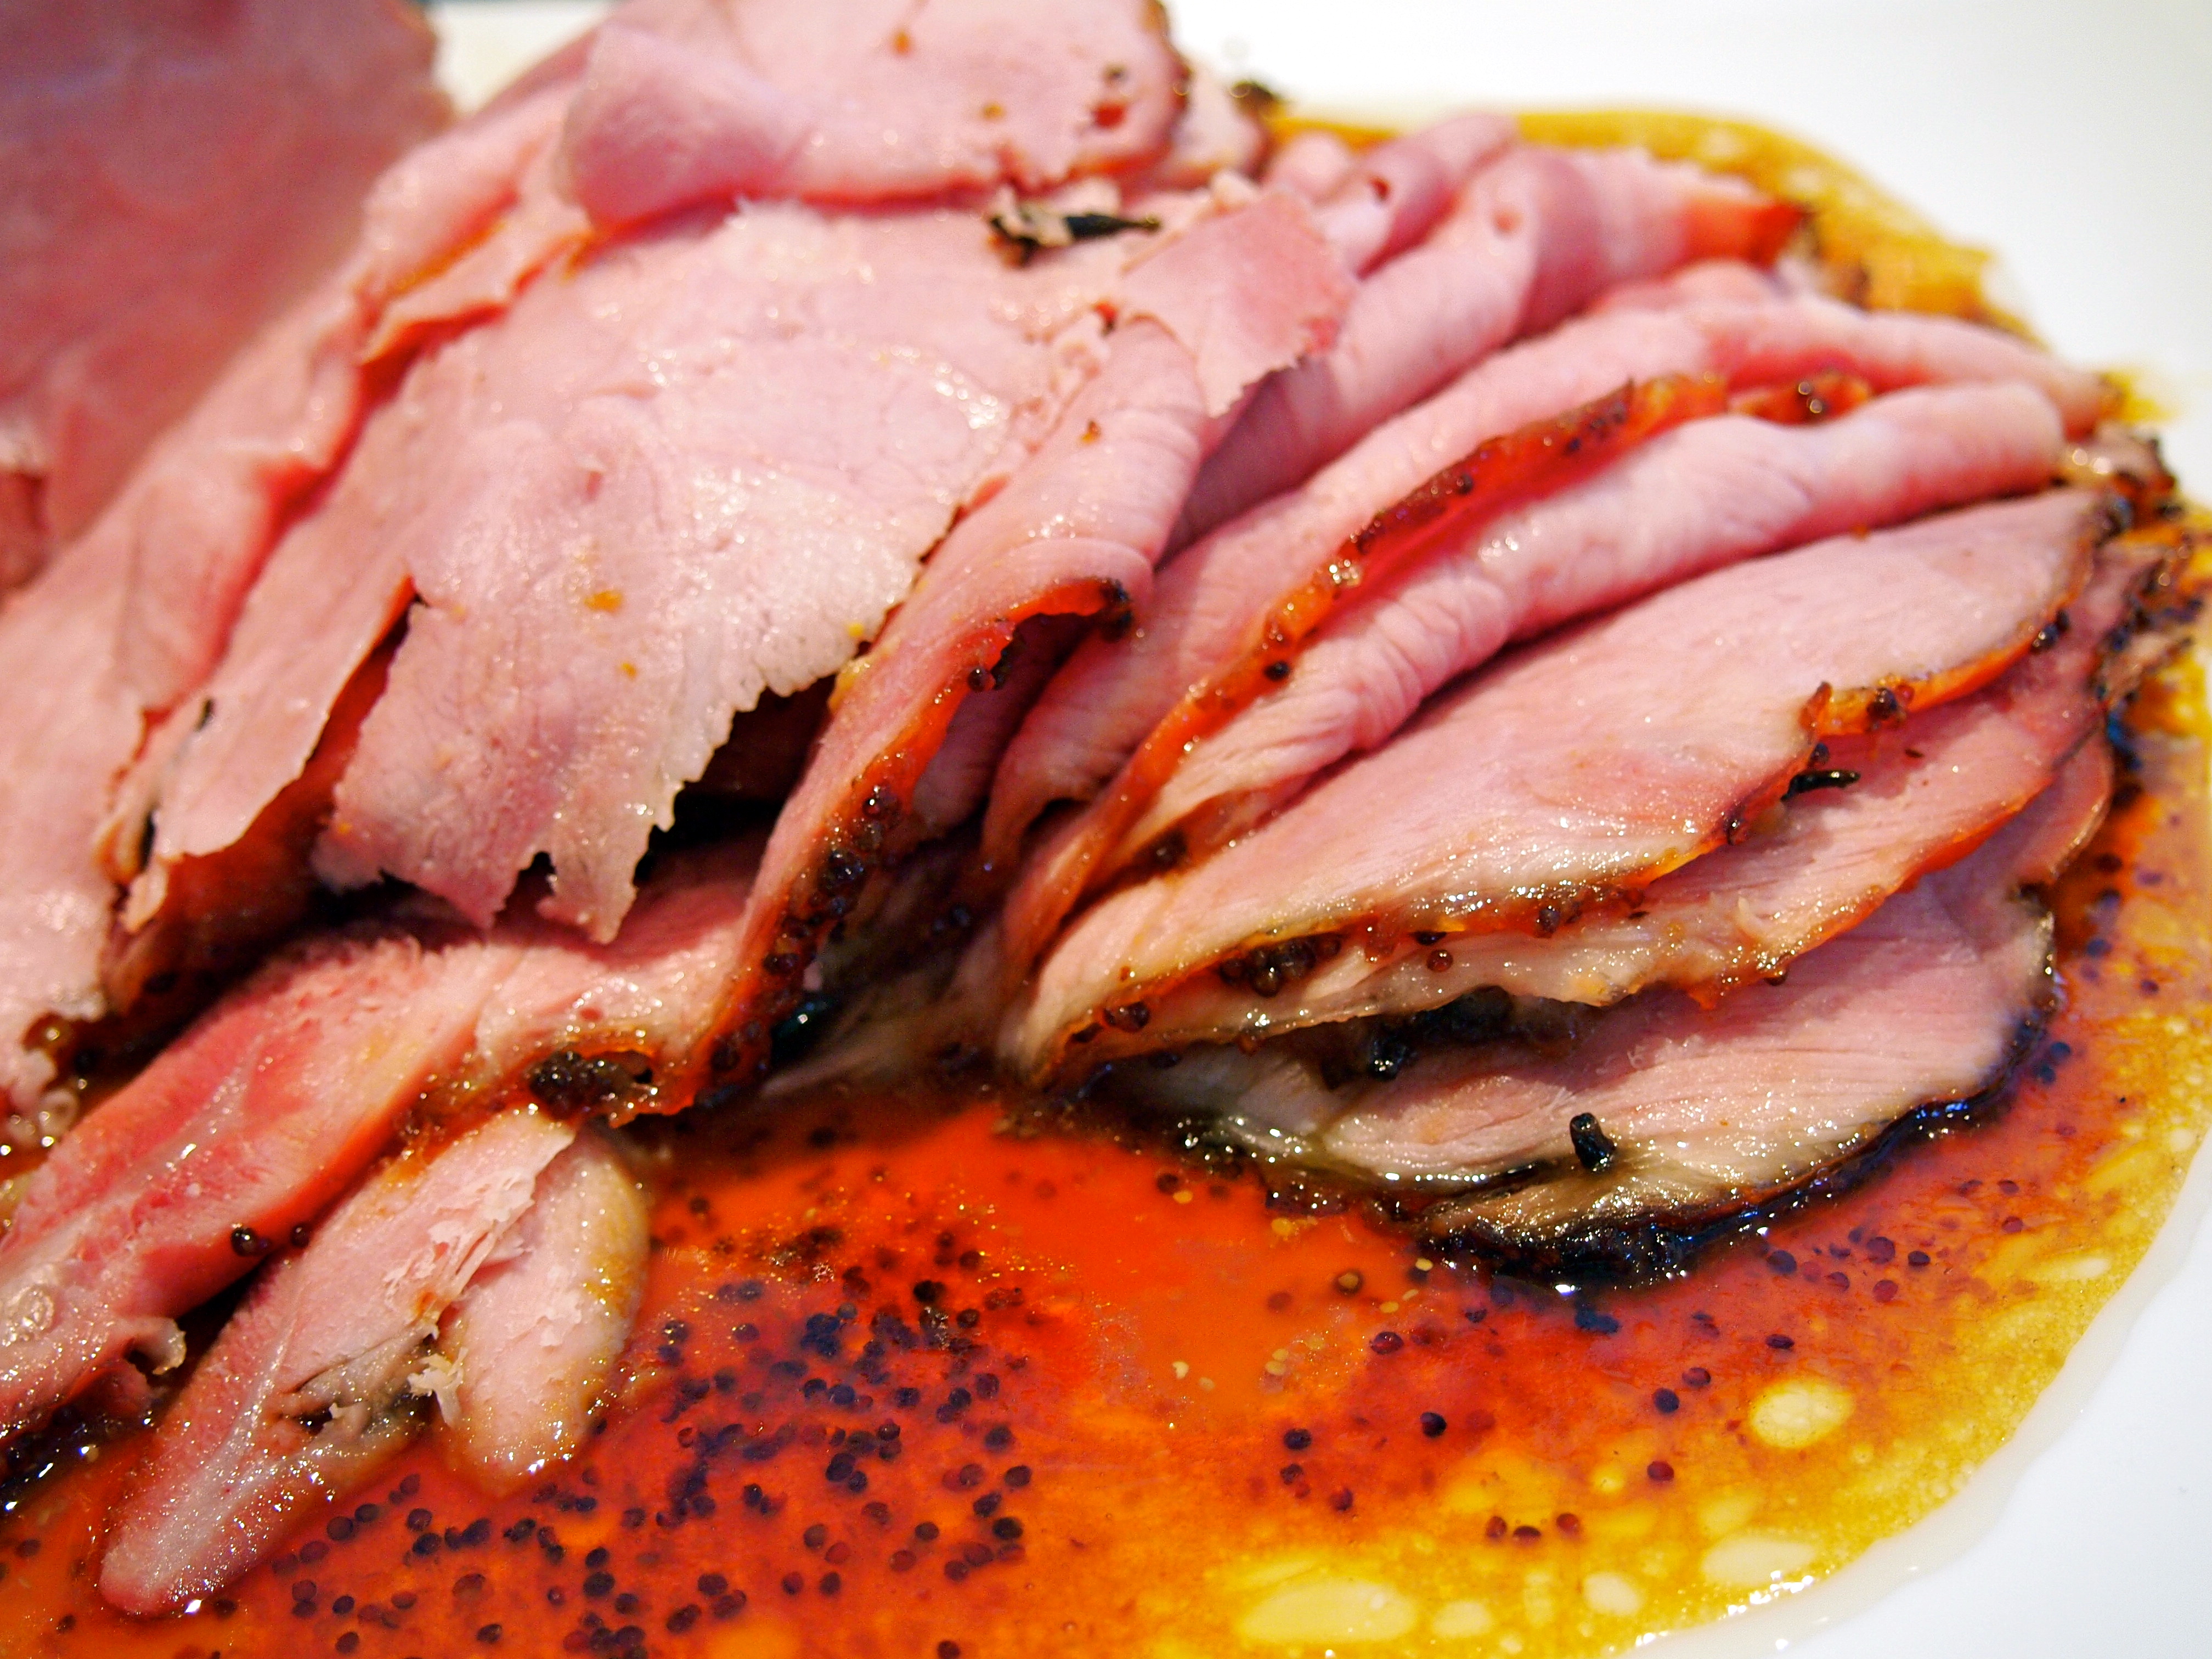
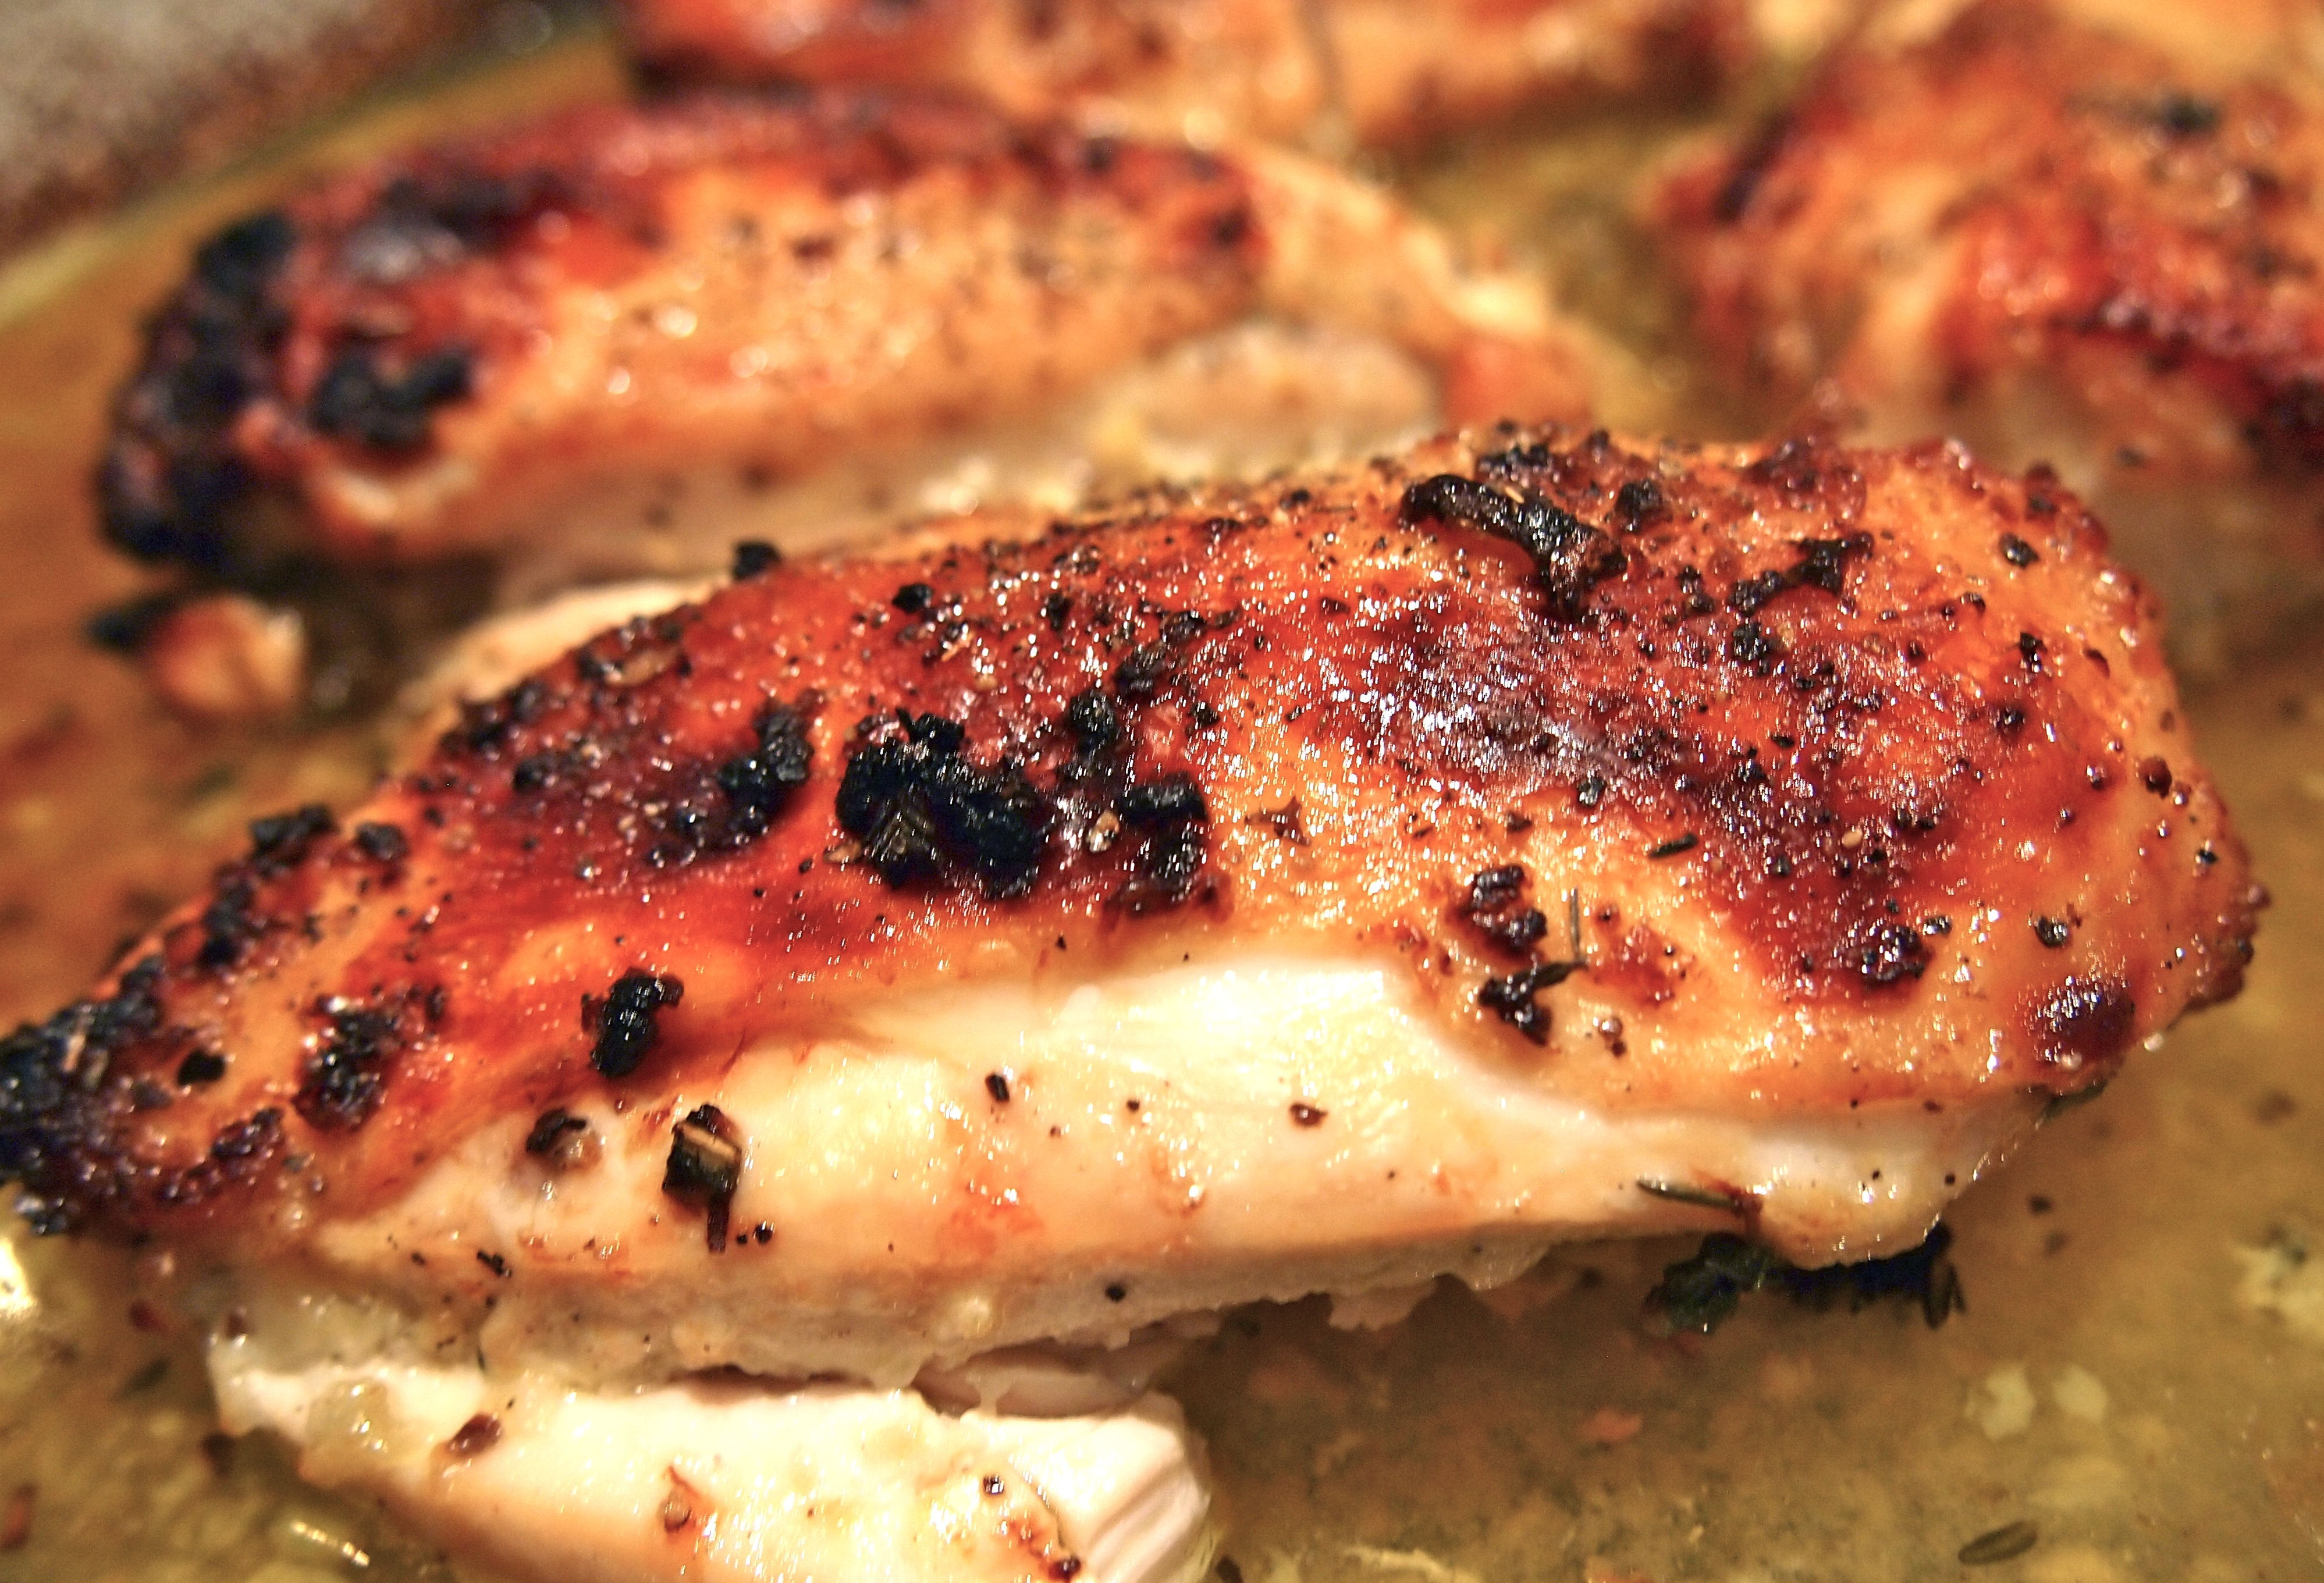
Baked ham is somewhat of a new addition to our Christmas table. I only started making it a few years ago when my husband received a gift of a beautiful organic picnic ham, and I’ve been addicted ever since. There are so many recipes out there for baked ham, with all different kinds of glazes and I did a lot of searching before finally settling on this stellar one from a friend’s sister. I made a few adjustments to the glaze but the basis of the recipe, and what makes it really stand out, is that the ham is first steamed (in the oven so not difficult at all) which makes all the diamond crescents that you’ve scored into the fat open up slightly allowing the glaze to really penetrate the ham. Oh and that glaze – thick, sweet, sticky and baked into to the fat to create a beautiful burnished topping. It’s utterly delicious especially eaten warm, straight out of the oven.

Baked & Glazed Christmas Ham

For me, one of nicest things about baking a ham is that for the next few days we have lots of leftover ham to cook up with eggs for breakfast, toasted sandwiches at lunch time and best of all a Thomas Keller inspired ham and pasta gratin which is comfort food nirvana. When all the ham has gone the hock gets used in a soup, believe me there is very little wasted. In fact one year I used the skin, which is normally discarded, to cover the turkey whilst it roasted to keep it moist, a trick I learned from a catering friend. So now Christmas for me just wouldn’t be the same without this baked ham, I just wish I’d discovered it earlier!

Ingredients
A Note on the ham: in Australia ham is sold already cooked and smoked so the baking and glazing is just to warm the ham through. In countries where the ham is cold smoked, like the UK, you will need to cook your ham first and then proceed with the glazing process. I like to use a picnic ham, which is smaller than a whole leg (approx 5 kgs) and easier to carve. You can of course use a whole leg – just double the glaze ingredients and increase the baking time slightly.

1 pre-cooked and smoked ham (see note above) – free range or organic if possible. If you’re in Sydney Vic’s Meats rare breed Kurobuta Berkshire ham is wonderful
Whole cloves
½ cup brown sugar
½ cup honey
2 tablespoons seeded mustard
½ cup pineapple juice

Method

Preheat oven to 180C. To prepare ham, gently remove the skin leaving as much fat on as possible. This easiest way to do this is to insert your fingers under the edge of the skin and work it gently back. Lightly score the fat in a diamond pattern (making sure you don’t penetrate the flesh) and insert a clove in the centre of each diamond.

Place ham, fat side up in a roasting dish on a rack and pour 2-3cm of boiling water in the bottom of the pan. Cover the dish with some tented foil and place in the oven for 25 minutes. This will open the scoring and allow the glaze to penetrate into the ham. Take the ham out of the oven and remove the foil.

To glaze the ham, mix all the remaining ingredients in a bowl. Spread a quarter of the mixture all over the scored fat. Bake the ham, uncovered, for a total of 1 – 1½ hours basting every 15-20 minutes until the ham is a lovely dark golden colour. Remove from the oven and slice the ham thinly making sure that each piece has a little of the fat and glaze. The ham can be served hot or cold but we love it hot from the oven.
Best Ever Baked & Glazed Christmas Ham

Dec 3, 2013
mustardwithmutton

no comments

Baked No-Stir Pumpkin & Sage Risotto

Baked No -Stir Pumpkin & Sage RisottoYou heard me, no stirring! This is such a great way to make risotto and I can tell you now that if you did a taste test with a traditional risotto and this baked one nobody would be able to tell the difference, so why wouldn’t you save yourself twenty five minutes of stirring over a hot stove! Donna Hay, whose recipe this is, loves to find short cuts and she’s really succeeded with this dish. The only change I made was to roast the diced pumpkin before adding them to the risotto. The original recipe has the pumpkin added in raw but I wanted to make sure that the pumpkin would be sufficiently softened and to also add a slight caramelisation. You could certainly skip this step if you’re stretched for time. I can see myself adapting this recipe to make a variety of baked risottos  – everything from mushroom risotto to risotto Milanese would work and using this method risotto turns into a meal that requires very little effort or time. I served this as an accompaniment to Ina Garten’s lemon roasted chicken breasts and it was such an easy meal to throw together with everything being baked in the oven at the same time.

Ingredients – serves 4 generously as a main meal or 6 as a side dish   Adapted from Donna Hay

4 tablespoons olive oil
1 large onion, finely chopped
12 sage leaves
400g arborio rice
800g pumpkin, peeled and chopped into small pieces
5 cups chicken stock – use vegetable stock if you want to keep it vegetarian
Salt and freshly cracked black pepper
30g butter
40g finely grated parmesan
Extra finely grated parmesan and fried sage leaves, to serve

Method

Preheat oven to 200C. Place the diced pumpkin on a baking sheet and drizzle with 2 tablespoons olive oil. Season with salt and pepper and mix with your hands to ensure all the pumpkin is coated with some oil. Place in the oven and roast for 25 – 30 minutes. Remove the pumpkin and set aside – this step can be done a few hours in advance. In Donna Hay’s original recipe the pumpkin isn’t roasted and is added to the risotto raw, so if you’re stretched for time you can certainly skip this step but I like the extra layer of flavour the roasted pumpkin adds to the risotto.

Heat a large ovenproof saucepan (I used large but shallow sauté pan) over medium-high heat. Add the first measure of oil and onion and cook for about 5 minutes or until soft. Add the sage and cook for another couple of minutes. Add the rice, pumpkin, stock and season with salt and pepper. Cover with a tight-fitting lid and bake for 30 minutes. At this stage the risotto will still be quite liquid. Remove the pan from the oven and place over medium heat and stir for a few minutes or until the liquid in the pan has slightly thickened. Turn off the heat and stir through the butter and parmesan and stir for another couple of minutes. Taste for seasoning and adjust if necessary. Sprinkle with extra parmesan and fried sage leaves to serve.

Donna Hay's Baked Pumpkin & Sage Risotto

Nov 26, 2013
mustardwithmutton

1 comment

Beef, Cheddar & Caramelised Onion Sausage Rolls

Beef, Cheddar & Caramelised Onion Sausage RollsParty season is here and if you’re scratching your head trying to come up with an appetiser to serve with drinks for Thanksgiving, Christmas, New Years Eve or any other party then look no further because these little bundles of deliciousness are awesome. Crispy puff pastry encloses savoury meat that’s sweetened with caramelised onions and then sharpened up with a generous dose of vintage cheddar before being baked to golden perfection. Apart from being just about the best sausage roll I’ve ever had there are another couple of benefits to this recipe. The first being that unlike traditional sausage rolls no pork is used, so if you’re entertaining people who may be pork averse you don’t need to worry and secondly they are super easy to make. They can in fact be made days in advance and refrigerated until you’re ready to bake them. The only stipulations I make is that you use the best quality lean beef mince you can find, organic is preferable, and that the puff pastry be an all butter one. Once those two items have been taken care of the rest is a breeze.

Ingredients – makes 20 – 24 mini sausage rolls   Inspired by Raspberri Cupcakes

3 onions, peeled and thinly sliced
2 tablespoons olive oil
1 tablespoon butter
1 teaspoon brown sugar
1 tablespoon balsamic vinegar
500g lean beef mince, organic is preferable
1 carrot, peeled and finely grated
½ cup grated mature cheddar cheese
1 tablespoon finely chopped flat-leaf parsley
1 teaspoon thyme leaves
Salt & freshly ground black pepper
3 sheets pre-rolled all butter puff pastry
Egg wash – 1 egg and 1 tablespoon milk whisked together

Method

To make the caramelised onions, heat a non stick fry pan over medium heat and add the oil and butter. When the butter has melted add the onions and cook stirring frequently until lightly golden. Add the sugar and balsamic and continue cooking until well caramelised, making sure not to burn them. Remove from the heat and set aside to cool.

Preheat oven to 220C and line one large or two medium size baking trays with baking paper. Place beef, carrot, cheese, parsley and thyme in a bowl and season well with salt and pepper. Add the cooled onions and mix until well combined. Cut pastry sheets in half. Prepare egg wash and brush egg wash along one long edge of each piece of pastry. On the opposite long edge, shape a 3cm diameter sausage of the beef mixture. Starting from the long edge with the beef, roll pastry up so that it seals along the edge with egg wash. Cut roll into four equal pieces and place equally spaced on the lined baking trays, seam side down. Brush tops with egg wash and make a couple of slits with a sharp knife on each roll. Repeat with remaining pastry and beef mixture. Bake for 20-25 mins or until golden brown and puffed.

Home Made Sausage Rolls -  Beef, Cheddar & Caramelised Onions Beef, Cheddar & Caramelised Onion Sausage Rolls

Remove from oven and carefully transfers to a wire rack to cool. Best served while still warm and fresh from the oven with a dipping sauce of tomato ketchup mixed with a bit of dijon mustard. The sausage rolls can be refrigerated in an airtight container for several days and reheated in the oven or microwave.

Home Made  Beef, Cheddar & Caramelised Onion Sausage Rolls

Nov 19, 2013
mustardwithmutton

8 comments

Ultimate One-Bowl Chocolate Dessert Cake

Donna Hay Ultimate One-Bowl Chocolate Dessert CakeDonna Hay says that of all the desserts she makes this is the one that’s most requested by her friends, and I think if you were one of Donna’s friends there would be quite an array to choose from so that’s high praise indeed. Looking at the final product, and tasting it, one would think that a lot of time, effort and baking finesse would be required but it truly is a one-bowl cake and couldn’t be simpler to make. The only word of caution is in the baking time. The original recipe states 40 minutes at 170C. A lot of comments have been made that the cake didn’t cook in that period and many people were keeping it in the oven for much longer. The cake after 40 – 45 minutes will still be quite wobbly in the centre but have faith and take it out of the oven. Let it cool and then put it in the fridge to set (and it will set – it has 5 eggs in it!) for a good 4 hours but I find overnight is best. This is a dense cake with a fudge like consistency which is achieved by covering the cake with foil whilst it cooks. I once made the mistake of not covering it, and the cake whilst still delicious didn’t have that lovely, soft, mousse-like consistency. This cake is so good that I’ve actually made it 3 times in as many weeks – you get a lot of wow factor for very little effort so it’s hard not to turn to this recipe when you want to impress.

Ingredients – serves 8-10  Adapted from Donna Hay

125g butter, chopped
375g dark chocolate, coarsely chopped
1 cup (175g) brown sugar
¼ cup (35g) plain flour, sifted
2 tablespoons milk
1 cup (120g) almond meal (ground almonds)
5 eggs
Cocoa, for dusting

Method

Preheat oven to 170C (not fan-forced). Place the butter and chocolate in a heatproof bowl over a saucepan of simmering water until melted then stir to combine well. Take it off the heat and add the sugar, flour, milk and almond meal and mix to combine. Add the eggs and mix well.

Donna Hay Ultimate One-Bowl Chocolate Dessert Cake Donna Hay Ultimate One-Bowl Chocolate Dessert Cake

Pour mixture into a greased 22cm round springform tin lined on the bottom and sides with non-stick baking paper (don’t miss this step otherwise the cake will be hard to remove). Cover the tin with aluminium foil and bake for 40 minutes. The cake will still be wobbly in the centre but it will set as it cools. Uncover and cool in the tin then place in the fridge to set for at least four hours but overnight is best. Dust with cocoa and serve with cream and berries.

Donna Hay Ultimate One-Bowl Chocolate Dessert Cake

Nov 12, 2013
mustardwithmutton

no comments

Spaghetti with Prawns, Baked Peppers and Pangrattato

Spaghetti with Prawns, Baked Red Peppers & PangrattatoA while ago I made a batch of Simon Hopkinson’s Piedmontese baked red peppers as a side dish to a steak meal. There was some leftover so during the week I chopped up the remaining peppers along with all the garlic and tomato infused oil they were steeped in and added them to spaghetti, creating one of the best pasta dishes we’ve had in a long time. In fact it was so good that I now cook Simon Hopkinson’s peppers just to make this pasta dish. In this version I’ve added some prawns and a delicious pangrattato which is an Italian toasted bread crumb mixture that’s popular in Sicily, where it’s sometimes used as a topping instead of parmesan cheese. The pangrattato was spiked with lots of garlic, dried chilli and porcini and added a delicious crunchy flavour boost to every forkful. This is pasta in the true Italian sense in that there’s just enough sauce to cling to the spaghetti, it’s not a saucy ragu. I also highly recommend undercooking the spaghetti more than you’re normally used to as it somehow makes the dish taste even better. I like to cook the pasta slightly hard or “duro” as the Italians would say, even more so than the usual al dente. Try it and you’ll never over cook your pasta again.

Ingredients – Serves 4

1 batch of Simon Hopkinson’s Baked Peppers – recipe can be found here
Olive oil
4 large cloves of garlic, minced or put through a garlic press
1 long red chilli, deseeded and diced
5-6 prawns per person, depending on their size. Peeled and deveined – the tails can be left on or off
500g spaghetti

Pangrattato  this quantity will make more than you need but keeps well in an airtight container
4-5 slices of thick cut bread, crusts removed (sourdough or an artisan type dense bread is best)
1 teaspoon dried chilli flakes
4 cloves of garlic
¼ cup dried porcini
Olive oil

Method

To make the pangrattato place all the ingredients except the oil into a food processor and briefly pulse until the bread is roughly chopped into crumbs. Heat a generous amount of oil in a small non stick fry pan and when hot add the breadcrumb mixture. Season with salt and cook, stirring regularly until the crumbs are evenly browned. Remove from the pan and set aside.

Simon Hopkinson's Piedmontese Red Peppers

To make the sauce, place the finished peppers along with all the accumulated juices onto a large plate or platter and roughly chop them up, not too finely, and set aside. Heat a large fry pan over low-medium heat and add a generous amount of olive oil. Add the garlic and chilli and cook gently for about 4 minutes or until the garlic and chillies become soft and the oil is nicely aromatic. Make sure that your heat is gentle enough for the garlic not to burn. Add the prawns and season with some salt. Raise the heat a little and cook until the prawns have just changed colour. Add the reserved chopped peppers and stir to incorporate them with the prawns, garlic and chilli. If it looks a bit dry add a splash of water but there should be enough liquid from the peppers, this isn’t a dish with a lot of sauce – there will be just enough sauce to coat the pasta. Bring the pan to a simmer then lower the heat to the lowest setting and cover with a lid.

Whilst the sauce is cooking bring a large pan of salted water to the boil. Add the spaghetti and cook until slightly underdone – about a minute or two less than the time stated on the packet. Drain the pasta, reserving a little of the cooking water and add the spaghetti to the sauce. Using tongs, stir the pasta through the sauce, adding a little of the pasta cooking water and good a drizzle of olive oil.

To serve place some spaghetti on each plate and from a height sprinkle generously with the pangrattato, the remaining pangrattao can be served tableside.

Spaghetti with Simon Hopkinson's Piedmontese Peppers, Prawns & Pangrattato

Nov 5, 2013
mustardwithmutton

9 comments

Ina Garten’s Lemon Roasted Chicken Breasts – The Most Tender Chicken Breasts Ever

Ina Gartens Lemon Roasted Chicken Breasts - The Most Tender Chicken Breasts You'll Ever EatLet me start by saying that I’m not a big fan of chicken breasts. They are my least favourite cut of chicken. I find them to be dry and lacking in flavour and I avoid using them as much as I can, opting for thigh fillets instead. But this recipe from the Barefoot Contessa has converted me. The chicken is bathed in olive oil that’s been infused with garlic, lemon juice and herbs, quite a lot of garlic and oil actually, but don’t be tempted to cut down on either. It’s this rich oil that the chicken is baked in that stops it from drying out and at the same time infuses the meat with all it’s lemony garlic flavours. The only change I made was to add a hint of honey to counteract the lemon juice and to help the skin to crisp to a nice golden brown. This is cooking at it’s simplest and best. After very little effort you’re rewarded with a truly delicious meal of succulent chicken meat and a lovely thin sauce to drizzle over. I’d happily serve this for guests but you can’t beat it for an easy mid week meal. I had a large number of people for dinner recently and I served this with a baked pumpkin and sage risotto that required no stirring whatsoever – a truly simple and stress free way to feed a crowd.

Ingredients – serves 4  Adapted from Ina Garten

¼ cup good olive oil
3 tablespoons minced garlic (about 9 cloves)
⅓ cup dry white wine
1 tablespoon grated lemon zest (2 lemons)
2 tablespoons freshly squeezed lemon juice
1 ½ teaspoons dried oregano
1 teaspoon minced fresh thyme leaves
1 tablespoon honey – optional
Salt and freshly ground black pepper
4 boneless chicken breasts, skin on

Method

Preheat the oven to 200C. Warm the olive oil in a small saucepan over medium-low heat, add the garlic, and cook for just 1 minute but don’t allow the garlic to turn brown. Off the heat, add the white wine, lemon zest, lemon juice, oregano, thyme, honey and ½ teaspoon salt and pour into a baking dish that will fit the chicken breasts snugly in one layer. Pat the chicken breasts dry and place them skin side up over the sauce. Brush the chicken breasts some of the infused oil in the dish and sprinkle them liberally with salt and pepper.

Bake for 30 to 40 minutes, depending on the size of the chicken breasts, until the chicken is done and the skin is nicely browned. If the chicken isn’t browned enough, put it under the griller for 2 minutes. Cover the pan tightly with aluminum foil and allow to rest for 10 minutes. Serve hot with the pan juices.

Ina Garten's Baked Chicken Breasts - The Most Tender Breast Fillets You'll Ever Eat

Oct 29, 2013
mustardwithmutton

no comments

Shaved Brussels Sprouts, Walnut & Gorgonzola Salad – A Side Dish for Thanksgiving

Shaved Brussels Sprouts, Walnut & Gorgonzola Salad - A Perfect Side Dish for Thanksgiving

Whilst the weather here in Sydney has been hot and steamy, readers in the northern hemisphere are experiencing lovely, cool autumnal weather and with Thanksgiving (not to mention Christmas – yikes!) just around the corner this would make a wonderful side dish to a celebration meal. If you’re not a fan of Brussels sprouts, don’t worry – you’ll never even notice you’re eating them! The sprouts are served raw and shaved finely on a mandolin which completely changes their flavour profile and texture. In addition to the sprouts you have walnuts, creamy Gorgonzola, pears and shallot all bought together by a zingy dressing. Don’t just reserve this salad for cooler weather though, it’s light enough despite the cheese to make it suitable as a summer side dish too. Speaking of cheese, the original recipe (from Gourmet Traveller) calls for Gorgonzola cremificato, which is a very soft creamy version of Gorgonzola. You may be able to find it in some delicatessens and if you do you should grab some as it melts into the salad and dressing beautifully. If you can’t, just use Gorgonzola dolce and leave it out of the fridge for a good couple of hours so as it gets nice and runny. I know Brussels sprouts can leave some people cold but served like this I guarantee they’ll be consumed without a word of complaint.

Ingredients – Serves 4-6 as a side dish  Adapted from Gourmet Traveller

320g Brussels sprouts (about 15), trimmed, outer leaves discarded
⅓ cup extra virgin olive oil
80g walnuts
1 witlof, thinly sliced widthways
1 ripe green pear, very thinly sliced
1 shallot, shaved on a mandolin
½ cup flat leaf parsley, leaves roughly torn
Juice of 1 lemon
1 tablespoon white wine vinegar
100g Gorgonzola cremificato at room temperature, or substitute with Gorgonzola dolce at room temperature
Salt & freshly ground black pepper

Method

Thinly shave the Brussels sprouts on a mandolin into a bowl of iced water and leave for 5 minutes to crisp, then drain and set aside. Heat the oil in a small frypan over medium heat until hot, add walnuts and stir until just golden (2-3 minutes). Pour into a heatproof bowl and set aside to cool, then coarsely chop.

Combine sprouts, witlof, pear, shallot and parsley in a bowl. Add lemon juice and white wine vinegar and season to taste. Pour walnuts and oil over salad, add Gorgonzola, toss to combine, then transfer to a platter to serve.

Thanksgiving Side Dish - Shaved Brussels Sprouts, Walnut & Gorgonzola Salad

Oct 22, 2013
mustardwithmutton

no comments

Gozleme – Spinach & Feta Filled Savoury Turkish Pastries

Spinach & Feta Gozleme - Savoury Turkish PastriesIf you live in Sydney, Gozleme are something that you’ll be familiar with as they’re cooked and served at just about every local market. It’s common to see stalls manned by white-scarved Turkish woman rolling out pastry, stuffing them with a variety of fillings before griddling them to golden brown perfection. Our local Saturday market serves two different fillings, spinach and feta and a fiery minced beef. We love the former which is served with wedges of lemon that brighten up all the flavours. Gozleme are actually pretty easy to recreate at home and make a lovely appetiser or light lunch/snack. Whilst they taste wonderful straight off the griddle and piping hot they’re also lovely at room temperature which make them great for the kids lunch box. The pastry is very easy and manageable and quite unusual as it incorporates yogurt. I often do all the preparation in advance. The pastry can be made and the gozleme filled and kept covered until you’re ready to fry them – which doesn’t take very much time at all and only uses a small amount of oil. I recently made these and cut them up into small wedges as an hor d’oeuvres for a dinner party and they were gone in a matter of moments so make the full quantity as they’ll disappear fast.

Ingredients – Makes 4 Gozleme

200g plain yogurt
1/4 teaspoon salt
250g self-raising flour
100g baby spinach
200g feta cheese, crumbled or cut into thin shards
Salt and pepper
Olive oil
Lemon wedges, to serve

Method

Beat the yogurt and salt together in a large bowl until smooth. Gradually add the flour until you have a stiff dough. Tip onto a lightly floured bench and gradually knead the dough, incorporating any remaining flour until the dough is soft and only slightly sticky. Transfer to a clean bowl and stand covered for 30 minutes.

Gozleme Dough Spinach & Feta Gozleme Filling

Gozleme Ready for Frying Spinach & Feta Gozleme - Savoury Turkish Pastries

On a floured surface, split dough into 4 equal sized round pieces. Roll each piece of dough into a 30cm circle. Place ¼ of the spinach over half the circle, then sprinkle ¼ of the feta over it and season. Fold dough over and seal edges with a fork. Repeat this process with remaining dough. Preheat barbecue hot plate, griddle or a large non stick frying pan. Add a little olive oil and place a gozleme on the pan/griddle once the oil is hot. Cook over medium heat until the base is golden. Turn and  cook the other side until also golden. It will only take a few minutes per side and the gozleme will deflate slightly as the spinach cooks and the cheese starts to melt. Place on a board and cut into 4 – 6 pieces. Serve hot or warm accompanied by lemon wedges.

Spinach & Feta Gozleme - Savoury Turkish Pastries

Oct 15, 2013
mustardwithmutton

2 comments

Sour Cherry Pie

Sour Cherry Pie with Lattice TopIt’s been a while since I posted a sweet recipe. I try to refrain from making cakes and sweet treats unless we have company, otherwise there are far too many leftovers lurking around tempting me. A few weeks ago I needed to make a dessert to take to a family dinner and I was craving sour cherries. Unfortunately we don’t get fresh sour cherries here in Sydney, not that I’ve seen anyway, so I had to rely on jarred sour cherries that are imported from Macedonia. I did a lot of searching on the web in regards to the filling as the crux of this pie, and most fruit pies, is for the filling to set and be firm. It seems that tapioca flour is the best product to use but I’ve never come across it in Sydney. Obviously in the States where pie making is a national pastime it’s readily available, so definitely use it if you can. I substituted with cornflour which worked but I would’ve liked the filling to be slightly firmer. It’s important to let the pie rest and cool down before slicing. Cutting into it while it’s still warm will leave a puddle of fruit on your plate. This is a very easy pie to put together. The only slightly fiddly element being the pastry. I turned to baking genius extraordinaire Rose Levy Beranbaum for guidance on the lattice topping. Her Youtube video on how this is done can be found here. Nothing beats a nice traditional slice of pie after dinner or with a cup of coffee, it’s both comforting and delicious and makes you feel a little old fashioned in the best possible way.

Ingredients 

Pie Crust – Enough for 1x 9 inch pie with lattice
2 cups plain flour
180g cold unsalted butter
½ teaspoon salt
1 tablespoon sugar
4-6 tablespoons iced water
1 egg beaten with a little cream

Sour Cherry Filling
2 x 670g jars pitted sour cherries, place the cherries into a sieve over a bowl and let it drain for an hour
½ cup caster sugar
4 tablespoons corn flour – use tapioca flour if you can find it
1 tablespoon lemon juice
½ teaspoon almond extract

Method

To make the pie dough: Divide the butter into two parts, about two thirds to one third. Cut the butter into 2cm cubes and leave it in the fridge to keep it cold. Place the flour and salt in a medium size bowl and stir to combine. Using a pastry cutter or your thumb and forefingers, blend the larger portion of the butter into the flour until it resembles coarse meal. Add the rest of the butter and rub in with your fingers or your pastry cutter. Sprinkle 3 tablespoons of the ice water over the flour and butter mixture, and bring together with a fork or pastry cutter. Keep adding a tablespoon of water at a time until the dough just comes together, this normally works out to be about 5 tablespoons but can vary depending on your flour. Knead with your hands into a ball, taking care not to work the dough too much. Transfer the dough to a piece of plastic wrap, and flatten into a disc about six-inches wide. Chill in the refrigerator for at least 45 minutes before using.

Preheat oven to 200C. To make the filling place the drained cherries into a bowl. Take one third of a cup of the reserved cherry juice and combine with the cornflour, stirring well to completely incorporate it into the juice. Add the juice mixture to the cherries along with all the other ingredients. Lightly stir to thoroughly combine, being careful not to crush the fruit. Set aside.

Sour Cherry Pie Filling

Lattice Topping for Sour Cherry Pie Sour Cherry Pie Ready for the Oven

To roll out the crust, take the dough out of the fridge, if it’s been in longer than 45 minutes let it rest for a while to bring it to a workable temperature. Lightly flour your work surface and divide the dough into two thirds and one third. Tale the bigger piece of dough and roll it out until it’s large enough to fit the bottom and sides of your pie dish. Carefully transfer it into your dish and lightly press it into the bottom and sides. Don’t worry if you have a little too much overhang. Spoon the cherry  filling into the pie dish and smooth it out into an even layer. Set the pie aside while you make the lattice topping using this method. Brush the exposed pastry, lattice and sides, with the egg and cream mixture and bake for 50-60 minutes. 20 minutes into the cooking time take the pie out of the oven and cover the edges of the pastry with foil to stop them from over browning. When the pie has finished cooking leave it to completely cool before slicing. Serve at room temperature with a scoop of vanilla ice cream.

Classic Sour Cherry Pie with Lattice Topping

Oct 8, 2013
mustardwithmutton

no comments

Broad Bean, Pea & Dill Risotto

Broad Bean. Pea & Dill RisottoI’m always on the look out for new risotto combinations, and lets face it there are a lot of them out there, some good and some great. This one goes into the great category. It’s wonderful on its own or paired with some grilled fish. I know in Italy risotto is never served as a side dish to a main meal but it’s something that I quite like to do. You can make this vegetarian by  omitting the bacon/speck and using vegetable stock instead of chicken stock without any great loss of flavour. Broad beans are one of my favourite vegetables and pair with the dill beautifully – a combination used extensively in Persian cooking. If fresh broad beans are in season then by all means make use of them, but like peas, broad beans are another vegetable that don’t suffer one bit from being frozen. If you’re pushed for time and want to prep some of this, or any risotto, in advance you can soften the onions and get to the point of adding the rice and the wine before turning off the heat and placing on the lid until you’re ready to continue. I do this constantly with no ill effect. When you’re 20-25 minutes away from being ready to serve, turn the heat back on, add the first ladle of hot stock and bring to a simmer and continue as usual.

Ingredients – Serves 4 as a main course or 6 as a starter

2 tablespoons olive oil
1 small white onion, very finely diced
80g speck or smoked bacon, cut into lardons – you can omit this if you’re making it for vegetarians
2 cups arborio or carnaroli rice
½ cup white wine
4-5 cups chicken stock – you can also use vegetable stock.
300g frozen broad beans, defrosted and podded – or you can use 300g of fresh broad beans, podded weight
1 cup frozen peas, defrosted
⅓ cup finely chopped dill
2 tablespoons butter
½ cup freshly grated parmesan cheese
Salt & freshly ground black pepper

Method

Place the stock in a saucepan and bring to a simmer. Leave it over a low heat to keep it hot. Heat the oil in a good size saucepan over medium-low heat. Add the onion and speck/bacon, along with a pinch of salt, and cook for about 5 minutes or until the onions are soft and translucent and the speck has started to render it’s fat. Add the rice and stir well, making sure that all the grains are coated in oil. Add the wine and stir until it has evaporated, then add a ladle full of the simmering broth. At this stage check the heat of your pan. You want the liquid, when it’s added, to instantly come to a simmer but you don’t want it to boil away too vigourously. Keep stirring, adding a ladle of stock at a time when each last addition has been incorporated. When you have about 4 ladles of stock left, check the rice, it should be almost done, with some bite still remaining in the grain. At this point add the broad beans, peas and dill with the next ladle of stock.

Keep stirring and cooking and adding the stock as previously. When the rice is done (at which point most if not all of your stock will have been used) turn off the heat and add the parmesan, butter, freshly ground pepper and some salt if it needs it. Stir the butter and parmesan into the rice as vigorously as you can then immediately put on the lid and let the risotto sit for just a couple of minutes. This last step is called mantecare and it’s this vigoruous final beating of the butter and cheese which is essential in creating a creamy homogenous risotto and many Italians believe that missing out on this step is why so many risottos fail miserably. A  good risotto must have some fluidity to it, you should be able to shake the plate and have it move and spread out, it shouldn’t be a stiff pile of rice. If you find that your risotto is looking too “stiff” add a small splash of stock (or boiling water if you’ve run out of stock) at the very end with the butter and parmesan to help achieve this. Serve straight away topped with extra grated parmesan.

Broad Bean, Pea & Dill Risotto